












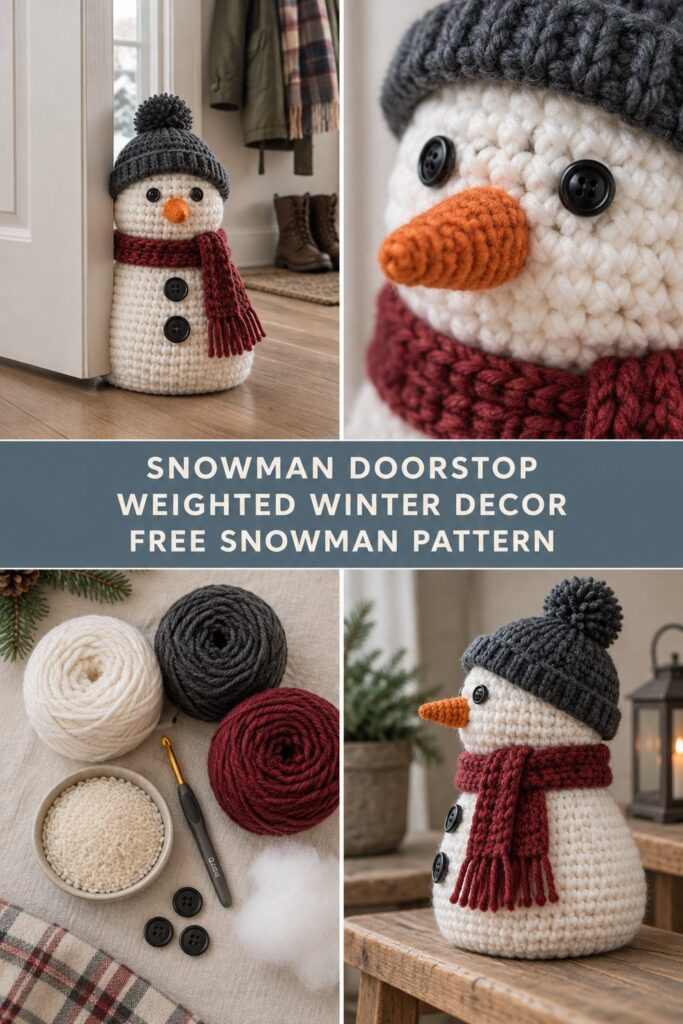
There is nothing quite like the cozy, quiet charm of a chilly morning when soft light spills across the floor and a cold winter breeze nips at the doorframe. This weighted crochet snowman doorstop brings both functional warmth and whimsical seasonal cheer to your home, standing sturdy against chilly drafts while welcoming guests with his friendly face. Crafted in thick, plush white yarn with classic coal-black accents and rich winter accessories, he is a joyful piece of winter decor that seamlessly bridges the gap between holiday styling and all-season winter comfort.
Quick Facts
This charming crochet doorstop pattern is designed using basic amigurumi techniques, making it an enjoyable project for stitchers of various experience levels. Worked with continuous single crochet rounds, back-loop ribbing, and simple half double crochet stitches, it comes together swiftly in approximately 4 to 6 hours. Standing roughly 11 inches tall with a weighted flat base, this sturdy snowman makes a delightful addition to your own entryway or a deeply thoughtful, handmade gift for housewarmings, holiday hosts, and winter birthdays.
💡 Designer Tip: Looking to adjust the height or weight of your doorstop? Check out our size customization tips further down the page!
What Makes This Crochet Snowman Doorstop Special
Unlike standard plush amigurumi that easily tip over, this weighted crochet snowman is specifically engineered as a functional home accessory. Its structural integrity relies on a flat, reinforced circular base worked in back-loop single crochet, which creates a crisp ninety-degree angle between the floor and the body walls. This clean design prevents rolling and provides a stable surface for an inner fabric pouch filled with dry rice or glass weight pellets.
The aesthetic charm lies in the play of rich, cozy textures. Dense single crochet stitches in bright white chunky yarn give the body a smooth, snow-like density without allowing inner stuffing to poke through. The charcoal hat uses back-loop half double crochet to replicate the look of classic hand-knit ribbing, while a cranberry red scarf adds a traditional pop of winter color. Topped with a sculpted carrot nose and vintage-style black button eyes, this piece brings a tactile, high-end editorial look to your winter home decor.
Skill Level
This pattern is rated as Easy / Advanced Beginner. It is ideal for anyone who has mastered the basics of crochet in the round and wants to try an applied functional project.
- Working in a magic ring (magic circle)
- Single crochet in continuous spiral rounds
- Working in Back Loops Only (BLO)
- Basic single crochet increases and decreases
- Basic sewing skills for attaching buttons, nose, and hat
⚠️ Note: If you are comfortable holding yarn, counting rounds, and working basic decreases, you can make this doorstop with complete confidence!
Finished Measurements
| Measurement | Inches | Centimeters |
|---|---|---|
| Total Height (with Hat) | 11.0 in | 28.0 cm |
| Base Diameter | 6.0 in | 15.0 cm |
| Body Circumference (Widest Part) | 18.0 in | 45.5 cm |
| Scarf Length | 22.0 in | 56.0 cm |
Materials You Will Need
To create your snowman doorstop, you will need chunky bulky weight yarn in four classic shades, along with standard assembly tools and weighting materials.
| Material / Item | Specification / Color | Quantity Needed |
|---|---|---|
| Primary Yarn | Bright White (Bulky / Category 5) | 160 yds / 146 m |
| Contrast Yarn A | Charcoal Gray (Bulky / Category 5) | 65 yds / 60 m |
| Contrast Yarn B | Cranberry Red (Bulky / Category 5) | 45 yds / 41 m |
| Accent Yarn | Orange (Worsted / Category 4) | 15 yds / 14 m |
| Crochet Hook | 5.0 mm (US Size H/8) | 1 hook |
| Weighting Material | Cotton pouch filled with dry uncooked rice or poly-pellets | Approx. 1.5 – 2.0 lbs (700-900g) |
| Stuffing | Premium polyester fibrefill | Approx. 4 oz (115g) |
| Buttons | Flat black 2-hole or 4-hole buttons | 2 x 15mm (eyes), 2 x 20mm (body) |
| Notions | Tapestry needle, stitch marker, scissors, pins | Standard craft kit |
Yarn Suggestions
For best results, choose a smooth, well-twisted chunky yarn that yields tight, crisp stitch definition. Avoid loosely spun roving yarns, as they may stretch or pill under the weight of the inner pouch.
| Yarn Brand & Line | Weight Category | Yardage per Skein | Notes & Texture |
|---|---|---|---|
| Paintbox Yarns Simply Chunky | Bulky (#5) | 149 yds / 136m (100g) | Highly durable acrylic, excellent stitch definition, wide color range. |
| Lion Brand Hue & Me | Bulky (#5) | 137 yds / 125m (125g) | Wool-acrylic blend with a soft matte finish and rustic tactile feel. |
| Premier Yarns Everyday Bulky | Bulky (#5) | 87 yds / 80m (100g) | Anti-pilling acrylic; creates firm structural fabric ideal for doorstops. |
⚠️ Note: Avoid using delicate velvet or roving yarns for the main body. The heavy rice weight requires a stable, non-stretchy acrylic or sturdy wool blend to preserve its shape over time.
Gauge
Gauge is critical for amigurumi and weighted home decor to ensure the inner stuffing and rice bag do not show through the fabric stitches.
| Stitch Type | Measurement (4 x 4 inches / 10 x 10 cm) |
|---|---|
| Single Crochet (with 5.0 mm hook) | 14 stitches x 16 rows |
💡 Designer Tip: If your fabric feels loose or stretchy, drop down to a 4.5 mm hook. The crochet fabric must be dense and firm.
Abbreviations
This pattern uses standard US crochet terminology.
| Abbreviation | Full Meaning |
|---|---|
| ch | Chain stitch |
| sc | Single crochet |
| hdc | Half double crochet |
| inc | Increase (2 sc in the same designated stitch) |
| dec | Decrease (sc2tog – single crochet 2 stitches together) |
| BLO | Back Loop Only |
| st(s) | Stitch(es) |
| sl st | Slip stitch |
| rnd(s) | Round(s) |
| MR | Magic Ring (Magic Circle) |
Special Stitches Explained
1. Single Crochet Decrease (sc2tog / dec)
Insert hook into the front loop of the first stitch, then immediately insert hook into the front loop of the next stitch (invisible decrease). Yarn over, pull through both front loops. Yarn over, pull through both loops remaining on hook. (1 st remaining)
2. Back Loop Only (BLO)
Instead of inserting your hook beneath both top loops of a stitch, insert the hook only under the back loop (the loop furthest away from you). This creates a textured ridge on the front of the work, perfect for making sharp structural bends or decorative ribbing.
Pattern Instructions
The body of the snowman is worked from the bottom base upward in continuous spiral rounds. Do not join rounds with a slip stitch unless explicitly directed. Use a stitch marker to track the beginning of each round.
           [ Charcoal Hat ]
            /            \
           (  Snowman     )
            \   Head     /
           [Cranberry Scarf]
          /                \
         (   Snowman Body   )
        ======================  <- BLO Ridge
        [ Flat Weighted Base ]
Section 1: Base and Lower Body (Bright White Yarn)
Rnd 1: Begin with Bright White yarn. Work 6 sc into a Magic Ring. (6 sc)
Rnd 2: inc in each st around. (12 sc)
Rnd 3: (1 sc, inc) repeat 6 times. (18 sc)
Rnd 4: (2 sc, inc) repeat 6 times. (24 sc)
Rnd 5: (3 sc, inc) repeat 6 times. (30 sc)
Rnd 6: (4 sc, inc) repeat 6 times. (36 sc)
Rnd 7: (5 sc, inc) repeat 6 times. (42 sc)
Rnd 8: (6 sc, inc) repeat 6 times. (48 sc)
✅ Checkpoint: Your flat circular base should now measure approximately 6 inches (15 cm) in diameter. Lay it flat on your work surface to ensure it does not curl.
Rnd 9: Work in BLO sc in each st around. (48 sc)
💡 Designer Tip: Working Rnd 9 in BLO creates a crisp, perpendicular edge that allows the snowman to sit flat against the floor without rolling.
Rnds 10–22 (13 rnds): sc in each st around. (48 sc)
Rnd 23: (6 sc, dec) repeat 6 times. (42 sc)
Rnd 24: sc in each st around. (42 sc)
Rnd 25: (5 sc, dec) repeat 6 times. (36 sc)
Rnd 26: sc in each st around. (36 sc)
Rnd 27: (4 sc, dec) repeat 6 times. (30 sc)
Rnd 28 (Neck Indentation): (3 sc, dec) repeat 6 times. (24 sc)
✅ Checkpoint: You have now completed the lower body. This is the structural moment to insert your weight bag and begin stuffing.
⚠️ Note: Place your sealed cotton pouch containing 1.5–2 lbs of dry rice or poly-pellets flat against the inner base. Surround the bag with polyester fibrefill, ensuring the sides are firmly stuffed while keeping the bottom completely flat.
+------------------------------------+
|         Outer Crochet Body         |
|                                    |
|    [ Polyester Fibrefill Side ]    |
|   +----------------------------+   |
|   |  Sealed Cotton Rice Pouch  |   |
|   +----------------------------+   |
|====================================| <- Flat Base (Rnd 9 BLO)
+------------------------------------+
Section 2: Head (Bright White Yarn)
Continue directly from Rnd 28 to build the head attached to the body.
Rnd 29: (3 sc, inc) repeat 6 times. (30 sc)
Rnd 30: (4 sc, inc) repeat 6 times. (36 sc)
Rnd 31: (5 sc, inc) repeat 6 times. (42 sc)
Rnds 32–38 (7 rnds): sc in each st around. (42 sc)
Rnd 39: (5 sc, dec) repeat 6 times. (36 sc)
Rnd 40: (4 sc, dec) repeat 6 times. (30 sc)
Rnd 41: (3 sc, dec) repeat 6 times. (24 sc)
💡 Designer Tip: If sewing button eyes using thread or yarn, attach them now between Rnds 34 and 35, spaced about 4 stitches apart. Firmly stuff the head with polyester fibrefill.
Rnd 42: (2 sc, dec) repeat 6 times. (18 sc)
Rnd 43: (1 sc, dec) repeat 6 times. (12 sc)
Rnd 44: dec 6 times around. (6 sc)
Fasten off, leaving an 8-inch yarn tail. Thread tail onto a tapestry needle, weave through front loops of remaining 6 stitches, pull tight to close the crown, and weave in end securely.
Section 3: Carrot Nose (Orange Yarn)
Rnd 1: With Orange yarn, work 4 sc into a Magic Ring. (4 sc)
Rnd 2: (1 sc, inc) repeat 2 times. (6 sc)
Rnd 3: sc in each st around. (6 sc)
Rnd 4: (2 sc, inc) repeat 2 times. (8 sc)
Rnd 5: sc in each st around. (8 sc)
Fasten off, leaving a 10-inch tail for assembly. Lightly stuff nose with a tiny pinch of fibrefill.
Section 4: Knitted-Look Beanie Hat (Charcoal Gray Yarn)
The hat is worked flat in ribbing rows to mimic a cozy knit pattern, then seamed into a tube and cinched at the top.
Row 1: With Charcoal Gray yarn, ch 22. Work hdc in 2nd ch from hook and in each ch across. (21 hdc)
Rows 2–28: ch 1, turn. Work BLO hdc across all sts. (21 hdc)
Fasten off, leaving a long 18-inch yarn tail. Fold ribbed rectangle in half so short edges meet. Using tapestry needle and yarn tail, whipstitch short edges together to form a cylinder. Weave tail in and out around top edge of cylinder, pull tight to gather crown closed, and knot firmly on inside. Fold bottom 4 rows upward to create a folded ribbed brim. Make a pom-pom with remaining Charcoal Gray yarn and sew to the top of the hat.
Section 5: Ribbed Winter Scarf (Cranberry Red Yarn)
Row 1: With Cranberry Red yarn, ch 71. Work hdc in 2nd ch from hook and in each ch across. (70 hdc)
Row 2: ch 1, turn. Work BLO hdc across all sts. (70 hdc)
Row 3: ch 1, turn. Work BLO hdc across all sts. (70 hdc)
Fasten off and weave in ends.
Scarf Fringe: Cut 12 strands of Cranberry Red yarn, each 5 inches long. Group in pairs and attach 3 fringe tassels to each end of scarf using a simple lark’s head knot. Trim evenly.
Section 6: Assembly & Details
- Attach Carrot Nose: Center orange nose on face between Rnds 32 and 34, positioned midway between eyes. Sew securely around open edge using tapestry needle.
- Attach Body Buttons: Position two 20mm black buttons vertically along front lower body (at approximately Rnds 15 and 20). Sew in place securely with black sewing thread or yarn.
- Attach Hat: Fit charcoal beanie over head, angling it slightly backward for a relaxed look. Tack in place with hidden stitches along head crown using Charcoal yarn.
- Attach Scarf: Wrap cranberry scarf twice around neck crease (Rnd 28) and tie loosely, letting fringe ends drape down side of body. Stitch lightly in place to secure.
       [ Charcoal Hat ]
            \    /
         ( •  🥕  • )   <- Button Eyes & Carrot Nose
          \        /
       [Cranberry Scarf]
         /   [•]    \   <- Top Button
        (    [•]     )  <- Bottom Button
      =================
Size Customization Tips
Need a lighter accent piece for a mantel, or a larger, heavy-duty stop for an exterior door? Adjusting size is straightforward:
1. Miniature Version (approx. 8 inches tall)
- Yarn & Hook: Switch to Worsted Weight (#4) yarn with a 3.5 mm (US E/4) hook.
- Base: Stop base increases at Rnd 6 (36 sc).
- Height Adjustments: Reduce body rounds (Rnds 10–22) to 9 rounds.
- Weighting: Use approx. 0.75 lbs (350g) of weight pellets. Ideal for bookshelves or light interior doors.
2. Heavy Exterior Doorstop (approx. 14 inches tall)
- Yarn & Hook: Double up chunky yarn (work two strands together) with a 7.0 mm (US K/10.5) hook.
- Base: Add two increase rounds up to (60 sc) before making the BLO transition round.
- Weighting: Use 3.0 to 4.0 lbs (1.4–1.8 kg) of dry sand or heavy glass beads inside double-bagged heavy canvas. Perfect for heavy drafty doors or commercial spaces.
Care Instructions
Because this piece contains organic weight material (uncooked dry rice) inside, proper care ensures your snowman stays pristine for decades of winters to come:
- Spot Cleaning Only: Clean surface stains using a damp cloth with cold water and mild liquid soap. Do not submerge unit in water.
- Drying: Allow air drying completely away from direct heat sources.
- Storage: At the end of the winter season, store your doorstop in an airtight plastic container or sealed storage bag with a silica gel packet to protect inner rice from moisture.
Bring Winter Warmth to Your Home
This completed crochet snowman doorstop is ready to serve as a hardworking, delightful draft stopper all winter long. With his cozy textures, bright traditional colors, and smiling hand-stitched face, he delivers cozy, tactile charm right to your floorboards.
Did you enjoy working up this free crochet pattern? We would love to see your finished creations!
- Share Your Work: Tag your photos on Instagram using
#CrochetSnowmanDoorstopso we can feature your cozy winter creations! - Save to Pinterest: Pin the project image to your favorite winter craft or holiday crochet boards for later.
- Join the Conversation: Leave a comment below telling us what color scarf you chose for your snowman! Happy stitching!
📄 Your free PDF pattern