












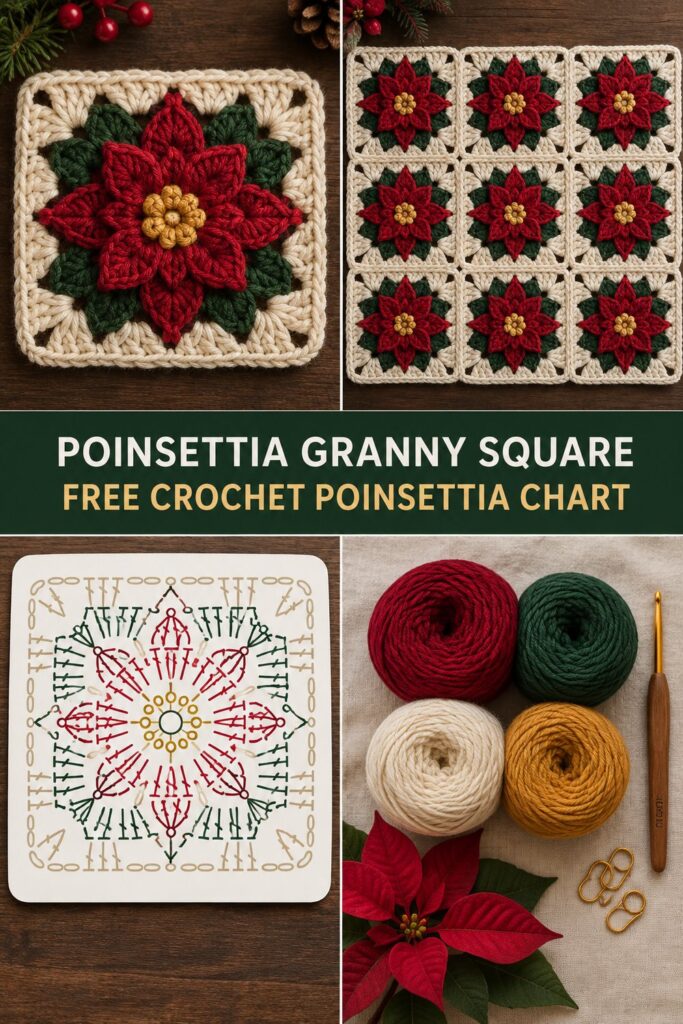
Bring the festive warmth of the holiday season right to your crochet hook with a design that captures the tactile magic of winter. This gorgeous poinsettia granny square combines a rich, raised texture with a classic holiday color palette, perfect for assembling into heirloom blankets, festive table runners, or cozy holiday cushions. With its dimensional cranberry red petals bursting from a glittering gold center, this floral granny square is bound to become your favorite holiday granny square project.
Quick Facts
This festive holiday granny square features a dimensional puff-stitch flower center that transitions into a classic square shape using basic crochet stitches like double crochet and chain spaces. Each individual square takes about 30 to 45 minutes to complete, making it a fast and satisfying holiday project. Whether you assemble nine squares into a stunning holiday cushion or join dozens for a cozy Christmas throw, this crochet square pattern is perfect for creating handmade gifts that will be cherished for generations.
💡 Designer Tip: Read on to discover how easily you can adapt this motif for different projects with our size customization tips included later in this article!
What Makes This Poinsettia Granny Square Special
The magic of this Christmas granny square lies in its striking three-dimensional texture. Unlike flat floral designs, this pattern uses a central gold bobble surrounded by layered cranberry red puff stitches to mimic the natural depth of a real poinsettia. The forest green leaf round frames the flower beautifully, while the final cream granny border softens the transitions, allowing the motifs to lock together seamlessly. Plus, our color-coded crochet color chart makes tracking your yarn changes a breeze, ensuring your stitches align perfectly every single round.
Skill Level
- Working in the round
- Color changes (fastening off and joining new colors)
- Special stitches: Bobble stitch and puff stitch
- Working into chain spaces
If you have mastered the basic granny square and want to venture into textured floral motifs, this is the perfect intermediate-friendly project to elevate your skills!
Finished Measurements
| Motif / Project Component | Width (Inches) | Width (cm) | Height (Inches) | Height (cm) |
|---|---|---|---|---|
| Single Square (5 Rounds) | 5.0 in | 12.7 cm | 5.0 in | 12.7 cm |
| 3×3 Cushion Panel (9 Squares) | 15.0 in | 38.1 cm | 15.0 in | 38.1 cm |
| Standard Holiday Throw (30 Squares) | 30.0 in | 76.2 cm | 36.0 in | 91.4 cm |
Materials You Will Need
| Material / Color | Yarn Weight / Type | Yardage (per square) | Yardage (for 9-square panel) |
|---|---|---|---|
| Gold (Center) | Worsted / Medium (Category 4) | 3 yds (2.7 m) | 27 yds (24.6 m) |
| Cranberry Red (Petals) | Worsted / Medium (Category 4) | 12 yds (11.0 m) | 108 yds (98.7 m) |
| Forest Green (Leaves) | Worsted / Medium (Category 4) | 10 yds (9.1 m) | 90 yds (82.3 m) |
| Cream (Border) | Worsted / Medium (Category 4) | 15 yds (13.7 m) | 135 yds (123.4 m) |
- 4.0 mm (US G/6) crochet hook (or size needed to obtain gauge)
- Gold stitch markers
- Yarn needle for weaving in ends
- Scissors
Yarn Suggestions
| Yarn Brand & Line | Fiber Content | Skein Weight / Yardage | Recommended Colors |
|---|---|---|---|
| Lion Brand Vanna’s Choice | 100% Acrylic | 100g / 170 yds (156 m) | Mustard (Gold), Cranberry, Forest Green, Fisherman (Cream) |
| Paintbox Yarns Simply Aran | 100% Acrylic | 100g / 201 yds (184 m) | Mustard Yellow, Red Wine, Racing Green, Champagne White |
| Cascade Yarns 220 Superwash | 100% Superwash Wool | 100g / 220 yds (200 m) | Goldenrod, Secondary Red, Forest Green, Cream |
⚠️ Note: Avoid using highly variegated yarns or extremely textured novelty yarns (like boucle or chenille) for this pattern. These yarns will obscure the delicate stitch definition of the puff stitches and make the crisp floral details of your crochet chart difficult to see.
Gauge
| Stitch Pattern | Stitch Count (4″ / 10 cm) | Row Count (4″ / 10 cm) |
|---|---|---|
| Standard Double Crochet (dc) | 16 sts | 8 rows |
💡 Designer Tip: A single finished 5-round poinsettia granny square should measure exactly 5″ x 5″ (12.7 cm x 12.7 cm). If your square is too large, try dropping down to a 3.75 mm hook; if it is too small, try sizing up to a 4.5 mm hook. Always swatch first to ensure your squares join together perfectly!
Abbreviations
| Abbreviation | Full Meaning |
|---|---|
| ch | Chain |
| sl st | Slip Stitch |
| sc | Single Crochet |
| hdc | Half Double Crochet |
| dc | Double Crochet |
| tr | Treble Crochet |
| st(s) | Stitch(es) |
| sp(s) | Space(s) |
| yo | Yarn Over |
| bobble | Bobble Stitch |
| puff | Puff Stitch |
Special Stitches Explained
- 4-Double Crochet Bobble Stitch (bobble): Yo, insert hook into specified st, yo and pull up a loop. Yo, pull through 2 loops on hook (2 loops remaining on hook). Repeat this process 3 more times in the same stitch. You should now have 5 loops on your hook. Yo and pull through all 5 loops on your hook. Ch 1 to secure the bobble.
- Puff Stitch (puff): Yo, insert hook into specified st or space, yo and pull up a loop to the height of a double crochet (approx. 1/2 inch). Repeat this process 3 more times in the same space. You should now have 9 loops on your hook. Yo and pull through all 9 loops on your hook. Ch 1 to secure the puff stitch.
Pattern Instructions
Round 1: Gold Flower Center
Using Gold yarn, make a magic ring.
Round 1: Ch 2 (does not count as a stitch), [bobble, ch 2] 8 times into the ring. Pull the magic ring tail tight to close the center. Join with a sl st to the top of the first bobble. Fasten off Gold yarn. (8 bobbles, 8 ch-2 spaces)
✅ Checkpoint: Verify that you have exactly 8 bobbles and 8 ch-2 spaces before fastening off the gold yarn.
Round 2: Cranberry Red Puff Petals
Join Cranberry Red yarn with a sl st in any ch-2 space of Round 1.
Round 2: Ch 2 (does not count as a stitch), [puff, ch 2, puff] in the same ch-2 space. *[Puff, ch 2, puff] in the next ch-2 space; repeat from * around. Join with a sl st to the top of the first puff stitch. Fasten off Cranberry Red yarn. (16 puff sts, 16 ch-2 spaces)*
✅ Checkpoint: You should have exactly 16 puff stitches. If you have more or less, your square will not frame correctly in the next round.
Round 3: Forest Green Leaf Frame
Join Forest Green yarn with a sl st in any ch-2 space of Round 2. We will now turn the circle into a square.
Round 3: Ch 4 (counts as first tr).
* First Corner: [2 tr, ch 2, 3 tr] in the same ch-2 space.
* First Side: 3 dc in the next ch-2 space, 3 hdc in the next ch-2 space, 3 dc in the next ch-2 space.
* Second Corner: [3 tr, ch 2, 3 tr] in the next ch-2 space.
* Second Side: 3 dc in the next ch-2 space, 3 hdc in the next ch-2 space, 3 dc in the next ch-2 space.
* Third Corner: [3 tr, ch 2, 3 tr] in the next ch-2 space.
* Third Side: 3 dc in the next ch-2 space, 3 hdc in the next ch-2 space, 3 dc in the next ch-2 space.
* Fourth Corner: [3 tr, ch 2, 3 tr] in the next ch-2 space.
* Join with a sl st to the top of the starting ch-4. Fasten off Forest Green yarn. (60 sts, 4 ch-2 corner spaces)
✅ Checkpoint: Lay your square flat. It should now have 4 distinct corners and measure approx. 3.5 inches across.
Round 4: Cream Granny Border Round 1
Join Cream yarn with a sl st in any corner ch-2 space of Round 3.
Round 4: Ch 3 (counts as dc), [2 dc, ch 2, 3 dc] in the same corner space.
* Side: Skip the next 3-tr cluster. Work 3 dc in the space before the next cluster. Skip the next 3-dc cluster, work 3 dc in the space before the next cluster. Skip the next 3-hdc cluster, work 3 dc in the space before the next cluster. Skip the next 3-dc cluster, work 3 dc in the space before the corner.
* Corner: [3 dc, ch 2, 3 dc] in the corner ch-2 space.
* Repeat the side and corner instructions around. Join with a sl st to the top of the starting ch-3. Do not fasten off. (72 dc, 4 ch-2 corner spaces)
Round 5: Cream Granny Border Round 2
Slip stitch across the next 2 dc stitches to reach the corner ch-2 space.
Round 5: Ch 3 (counts as dc), [2 dc, ch 2, 3 dc] in the same corner space.
* Side: Work 3 dc in each space between the 3-dc clusters across to the next corner.
* Corner: [3 dc, ch 2, 3 dc] in the corner ch-2 space.
* Repeat from * around, ending with a sl st to the top of the starting ch-3. (84 dc, 4 ch-2 corner spaces)
📄 Your free PDF pattern