
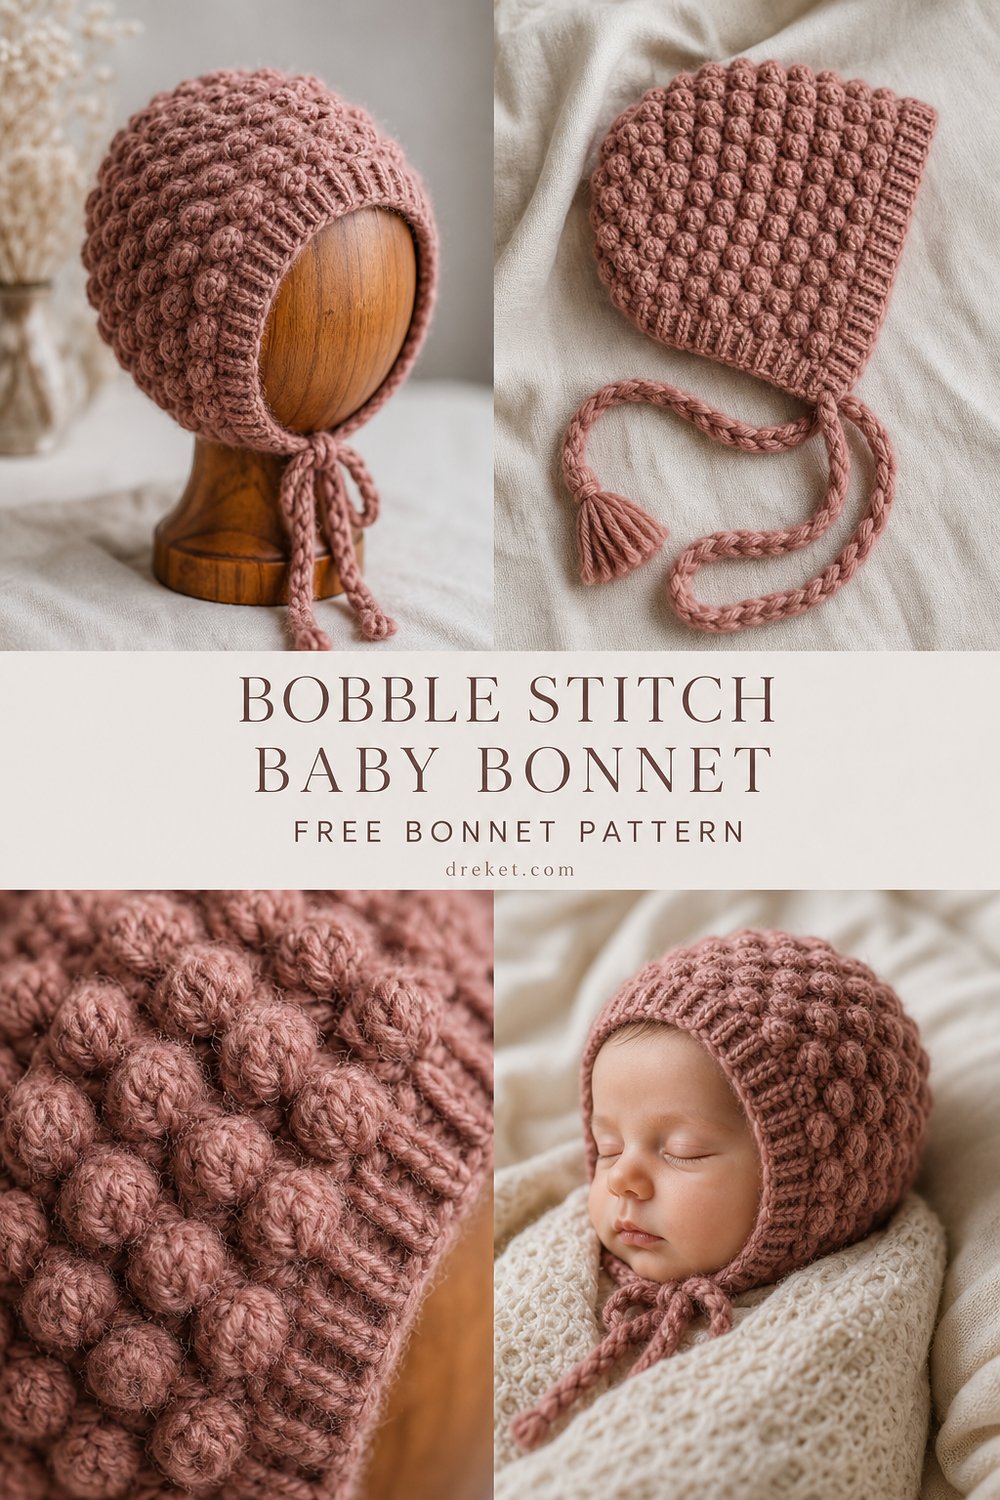
Wrap your little one in heirloom-quality softness with a vintage-inspired pixie bonnet designed to keep tender ears warm and cozy. Featuring a gorgeous texture of raised bobble stitches and finished with long braided chin ties, this handmade piece looks stunning whether captured in professional milestone photography or worn during a peaceful afternoon nap.
Chunky Bobble Stitch Baby Bonnet Free Bonnet Pattern
Quick Facts
- Stitches Used: Chain (ch), Single Crochet (sc), Double Crochet (dc), Bobble Stitch (5-dc bobble), Slip Stitch (sl st)
- Size Fit: 0–3 Months (easily customizable)
- Estimated Hours to Complete: 3–4 hours
- Gift-Appeal: Perfect for baby showers, newborn photo props, and cherished family keepsakes.
💡 Designer Tip: Sizing customization tips are included later in the pattern to help you adjust the fit for larger babies or toddlers.
What Makes This Chunky Bobble Stitch Baby Bonnet Special
This bonnet achieves its classic vintage aesthetic through a combination of structured single crochet ribbing and deeply textured, clustered 5-double-crochet bobble stitches. The construction begins at the back crown in smooth rows, working outward before transitioning into the main body where the bobble pattern creates a rich, three-dimensional fabric. A clean, ribbed face-framing edge provides a snug fit around the cheeks, while braided chin ties threaded through the base ensure the bonnet stays securely in place. The resulting heirloom wool texture offers both breathability and genuine warmth without feeling heavy on a sleeping baby.
Skill Level
- Intermediate: Familiarity with basic crochet stitches, working in rows and rounds, and understanding texture placement.
- Required Skills:
- Reading a standard crochet pattern
- Working into front and back loops for ribbing
- Executing clustered multi-stitch bobbles
- Basic three-strand braiding for chin ties
- Reassurance Line: If you know how to make a standard double crochet and want to take your texture skills to the next level, you have all the confidence you need to complete this project.
Finished Measurements
| Size | A: Crown Width (Inches / cm) | B: Depth from Crown to Brim (Inches / cm) | C: Face Opening Height (Inches / cm) |
|---|---|---|---|
| 0–3 Months | 5.5 in / 14 cm | 5.0 in / 12.5 cm | 5.5 in / 14 cm |
Materials You Will Need
| Color Name | Color Order | Yarn Weight / Fiber | Yardage / Meters Needed |
|---|---|---|---|
| Dusty Rose | 1 | Bulky (#5) / 100% Wool | 110 yds / 100 m |
| Cream | 2 (Ties & Trim) | Bulky (#5) / 100% Wool | 25 yds / 23 m |
- Hook: US J/10 (6.0 mm) crochet hook (or size needed to obtain gauge)
- Additional Tools: Tapestry needle for weaving ends, measuring tape, locking stitch markers
Yarn Suggestions
| Yarn Brand & Line Name | Yarn Weight | Yardage per Skein | Notes |
|---|---|---|---|
| Cascade Yarns Cascade 220 Superwash Chunky | Bulky (#5) | 120 yds / 110 m per 100g | Excellent stitch definition; gentle on baby skin. |
| Berroco Vintage Chunky | Bulky (#5) | 130 yds / 119 m per 100g | Durable wool-acrylic blend with a soft heirloom feel. |
| Lion Brand Hue + Me | Bulky (#5) | 137 yds / 125 m per 147g | Great color palette; provides structured bobbles. |
⚠️ Note: Avoid 100% synthetic scratchy acrylics or novelty ladder yarns. They lack the elasticity needed for the ribbed framing and do not block well to showcase the raised bobble texture.
Gauge
| Measurement Type | Stitch / Row Count | Over 4 Inches (10 cm) |
|---|---|---|
| Pattern Stitch | 12 sts x 10 rows | Bobble and sc texture pattern using 6.0 mm hook |
💡 Designer Tip: Always make a gauge swatch using the bobble stitch pattern. If your bobbles pop backward instead of forward, adjust your hook tension or switch hook sizes to ensure proper structural rigidity.
Abbreviations
| Abbreviation | Meaning |
|---|---|
| ch | Chain |
| sc | Single Crochet |
| dc | Double Crochet |
| bobble | 5-double-crochet bobble stitch |
| sl st | Slip Stitch |
| st(s) | Stitch(es) |
| rep | Repeat |
| RS | Right Side |
| WS | Wrong Side |
| sk | Skip |
| yo | Yarn Over |
Special Stitches Explained
- 5-Double-Crochet Bobble (bobble): [Yo, insert hook in indicated st, yo, pull up loop, yo, draw through 2 loops] 5 times in the same stitch/space, yo, draw through all 6 loops on hook.
- Back Loop Only (BLO): Working under the back loop of the designated stitch only, leaving the front loop unworked to create a ribbed texture.
Pattern Instructions
Section 1: Crown Shaping
Using Dusty Rose and 6.0 mm hook, leave a 6-inch tail for weaving.
– Row 1 (RS): Ch 3, work 6 dc in 3rd ch from hook (the 2 skipped chs do not count as a st), turn. (6 dc)
– Row 2 (WS): Ch 1, 2 sc in each st across, turn. (12 sc)
– Row 3 (RS): Ch 2, 1 dc in next st, 2 dc in next st; rep from * around, turn. (18 dc)
– Row 4 (WS): Ch 1, 1 sc in next 2 sts, 2 sc in next st; rep from * across, turn. (24 sc)
– Row 5 (RS): Ch 2, 1 dc in next 3 sts, 2 dc in next st; rep from * across, turn. (30 dc)
– Row 6 (WS): Ch 1, 1 sc in next 4 sts, 2 sc in next st; rep from * across, turn. (36 sc)
✅ Checkpoint: You have completed the circular crown section. Confirm you have (36 sc) before proceeding to the bobble body rows.
Section 2: Bobble Body Texture
- Row 7 (RS): Ch 1, sc in first st, bobble in next st, sc in next st; rep from * across, turn. (18 sc, 18 bobbles)*
- Row 8 (WS): Ch 1, sc in each st and across top of each bobble across, turn. (36 sc)
- Row 9 (RS): Ch 1, sc in first 2 sts, bobble in next st, sc in next st; rep from * ending with sc in last 2 sts, turn. (19 sc, 17 bobbles)*
- Row 10 (WS): Repeat Row 8. (36 sc)
- Rows 11–14: Repeat Rows 7–10 once more. (36 sc)
💡 Designer Tip: Push the bobble clusters outward with your thumb from the wrong side of the fabric to ensure they pop crisply on the right side.
Section 3: Face-Framing Ribbed Edge
Switch to Cream yarn for a neat contrast trim.
– Row 15 (RS): Ch 1, working in BLO, sc in each st across, turn. (36 sc)
– Row 16 (WS): Ch 1, working in BLO, sc in each st across, turn. (36 sc)
– Row 17: Fasten off Dusty Rose and Cream yarns, leaving a tail to weave in.
Section 4: Chin Ties and Assembly
- Step 1: Using Cream, cut six strands measuring 24 inches each. Divide them into two sets of three strands.
- Step 2: Attach one set of three strands securely to the bottom corner of the left face edge using a lark’s head knot.
- Step 3: Braid the three strands tightly to a length of 7 inches, secure with a small overhand knot, and trim the ends evenly to form a neat tassel.
- Step 4: Repeat Steps 2–3 on the bottom corner of the right face edge.
- Step 5: Use a tapestry needle to weave in all loose ends securely into the wrong side of the bonnet fabric.
Size Customization Tips
To adjust this bonnet for a slightly larger 3–6 month size, work one additional increase row in the crown section (Row 7: working 1 dc in next 4 sts, 2 dc in next st, resulting in 42 sts), and adjust your bobble count accordingly to maintain the alternating texture sequence. Ensure your stitch count remains a multiple of 2 to keep the bobble placement symmetrical.
Care Instructions
- Hand wash gently in cool water using a mild wool-safe detergent.
- Do not wring or twist the damp fabric; gently squeeze out excess water in a clean towel.
- Reshape flat on a dry towel to natural dimensions and allow to air dry completely away from direct heat and sunlight.
Chunky Bobble Stitch Baby Bonnet Free Bonnet Pattern
I hope you adore making this sweet textured bonnet as much as I loved designing it! If you share your lovely creations online, please tag me and use the hashtag so I can admire your heirloom pieces. Don’t forget to save this tutorial to your Pinterest boards for your next baby crafting session, and leave a comment below to share what color combination you chose!