











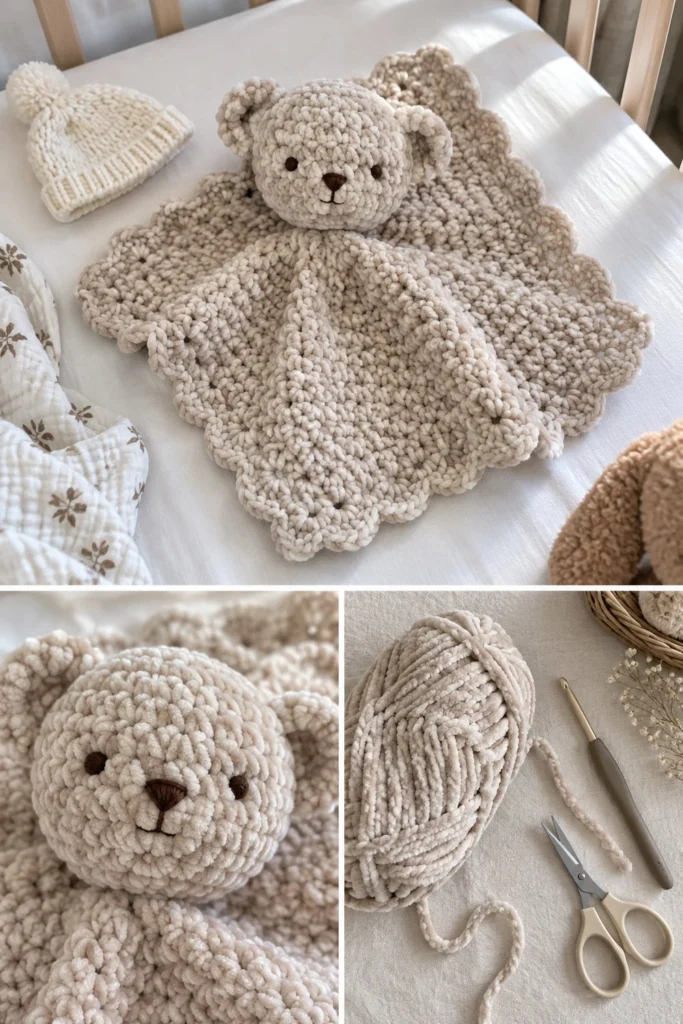
Wrap your little one in pure comfort with this adorable velvet teddy bear lovey. Combining a soft, squishy amigurumi bear head with a plush chenille blanket square and a delicate scalloped edge, this project creates the ultimate security blanket for naptime and bedtime. Embroidered facial features keep it completely safe for newborns and infants, while the velvety chenille yarn effortlessly hides stitches to make this a wonderful project for confident beginners.
Easy Crochet Bear Lovey – Free Velvet Baby Blanket Pattern
Quick Facts
- Skill level: Easy
- Finished size: Blanket is approximately 11.5 inches (29 cm) square; Bear head is about 3.5 inches (9 cm) wide
- Yarn: Bulky weight (5) chenille velvet yarn in Cream
- Hook: 4.5 mm (US 7) crochet hook
- Stitches used: ch, sl st, sc, inc, dec, shell
- Time to make: 4 to 6 hours
Size customization tips and adjustments are included further down in the pattern.
What Makes This Bear Lovey Special
This lovey uses thick, plush chenille yarn that creates an irresistibly soft texture against baby’s skin. The construction starts from the center of the blanket square and grows outward in rows, finishing with a decorative shell border. The stuffed bear head is worked in continuous amigurumi rounds and securely stitched to the center of the blanket, while embroidered facial details ensure it is entirely baby-safe with no hard plastic pieces.
Skill Level
- Basic understanding of crochet terminology and working in the round
- Familiarity with magic rings and single crochet increases/decreases
- Basic yarn embroidery skills for the nose and mouth
Don’t worry if you are new to chenille yarn—its plush texture is very forgiving and hides stitches beautifully!
Finished Measurements
| Part | Width | Height / Length |
|---|---|---|
| Blanket Square | 11.5 in (29 cm) | 11.5 in (29 cm) |
| Bear Head | 3.5 in (9 cm) diameter | 3.5 in (9 cm) height |
Materials You Will Need
| Material / Notion | Details / Color | Quantity / Amount |
|---|---|---|
| Yarn (Bulky / Chenille) | Cream (Shade matching main photos) | Approx. 120 yards (110 meters) |
| Embroidery Thread | Dark Brown | Small amount for eyes, nose, and mouth |
| Crochet Hook | 4.5 mm (US 7) | 1 hook |
| Polyfill Stuffing | Standard toy stuffing | Small handful |
| Tapestry Needle | Large eye for weaving ends and assembly | 1 needle |
| Stitch Markers | Locking stitch markers | 2 markers |
Yarn Suggestions
| Yarn Line | Skein Yardage | Notes |
|---|---|---|
| Bernat Blanket | 220 yds (201 m) per 300g ball | Excellent durability, super plush chenille texture |
| Premier Yarns Basix Chenille | 131 yds (120 m) per 100g ball | Soft, velvety finish with great stitch definition |
| Hobbii Honey Bunny | 131 yds (120 m) per 100g ball | Incredibly soft, perfect for baby items |
⚠️ Note: Avoid novelty eyelash yarns or fuzzy mohair yarns for baby loveies, as fibers can shed and pose a hazard to infants. Stick to smooth chenille or plush velvet yarns.
Gauge
- Blanket: First 3 rows of blanket square = 3 inches (7.5 cm) across
- Head: Rnds 1 to 6 of the amigurumi head = 3 inches (7.5 cm) across
Gauge is helpful but not critical for this lovey; adjust hook size if your stitches feel too loose or too tight.
Abbreviations
- ch: chain
- sl st: slip stitch
- sc: single crochet
- inc: single crochet increase (work 2 sc in the same st)
- dec: invisible single crochet decrease (insert hook into front loops of next 2 sts, yarn over, pull through both loops, yarn over, pull through remaining 2 loops)
- shell: work 5 dc in the designated stitch or space
- st(s): stitch(es)
- sk: skip
- rep: repeat
- Rnd(s): round(s)
- Row(s): row(s)
UK terminology conversion: sc = dc, hdc = htr, dc = tr.
Special Stitches Explained
- Magic Ring: Wrap yarn around your index finger twice to create a loop, insert hook through center of loop, pull up a working loop, and ch 1 to secure. Work initial stitches directly into the ring.
- Invisible Decrease (dec): Insert hook only into the front loop of the first stitch, then immediately insert hook into the front loop of the second stitch. Yarn over and pull through both front loops, yarn over and pull through remaining two loops on hook.
- Shell: Work 5 double crochet stitches into the exact same stitch or chain space to form a decorative fan edge.
Pattern Instructions
Pattern Notes
- The bear head is worked in continuous spiral rounds without joining. Use a stitch marker to keep track of the first stitch of each round.
- The blanket square is worked back and forth in rows from the center outward, creating a textured diagonal fabric.
Section 1: Bear Head (Cream, make 1)
Rnd 1: Start 6 sc in a magic ring (6 sc)
Rnd 2: (inc) x 6 (12 sc)
Rnd 3: (1 sc, inc) x 6 (18 sc)
Rnd 4: (2 sc, inc) x 6 (24 sc)
Rnd 5: (3 sc, inc) x 6 (30 sc)
Rnds 6 to 10: sc in each st around (30 sc)
Rnd 11: (3 sc, dec) x 6 (24 sc)
Rnd 12: (2 sc, dec) x 6 (18 sc)
Start stuffing the head firmly with polyfill.
Rnd 13: (1 sc, dec) x 6 (12 sc)
Rnd 14: (dec) x 6 (6 sc)
Fasten off, leaving a long tail for sewing. Use a tapestry needle to weave the tail through the front loops of the remaining 6 stitches and pull tightly to close the opening. Secure and weave in the end.
Section 2: Bear Ears (Cream, make 2)
Rnd 1: Start 6 sc in a magic ring, sl st to first sc to join (6 sc)
Rnd 2: ch 1, work (inc) in each st around, sl st to first st to join (12 sc)
Fasten off, leaving a 6-inch (15 cm) tail for sewing. Do not stuff the ears. Flatten them slightly before attaching to the head.
Section 3: Blanket Square (Cream, make 1)
The blanket is worked in rows from the center outward, expanding on two sides to create a square.
Row 1: ch 4, work 3 dc in 4th ch from hook (the 3 skipped ch count as 1 dc) (4 dc)
Row 2: ch 3 (counts as 1 dc here and throughout), turn, work 1 dc in same st, 1 dc in next 2 sts, 2 dc in top of turning ch (6 dc)
Row 3: ch 3, turn, 2 dc in same st, dc in each st across to last st, 2 dc in top of turning ch (8 dc)
Rows 4 to 18: Rep Row 3 fifteen more times. Stitch count increases by 2 sts each row, ending with (38 dc) on Row 18.
Rows 19 to 33: ch 3, turn, sk first st, dc in each st across to last 2 sts, sk next st, dc in top of turning ch. Stitch count decreases by 2 sts each row, ending with (8 dc) on Row 33.
Row 34: ch 3, turn, sk first st, dc in next 2 sts, sk next st, dc in top of turning ch (4 dc)
Fasten off and weave in ends.
Section 4: Scallop Border (Cream)
With the right side facing, attach yarn to any corner of the blanket square.
Rnd 1: ch 1, work 120 sc evenly around the outer edge of the blanket square (working across the side row-ends and top/bottom edges), working 3 sc into each of the 4 corners to maintain a sharp turn, bringing the total count to (132 sc). Join with a sl st to the first sc.
Rnd 2: ch 1, sk 2 sts, shell (5 dc) in next st, sk 2 sts, sl st in next st repeat around the entire perimeter of the blanket for a total of (22 shells / 110 dc). Join with a sl st to the first st.
Fasten off and weave in all remaining ends.
✅ Checkpoint: At this point, you should have one stuffed bear head, two flat ears, one completed blanket square with a textured center, and a finished scalloped border.
Assembly
- Ears Placement: Position the two ears on top of the bear head, spanning between Rnds 4 and 8. Secure with pins and sew them firmly in place using the yarn tails.
- Facial Embroidery: Using dark brown embroidery thread and a tapestry needle, embroider two closed sleeping eyes (or small straight stitches) on Rnds 8 and 9, spaced about 4 stitches apart. Embroider a small triangular nose centered between the eyes on Rnd 9, with a short vertical line extending downward for the mouth.
- Head to Blanket Attachment: Place the finished bear head securely in the exact center of the blanket square. Using the remaining head yarn tail and a tapestry needle, whipstitch the base of the head securely through the stitches of the blanket center, ensuring it is firmly attached for baby’s safety.
Finishing
- Check all sewn seams on the ears and head to make sure they are secure and tight.
- Trim any remaining yarn tails and hide them inside the amigurumi head or blanket stitches.
- Give the lovey a gentle steam block if desired, taking care not to melt synthetic chenille fibers with direct iron heat.
Size Customization Tips
- To make a larger security blanket, simply continue repeating Row 3 of the blanket square for more rows before beginning the decrease rows, ensuring you add a matching number of decrease rows to keep the square symmetrical.
Care Instructions
- Machine wash gentle in cold water inside a mesh laundry bag.
- Tumble dry on low heat or lay flat to air dry.
- Do not bleach, iron, or dry clean.
FAQ
Can I use safety eyes instead of embroidery?
For safety reasons, embroidered eyes are strongly recommended for toys and loveies given to infants and children under 3 years old, as plastic safety eyes can become a choking hazard.
Is chenille velvet yarn hard for beginners?
Chenille yarn can take a little practice to get used to because the stitches can be difficult to see. However, its plush texture naturally hides minor stitch inconsistencies, making it surprisingly forgiving once you get the feel of the stitches.
Can I use a different yarn weight?
Yes! You can use worsted weight (4) cotton or acrylic yarn with a smaller hook (like a 3.5 mm or 4.0 mm) to create a smaller, lighter lovey, though the finished dimensions and drape will change.
Happy Crocheting!
I hope you adore making this sweet velvet bear lovey! Be sure to save this pattern on Pinterest for your next baby shower project, and leave a comment below sharing what color velvet yarn you decided to use.
📄 Your free PDF pattern