
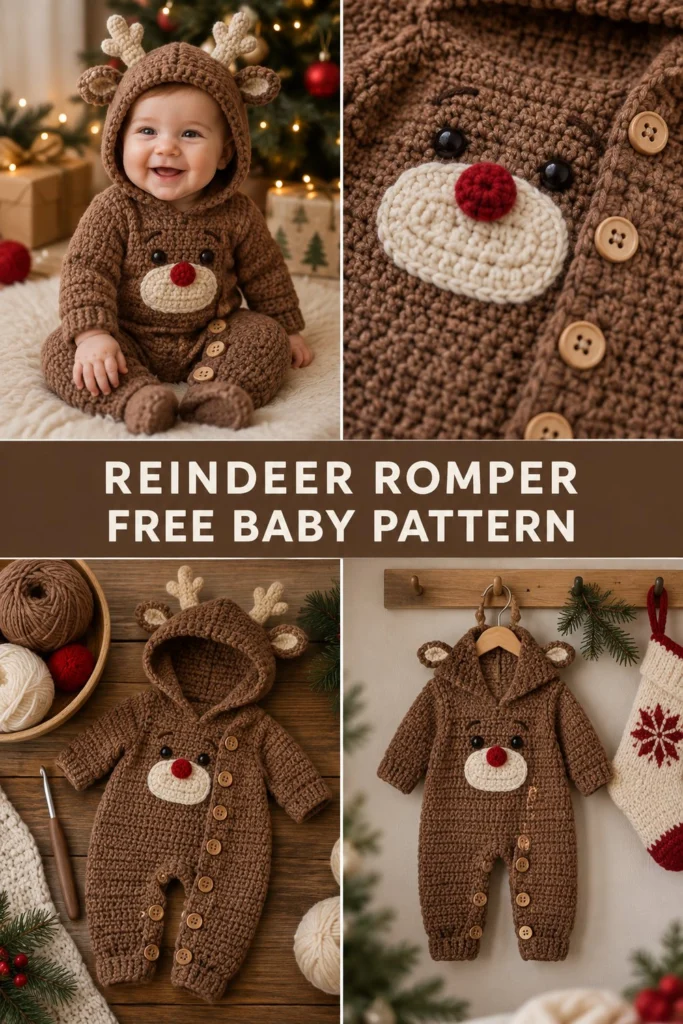
Wrap your little one in cozy holiday magic with this adorable reindeer romper, designed for baby’s very first Christmas photos and festive family gatherings. Worked in soft brown yarn with a fluffy cream muzzle, embroidered facial features, and cute little antlers on the hood, this garment combines comfort with festive charm.
Reindeer Crochet Baby Romper Free Christmas Pattern
Quick Facts
- Skill level: Intermediate
- Finished size: 0 to 18 months (4 sizes)
- Yarn: Worsted weight (Medium #4) acrylic or cotton blend
- Hook: 5.0 mm (US H/8) and 4.0 mm (US G/6)
- Stitches used: ch, sl st, sc, hdc, dc, hdc2tog, FLO, BLO
- Time to make: 12 to 15 hours
What Makes This Reindeer Baby Romper Special
This outfit is constructed with baby’s comfort and parent’s convenience in mind. The main body uses half double crochet for a dense, warm fabric that holds its shape while remaining stretchy. Wooden buttons along the inner legs and front placket make diaper changes quick and fuss-free. The hood features securely attached stuffed antlers and tiny ears, and all facial details are embroidered or crocheted flat with no loose plastic parts.
Skill Level
- Working in rows and joined rounds
- Basic increases and decreases (hdc2tog)
- Changing colors cleanly
- Simple surface embroidery and assembly
Don’t worry if you are new to garment construction—every step is broken down with clear stitch counts and measurements.
Finished Measurements
| Size | Chest / Body Width | Total Length (Shoulder to Crotch) | Inseam | Recommended Age |
|---|---|---|---|---|
| 0–3 Months | 18 in / 45.5 cm | 14 in / 35.5 cm | 5.5 in / 14 cm | 0–3 months |
| 3–6 Months | 19.5 in / 49.5 cm | 15.5 in / 39.5 cm | 6.5 in / 16.5 cm | 3–6 months |
| 6–12 Months | 21 in / 53.5 cm | 17 in / 43 cm | 7.5 in / 19 cm | 6–12 months |
| 12–18 Months | 22.5 in / 57 cm | 18.5 in / 47 cm | 8.5 in / 21.5 cm | 12–18 months |
Ease included: +2 inches of positive ease around the chest for comfortable movement and layering.
Materials You Will Need
| Material | Color / Description | Quantity / Yardage |
|---|---|---|
| Main Yarn (MC) | Medium Brown (Worsted #4) | 450 (520, 600, 680) yds / 410 (475, 550, 620) m |
| Contrast Yarn A (CA) | Cream / Off-White (Worsted #4) | 50 yds / 45 m |
| Contrast Yarn B (CB) | Tan / Light Beige (Antlers) | 40 yds / 36 m |
| Contrast Yarn C (CC) | Bright Red (Nose) | 10 yds / 9 m |
| Crochet Hook 1 | 5.0 mm (US H/8) | For main romper and hood |
| Crochet Hook 2 | 4.0 mm (US G/6) | For muzzle, nose, and antlers |
| Notions | Wooden buttons (0.75 in / 20 mm) | 8 to 10 buttons |
| Notions | Tapestry needle, stitch markers, scissors | As needed |
| Notions | Polyester fiberfill | Small handful for antlers |
Yarn Suggestions
| Yarn Brand | Line Name | Skein Yardage | Notes |
|---|---|---|---|
| Lion Brand | Heartland | 251 yds / 230 m | Extremely soft with a subtle sheen, great drape |
| Caron | Simply Soft | 315 yds / 288 m | Budget-friendly, washable, lovely stitch definition |
| Red Heart | With Love | 315 yds / 288 m | Durable, warm, excellent color selection |
Gauge
14 hdc and 11 rows = 4 in / 10 cm using a 5.0 mm hook. Check your gauge before starting to ensure the finished romper matches the size chart.
Abbreviations
- ch: chain
- sl st: slip stitch
- sc: single crochet
- hdc: half double crochet
- dc: double crochet
- hdc2tog: half double crochet 2 together (decrease)
- BLO: back loop only
- FLO: front loop only
- st(s): stitch(es)
- rnd(s): round(s)
- rep: repeat
- MC: Main Color (Brown)
- CA: Contrast A (Cream)
- CB: Contrast B (Tan)
- CC: Contrast C (Red)
UK translation note: UK sc = US dc, UK hdc = US tr, UK dc = US dtr. This pattern uses standard US terminology.
Special Stitches Explained
- Magic Ring: Wrap yarn around your index finger twice, insert hook under loops, pull up a loop, ch 1, and work initial stitches into the ring. Pull tail to close.
- hdc2tog: Yarn over, insert hook in next st, pull up a loop, insert hook in following st, pull up a loop, yarn over and draw through all 4 loops on hook.
- Puff Stitch (Nose): [Yarn over, insert hook into st, pull up a tall loop] 3 times in the same st, yarn over, pull through all 7 loops on hook, ch 1 to secure.
Pattern Instructions
Romper Body (Worked Top-Down)
With 5.0 mm hook and MC, ch 52 (56, 60, 64). Join with sl st to form a ring, taking care not to twist.
Row 1: Ch 2 (does not count as st here and throughout), work 1 hdc in each ch around. Join with sl st to first hdc. (52 (56, 60, 64) hdc)
Row 2: Ch 2, 1 hdc in next 6 hdc, inc in next hdc rep from * around. Join. (60 (64, 68, 72) hdc)
Row 3: Ch 2, 1 hdc in each hdc around. Join. (60 (64, 68, 72) hdc)
Row 4: Ch 2, 1 hdc in next 7 hdc, inc in next hdc rep from * around. Join. (68 (73, 78, 82) hdc)
Continue working straight hdc rows until piece measures 8 (9, 10, 11) inches from neckline down to underarms.
Dividing for Legs
Left Leg: Work hdc across half the stitches, skip the remaining half for the right leg, and join to the first st of the left leg to work in joined rounds. Work 8 (9, 10, 11) rounds of hdc. Finish with 1 rnd of sc. Fasten off.
Right Leg: Reattach MC to the remaining unworked leg stitches. Work 8 (9, 10, 11) rounds of hdc. Finish with 1 rnd of sc. Fasten off.
Hood
With 5.0 mm hook and MC, ch 50.
Row 1: Working in back bumps of foundation chain, 1 hdc in 3rd ch from hook and each ch across, turn. (48 hdc)
Rows 2 to 20: Ch 2, 1 hdc in each hdc across, turn. (48 hdc)
Fold hood in half along the top edge and sew the back seam closed. Attach bottom edge of hood evenly around the neckline opening of the romper body.
Muzzle (Chest Piece)
With 4.0 mm hook and CA (Cream), ch 12.
Row 1: 1 sc in 2nd ch from hook, 9 sc, 3 sc in last ch. Working along opposite side of foundation chain, 9 sc, 2 sc in last ch. Join with sl st. (24 sc)
Row 2: Ch 1, inc in first st, 9 sc, inc in next 3 sts, 9 sc, inc in last 2 sts. Join. (30 sc)
Row 3: Ch 1, 1 sc in each st around. Join. Fasten off, leaving a long tail for sewing. (30 sc)
Reindeer Nose
With 4.0 mm hook and CC (Red), make a Magic Ring.
Rnd 1: 6 sc in ring, join. (6 sc)
Rnd 2: Inc in each st around, join. (12 sc)
Rnd 3: Work 1 Puff Stitch in each st around, join. Fasten off, leaving a long tail. Stuff lightly before sewing to the center of the Muzzle.
Antlers (Make 2)
With 4.0 mm hook and CB (Tan), ch 10.
Row 1: 1 sl st in 2nd ch from hook, sl st in next 3 ch. Ch 4, 1 sl st in 2nd ch from hook, sl st in next 2 ch, sl st back down main stem, sl st in remaining chs to base. Fasten off, leaving a long tail for sewing. Stuff lightly with a tiny pinch of fiberfill.
Ears (Make 2)
With 5.0 mm hook and MC, ch 6.
Row 1: 1 hdc in 3rd ch from hook, 2 hdc, 4 hdc in last ch. Working along opposite side of chain, 3 hdc, turn. (10 hdc)
Fasten off, pinch base slightly, and sew to either side of the hood.
Assembly & Finishing
- Face Placement: Sew the Cream Muzzle to the center of the chest (approx. 3 inches below the neckline). Center the Red Nose on the Muzzle.
- Eyes: Using dark brown yarn or embroidery floss, embroider small French knots or simple horizontal sleep-eyes just above the muzzle.
- Antlers: Sew the two antlers securely to the top crown of the hood, spaced 2 inches apart.
- Ears: Sew the ears directly below and slightly outside the antlers on the hood.
- Buttonbands & Crotch: Attach 3 to 4 wooden buttons along the left inner leg opening and corresponding button loops (ch 3 spaces) along the right inner leg opening. Add remaining buttons along the front neckline placket.
- Weaving Ends: Weave in all loose yarn ends securely using a tapestry needle.
Size Customization Tips
- Adjusting Length: Add or subtract hdc rows on the main body before splitting for the legs. Each extra row adds approximately 0.35 inches to the total length.
- Adjusting Width: Work an additional increase round during the top-down yoke section to accommodate broader babies.
Care Instructions
Machine wash gentle in cold water inside a mesh garment bag. Lay flat to dry to preserve the shape of the hood and antlers. Do not tumble dry or iron directly over buttons.
FAQ
Can I use safety eyes instead of embroidery?
For babies under 3 years old, safety eyes pose a choking hazard. Embroidering the eyes with yarn or embroidery floss is the safest choice for infant garments.
Can I make this romper in cotton yarn instead of acrylic?
Yes! Cotton yarn gives great stitch definition and is breathable, though it will feel slightly heavier than acrylic. Be sure to check your gauge.
How do I adjust the leg openings for cloth diapers?
Cloth diapers are bulkier than disposable ones. Add 1 extra inch of positive ease to the leg opening rounds and extend the inseam length by 1 row.