
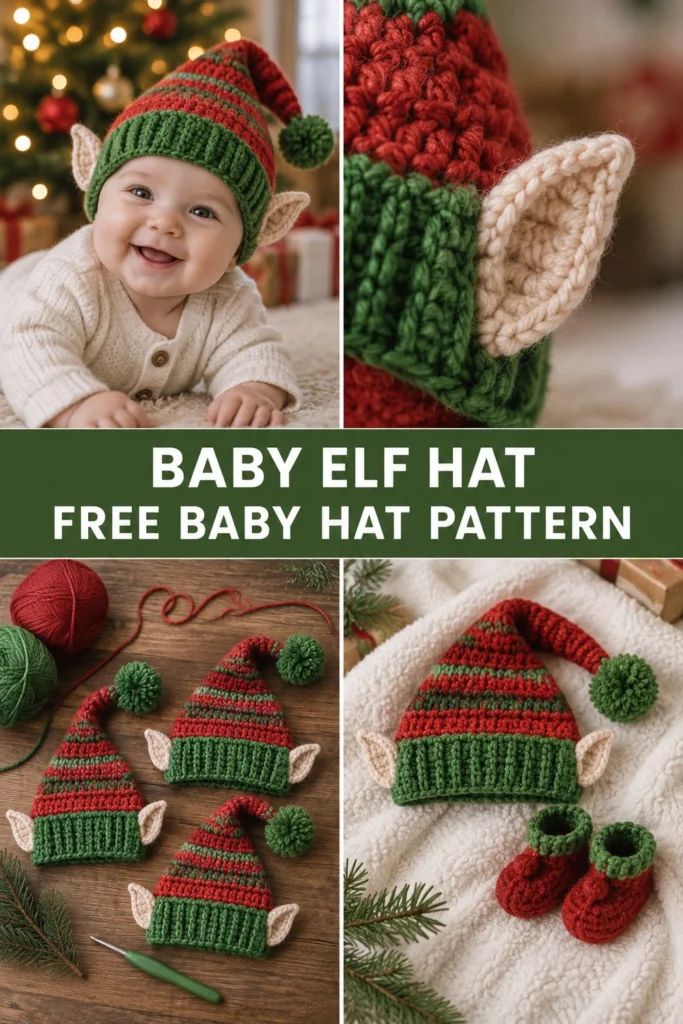
Santa’s littlest helper is ready for their first holiday photos in this adorable, classic elf hat! Worked in traditional Christmas colors with a cute pointed brim and tiny matching ears, this cozy project uses simple stitches and soft yarn to keep baby warm and comfortable.
Baby Crochet Elf Hat With Ears Free Christmas Pattern
Quick Facts
- Skill level: Easy / Intermediate beginner
- Finished size: Newborn (0–3 months, 3–6 months, 6–12 months, 12–24 months)
- Yarn: Worsted weight (Medium #4) in Christmas Green, Festive Red, and Cream/Off-White
- Hook: US G/6 (4.0 mm) and US H/8 (5.0 mm)
- Stitches used: ch, sl st, sc, hdc, dc, BLO, FLO, sc2tog
- Time to make: 3 to 4 hours
What Makes This Baby Elf Hat Special
This hat is designed with safety and comfort in mind for babies. Instead of jingle bells that can pull loose, a soft, secure handmade pompom tops the crown. The ribbed band stretches comfortably around little heads without pinching, and the tiny elf ears are securely hand-sewn to the sides at just the right perky angle.
Skill Level
- Working in joined rounds and rows
- Changing colors cleanly
- Basic single crochet ribbing (working in the back loop only)
- Basic decreasing and basic sewing of ears and pompom
- Reassurance line: If you know how to make a single crochet and change colors, you have all the skills needed for this project!
Finished Measurements
| Size | Head Circumference (in / cm) | Hat Height (in / cm) |
|---|---|---|
| Newborn | 13–14 in / 33–35.5 cm | 9 in / 23 cm |
| 0–3 Months | 14–15 in / 35.5–38 cm | 10 in / 25.5 cm |
| 3–6 Months | 15–16.5 in / 38–42 cm | 11 in / 28 cm |
| 6–12 Months | 16.5–18 in / 42–45.5 cm | 12 in / 30.5 cm |
| 12–24 Months | 18–19.5 in / 45.5–49.5 cm | 13 in / 33 cm |
Materials You Will Need
| Material | Description / Color | Quantity / Details |
|---|---|---|
| Yarn A | Worsted Weight / Festive Red | Approx. 70–120 yds / 64–110 m |
| Yarn B | Worsted Weight / Christmas Green | Approx. 50–90 yds / 45–82 m |
| Yarn C | Worsted Weight / Cream or Off-White | Approx. 15 yds / 14 m |
| Hook 1 | US G/6 (4.0 mm) crochet hook | For ears and tight ribbing |
| Hook 2 | US H/8 (5.0 mm) crochet hook | For main hat body |
| Notions | Yarn needle, stitch markers, scissors | For weaving ends and assembly |
Yarn Suggestions
| Yarn Line | Weight | Notes |
|---|---|---|
| Caron Simply Soft | Worsted (#4) | Great shine and soft drape for baby skin |
| Lion Brand Vanna’s Choice | Worsted (#4) | Sturdy, holds stripes and ribbed texture well |
| Red Heart Super Saver | Worsted (#4) | Durable, easy-care classic holiday colors |
Gauge
- With 5.0 mm hook in sc: 14 sts x 16 rows = 4 in / 10 cm.
Abbreviations
- ch: chain
- sl st: slip stitch
- sc: single crochet
- hdc: half double crochet
- dc: double crochet
- BLO: back loop only
- FLO: front loop only
- sc2tog: single crochet 2 together (invisible decrease)
- st(s): stitch(es)
- Rnd(s): round(s)
- Row(s): row(s)
- rep: repeat
- sk: skip
- yo: yarn over
UK conversion: sc = dc, hdc = htr, dc = tr.
Special Stitches Explained
- sc2tog (Invisible Decrease): Insert hook into the front loop only of the next two stitches. Yo, draw through both loops, yo, draw through remaining two loops on hook.
- BLO Ribbing: Working exclusively in the back loop of each stitch creates a stretchy, ribbed fabric that mimics knitted ribbing.
Pattern Instructions
Pattern Notes
- The hat is worked from the top pointed tip downwards in spiral rounds for the striped cone, then switched to worked rows for the bottom ribbed band.
- Use a stitch marker to track the beginning of each round. Move the marker up as you complete each round.
- Color changes happen smoothly at the start of designated rounds by dropping the old color and picking up the new color on the final pull-through of the last stitch of the previous round.
Section 1: Hat Crown and Body (Striped Cone)
Using Yarn A (Red) and 5.0 mm hook, make a magic ring.
* Rnd 1: 4 sc in magic ring. Pull ring tight. (4 sc)
* Rnd 2: sc in each st around. (4 sc)
* Rnd 3: (sc in next st, inc in next st) x 2. (6 sc)
* Rnd 4: sc in each st around. (6 sc)
* Rnd 5: (sc in next 2 sts, inc in next st) x 2. (8 sc)
* Rnd 6: sc in each st around. (8 sc)
* Rnd 7: Switch to Yarn B (Green). (sc in next 3 sts, inc in next st) x 2. (10 sc)
* Rnd 8: sc in each st around. (10 sc)
* Rnd 9: Switch to Yarn A. (sc in next 4 sts, inc in next st) x 2. (12 sc)
* Rnd 10: sc in each st around. (12 sc)
* Rnd 11: Switch to Yarn B. (sc in next 3 sts, inc in next st) x 3. (15 sc)
* Rnd 12: sc in each st around. (15 sc)
* Rnd 13: Switch to Yarn A. (sc in next 4 sts, inc in next st) x 3. (18 sc)
* Rnd 14: sc in each st around. (18 sc)
* Rnd 15: Switch to Yarn B. (sc in next 5 sts, inc in next st) x 3. (21 sc)
* Rnd 16: sc in each st around. (21 sc)
* Rnd 17: Switch to Yarn A. (sc in next 6 sts, inc in next st) x 3. (24 sc)
* Rnd 18: sc in each st around. (24 sc)
For sizes Newborn (0–3m, 3–6m, 6–12m, 12–24m), continue increasing following the rate below until reaching your target base stitch count:
* Newborn (Target: 42 sts): Continue alternating 2-round stripe blocks (Red/Green), increasing 3 sts evenly per increase round until Rnd 30. (42 sc)
* 0–3 Months (Target: 48 sts): Continue alternating stripe blocks, increasing 3 sts evenly per increase round until Rnd 34. (48 sc)
* 3–6 Months (Target: 54 sts): Continue alternating stripe blocks, increasing 3 sts evenly per increase round until Rnd 38. (54 sc)
* 6–12 Months (Target: 60 sts): Continue alternating stripe blocks, increasing 3 sts evenly per increase round until Rnd 42. (60 sc)
* 12–24 Months (Target: 66 sts): Continue alternating stripe blocks, increasing 3 sts evenly per increase round until Rnd 46. (66 sc)
Section 2: Ribbed Band
Switch to Yarn B (Green) and 4.0 mm hook.
* Row 1: Ch 7. Working in 2nd ch from hook, sc in each of the next 6 chs. Skip next st of the hat body, sl st into the next 2 sts of the hat body, turn. (6 sc)
* Row 2: Skip the 2 sl sts, working in BLO, sc in each of the next 6 sc, ch 1, turn. (6 sc)
* Row 3: Working in BLO, sc in each of the next 6 sc. Sl st into the next 2 sts of the hat body, turn. (6 sc)
* Rows 4 to end: Rep Rows 2 and 3 all the way around the bottom edge of the hat body, ending directly below your starting point.
* Fasten off, leaving a 10 in / 25 cm tail. Use the tail to neatly sew the final vertical rib seam closed.
Section 3: Elf Ears (Make 2)
Using Yarn C (Cream) and 4.0 mm hook.
* Row 1: Ch 6. Working in 2nd ch from hook, sc in next 2 chs, hdc in next 2 chs, (2 dc, ch 1, 2 dc) in last ch. Working along the opposite side of the foundation chain, hdc in next 2 chs, sc in next 2 chs. Join with sl st to first sc. (14 sts)
* Row 2: Ch 1, turn. Sc in first 5 sts, work 3 sc in the ch-1 space at the tip, sc in next 6 sts. Sl st to join. (16 sc)
* Fasten off, leaving an 8 in / 20 cm tail for sewing.
Section 4: Pompom
Using Yarn A (Red), wrap yarn around a 2 in / 5 cm piece of cardboard about 60 times. Slide off carefully, tie a tight length of yarn securely around the center, and cut the loops open. Trim evenly into a round pompom.
Assembly
- Pompom: Firmly sew the handmade red pompom to the very tip of the elf hat crown, weaving securely through multiple stitches inside the point so it cannot detach.
- Ears: Position the two cream elf ears on opposite sides of the hat, approximately 1 to 2 rows above the green ribbed band. Tilt them slightly outward for a perky look. Whipstitch securely around the inner edge of each ear base.
- Finishing: Weave in all remaining loose yarn ends on the inside of the hat using your yarn needle. Trim threads close to the fabric.
Size Customization Tips
- Each extra increase round added to the crown cone increases the final circumference by approximately 3 stitches (about 0.75 in / 2 cm).
- If baby’s head is between sizes, always size up so the ribbed band remains comfortable and non-restrictive.
Care Instructions
- Hand wash gently in cool water with mild wool detergent.
- Do not bleach.
- Lay flat on a clean towel to dry completely in the shade.
- Do not iron or tumble dry.
FAQ
Can I use safety eyes or jingle bells for decoration?
No. For safety reasons with babies under 3 years old, never use small plastic safety eyes, buttons, or metal jingle bells on hats or toys. Embroider any facial details or stick to soft yarn elements like pompoms.
How do I adjust this pattern for an older child or adult?
To scale up to older sizes, simply continue adding increase rounds (adding 3 stitches per increase round) until your base circumference matches the desired head measurement, then work the same ribbing method around the wider base.
What is the best yarn substitute if I cannot find the recommended brands?
Any standard acrylic or acrylic-blend worsted weight yarn (Medium #4) with a smooth twist will work wonderfully, provided you match the recommended gauge.