
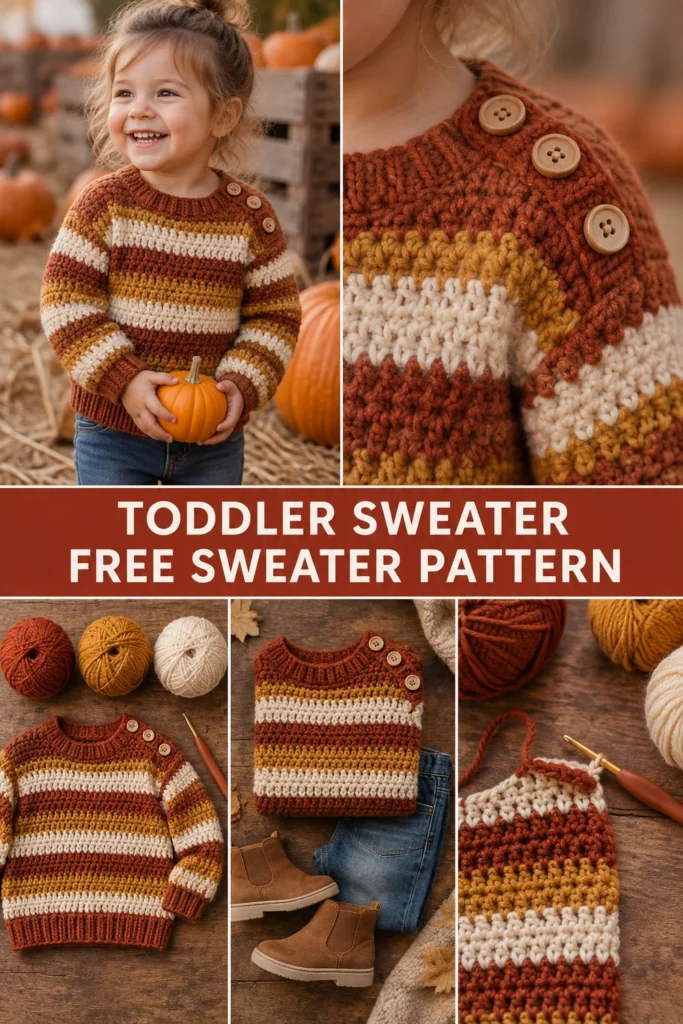
Create a cozy, handmade garment for the little ones in your life with this beginner-friendly pullover. Featuring classic autumn tones of rust, mustard, and cream, this sweater is warm, stretchy, and features a handy shoulder button placket to make dressing a breeze.
Harvest Stripe Crochet Toddler Sweater Free Thanksgiving Pattern
Quick Facts
- Skill level: Intermediate
- Finished size: Sizes 1 (2, 3, 4, 5) years
- Yarn: Worsted weight (Medium weight #4) acrylic or wool blend
- Hook: 5.0 mm (US H/8) crochet hook
- Stitches used: ch, sl st, sc, hdc, hdc2tog, BLO
- Time to make: Approximately 6 to 10 hours
What Makes This Striped Crochet Sweater Special
This crochet toddler sweater is designed with both style and practicality in mind. Working primarily in simple half double crochet rows creates a thick, warm fabric that holds its shape wonderfully. The ribbed cuffs and hem add a tailored finish, while the three wooden buttons on the shoulder placket ensure the neckline stretches easily over active toddlers’ heads.
Skill Level
- Working flat in rows and in the round
- Basic increases and decreases (hdc2tog)
- Working in the back loop only (BLO) for ribbing
- Basic sewing to attach buttons
You can master this project with patience and basic crochet confidence!
Finished Measurements
| Size | Chest / Bust | Total Length | Sleeve Length | Ease |
|---|---|---|---|---|
| 1 Year | 22 in / 56 cm | 13 in / 33 cm | 10 in / 25 cm | + 2 in / 5 cm |
| 2 Years | 23.5 in / 60 cm | 14 in / 36 cm | 11 in / 28 cm | + 2 in / 5 cm |
| 3 Years | 25 in / 64 cm | 15 in / 38 cm | 12 in / 30 cm | + 2 in / 5 cm |
| 4 Years | 26.5 in / 67 cm | 16 in / 41 cm | 13 in / 33 cm | + 2 in / 5 cm |
| 5 Years | 28 in / 71 cm | 17 in / 43 cm | 14 in / 36 cm | + 2 in / 5 cm |
Materials You Will Need
| Material | Description / Color | Yards | Meters |
|---|---|---|---|
| Color A (Rust) | Main Body & Ribbing | 280 (320, 360, 410, 460) yds | 256 (293, 329, 375, 421) m |
| Color B (Mustard) | Stripe Contrast 1 | 90 (100, 110, 125, 140) yds | 82 (91, 101, 114, 128) m |
| Color C (Cream) | Stripe Contrast 2 | 90 (100, 110, 125, 140) yds | 82 (91, 101, 114, 128) m |
| Hook | 5.0 mm (US H/8) crochet hook | — | — |
| Notions | 3 wooden buttons (0.75 in / 20 mm), tapestry needle, stitch markers, measuring tape | — | — |
Yarn Suggestions
| Yarn Line | Skein Yardage | Notes |
|---|---|---|
| Caron Simply Soft | 315 yds / 288 m per skein | Excellent drape, soft against toddler skin |
| Lion Brand Vanna’s Choice | 170 yds / 156 m per skein | Sturdy, holds stitch definition very well |
| Paintbox Yarns Simply Aran | 201 yds / 184 m per skein | Wide range of precise autumn colors |
Gauge
14 hdc and 11 rows = 4 in / 10 cm using a 5.0 mm hook. Check your gauge carefully before starting to ensure correct sizing.
Abbreviations
- ch: chain
- sl st: slip stitch
- sc: single crochet
- hdc: half double crochet
- hdc2tog: half double crochet 2 stitches together (decrease)
- BLO: back loop only
- st(s): stitch(es)
- rep: repeat
- RS: right side
- WS: wrong side
UK: sc = dc, hdc = htr, dc = tr.
Special Stitches Explained
- hdc2tog: Yarn over, insert hook into next st, yarn over and pull up a loop. Yarn over, insert hook into following st, yarn over and pull up a loop. Yarn over and draw through all 5 loops on the hook.
- BLO Ribbing: Working exclusively in the back loop of each stitch creates a stretchy ribbed texture ideal for cuffs, hems, and collars.
Pattern Instructions
Color Stripe Sequence
- Rows 1 to 4: Color A (Rust)
- Rows 5 & 6: Color B (Mustard)
- Rows 7 & 8: Color C (Cream)
- Rows 9 & 10: Color A (Rust)
- Rows 11 & 12: Color B (Mustard)
- Rows 13 & 14: Color C (Cream)
Repeat this 14-row stripe sequence throughout the body and sleeves.
Section 1: Back Panel (Make 1)
Using Color A and 5.0 mm hook, ch 39 (41, 43, 46, 48).
Row 1 (RS): Working in back bumps of foundation chain, hdc in 3rd ch from hook (skipped 2 chs count as first hdc), hdc in each ch across, turn (38 [40, 42, 45, 47] hdc).
Row 2: Ch 2 (does not count as st here and throughout), hdc in first st, hdc in each st across, turn (38 [40, 42, 45, 47] hdc).
Following the color stripe sequence, work in established hdc pattern until piece measures 13 (14, 15, 16, 17) in / 33 (36, 38, 41, 43) cm from foundation edge. Fasten off.
Section 2: Front Panel with Shoulder Placket (Make 1)
Using Color A, ch 39 (41, 43, 46, 48).
Row 1 (RS): Hdc in 3rd ch from hook, hdc across, turn (38 [40, 42, 45, 47] hdc).
Work stripe sequence until front panel is 1.5 in / 4 cm shorter than back panel, ending on a WS row.
Shoulder Shaping & Button Placket:
Next Row (RS): Work hdc across first 28 (30, 31, 33, 35) sts, leave remaining sts unworked, turn. Leave a 3-stitch button loop gap on the right shoulder by chaining 2, skipping 2 sts, on the final shoulder row if desired, or simply overlap buttons over the button band later.
Continue working on this shoulder section for 3 more rows to form the left shoulder flap. Fasten off.
Attach yarn to the opposite side for the right shoulder, work 3 rows to match, creating a button placket opening. Fasten off.
Section 3: Sleeves (Make 2)
Using Color A, ch 25 (27, 29, 31, 33).
Row 1 (RS): Hdc in 3rd ch from hook, hdc across, turn (24 [26, 28, 30, 32] hdc).
Row 2: Ch 2, 2 hdc in first st, hdc across to last st, 2 hdc in last st, turn (26 [28, 30, 32, 34] hdc).
Continue in hdc pattern, repeating the increase row every 4 rows 4 (5, 5, 6, 6) times, maintaining stripe sequence, until sleeve measures 10 (11, 12, 13, 14) in / 25 (28, 30, 33, 36) cm. Fasten off, leaving a 12 in / 30 cm tail for assembly.
Section 4: Ribbed Bottom Hem & Cuffs
- Bottom Hem: Join Color A along the bottom foundation chain of Front and Back panels. Work 1 row of sc evenly across.
Next Row: Ch 7, working in 2nd ch from hook, sl st in each of the next 6 chs, slip stitch into the next 2 base sc of the sweater body, turn.
Following Row: Working in BLO, sl st across 6 ribbing sts, turn. Repeat across the entire lower edge, then seam ends together. - Cuffs: Repeat ribbing process directly onto the cuff edge of each sleeve.
Section 5: Assembly
- Lay Front and Back panels right sides facing. Seam shoulder seams together, leaving the left shoulder button placket overlapping.
- Sew sleeves to armhole openings, aligning the center of the sleeve cap with the shoulder seam.
- Seam underarm and side seams in one continuous pass using mattress stitch.
- Sew 3 wooden matching buttons securely onto the left front shoulder band, aligning them with the button loops or spacing them evenly along the overlap.
Finishing
Weave in all loose ends securely with a tapestry needle. Give your finished sweater a gentle steam block or wash according to yarn label instructions to relax the stitches and even out your tension.
Size Customization Tips
- Adjusting Width: Each 2-stitch increase or decrease on the starting chain adjusts the overall chest circumference by approximately 1.2 in / 3 cm.
- Adjusting Length: Add or subtract 2-row blocks from the main body panels before starting the shoulder shaping to alter total length.
Care Instructions
- Machine wash gentle in cold water.
- Do not bleach.
- Tumble dry low or lay flat to dry in shade.
- Cool iron if needed.
FAQ
Can I substitute wool for acrylic yarn?
Yes, absolutely! Just ensure the yarn weight matches (worsted / #4) and that the fiber is machine washable if the garment is intended for everyday toddler wear.
How do I make the sweater larger or smaller?
Follow the multi-size stitch counts provided in the pattern. For custom intermediate sizes, adjust your foundation chain by increments of 2 stitches.
For toddlers under 3 years old, securely sew all wooden buttons with heavy-duty thread using a reinforced anchor stitch so they cannot be easily pulled off and become a choking hazard.