
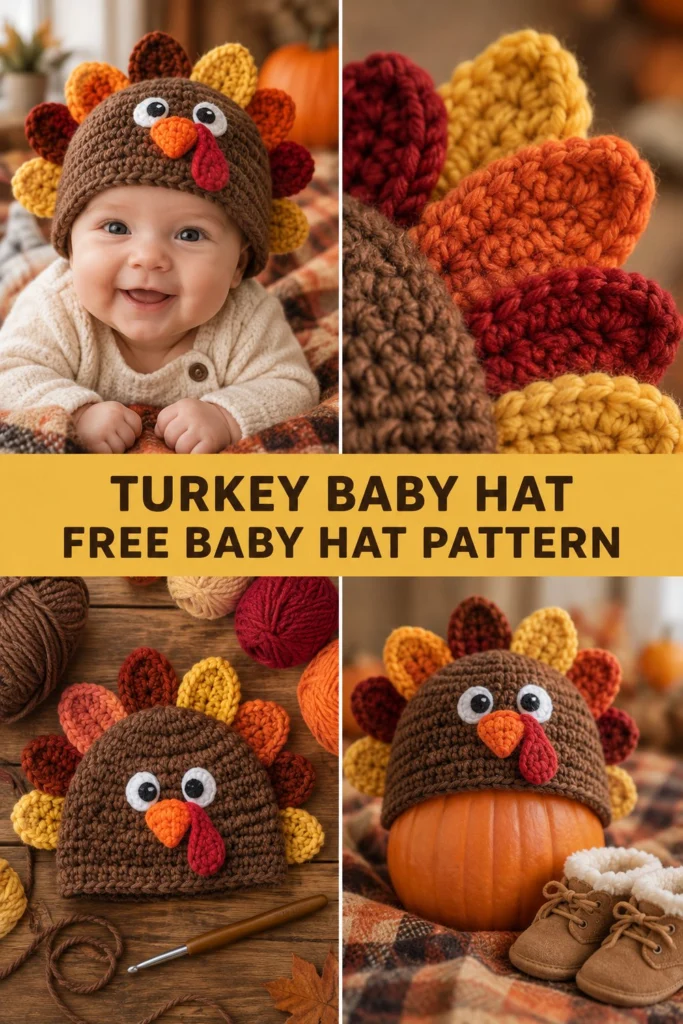
Your little turkey’s first Thanksgiving deserves a hat that is as cozy as it is adorable! This sweet baby hat features a textured brown beanie worked in rounds, finished with a friendly embroidered turkey face, a bright orange beak, a textured red wattle, and a gorgeous fan of colorful autumn tail feathers around the back. Whether you are prepping for family photos or a chilly holiday walk, this free pattern is designed to delight.
Turkey Crochet Baby Hat Free Thanksgiving Pattern
Quick Facts
- Skill level: Intermediate
- Finished size: Newborn (0–3 months, 3–6 months, 6–12 months, 12–24 months)
- Yarn: Worsted weight yarn (Category 4) in Dark Brown, Gold, Orange, Red, and Maroon
- Hook: 4.5 mm (US 7) crochet hook
- Stitches used: Chain (ch), slip stitch (sl st), single crochet (sc), half double crochet (hdc), double crochet (dc), increase (inc), decrease (dec)
- Time to make: 3 to 4 hours
What Makes This Crochet Turkey Baby Hat Special
This hat uses classic amigurumi and beanie techniques to create a sturdy, comfortable fit that holds its shape. The main beanie is worked seamlessly from the crown down in half double crochet stitches for a dense, wind-blocking fabric. The turkey features layered, textured tail feathers crocheted separately and stitched securely to the back, while the front showcases sweet embroidered eyes, a dimensional folded beak, and a dangling wattle.
Skill Level
- Working in the round and in rows
- Basic increasing and decreasing
- Simple surface embroidery and assembly
- Changing colors neatly
Finished Measurements
| Size | Head Circumference | Hat Height |
|---|---|---|
| Newborn | 13–14 in (33–35.5 cm) | 5 in (12.5 cm) |
| 0–3 Months | 14–16 in (35.5–40.5 cm) | 5.5 in (14 cm) |
| 3–6 Months | 16–17 in (40.5–43 cm) | 6 in (15 cm) |
| 6–12 Months | 17–19 in (43–48 cm) | 6.5 in (16.5 cm) |
| 12–24 Months | 19–20 in (48–51 cm) | 7 in (18 cm) |
Materials You Will Need
| Material | Details / Color | Quantity |
|---|---|---|
| Yarn A (Main) | Dark Brown (Worsted / Cat 4) | 50–90 yds (45–82 m) |
| Yarn B (Feather 1) | Gold (Worsted / Cat 4) | 15 yds (14 m) |
| Yarn C (Feather 2) | Orange (Worsted / Cat 4) | 15 yds (14 m) |
| Yarn D (Feather 3) | Red (Worsted / Cat 4) | 15 yds (14 m) |
| Yarn E (Feather 4) | Maroon (Worsted / Cat 4) | 15 yds (14 m) |
| Yarn F (Beak) | Bright Orange (Worsted / Cat 4) | 10 yds (9 m) |
| Yarn G (Eyes/Wattle) | White & Dark Brown / Red | Small scraps |
| Hook | 4.5 mm (US 7) crochet hook | 1 |
| Notions | Yarn needle, stitch markers, scissors | As needed |
Yarn Suggestions
- Caron Simply Soft: 100% acrylic, 315 yds per skein. Excellent stitch definition and gentle against baby skin.
- Red Heart Super Saver: 100% acrylic, 364 yds per skein. Durable, washable, and holds vibrant fall colors well.
- Lion Brand Vanna’s Choice: 100% acrylic, 170 yds per skein. A slightly heavier worsted weight that creates wonderfully structured hats.
Gauge
- 16 hdc and 12 rows = 4 in (10 cm) using a 4.5 mm hook.
- Hat Crown Check: Rnds 1 to 4 should measure approximately 3.5 to 4 in (9 to 10 cm) across depending on size.
Abbreviations
- ch: chain
- sl st: slip stitch
- sc: single crochet
- hdc: half double crochet
- dc: double crochet
- inc: 2 hdc (or sc) in the same stitch
- dec: work 2 stitches together (hdc2tog or sc2tog)
- st(s): stitch(es)
- rnd(s): round(s)
- rep: repeat
- FO: fasten off
UK: sc = dc, hdc = htr, dc = tr.
Special Stitches Explained
- Magic Ring: Wrap yarn around your index finger twice, insert hook under loops, pull up a loop, ch 1, and work your first round of stitches into the ring. Pull tail to close.
- Invisible Decrease (invdec): Insert hook into the front loop only of the next two stitches, yarn over, pull through both front loops, yarn over, and pull through remaining two loops on hook.
Pattern Instructions
Beanie Hat (Dark Brown)
Worked in joined rounds from the crown down. Ch 2 at the start of rounds does not count as a stitch.
- Rnd 1: Magic ring, work 8 (8, 9, 10, 10) hdc into ring, join with sl st to first hdc. (8 (8, 9, 10, 10) hdc)
- Rnd 2: Ch 2, 2 hdc in each st around, join. (16 (16, 18, 20, 20) hdc)
- Rnd 3: Ch 2, (1 hdc in next st, inc) rep around, join. (24 (24, 27, 30, 30) hdc)
- Rnd 4: Ch 2, (2 hdc, inc) rep around, join. (32 (32, 36, 40, 40) hdc)
- Rnd 5: Ch 2, (3 hdc, inc) rep around, join. (40 (40, 45, 50, 50) hdc)
- Rnd 6: Ch 2, (4 hdc, inc) rep around, join. (48 (48, 54, 60, 60) hdc)
(For Newborn and 0-3M sizes, skip to straight rounds. For larger sizes, continue increasing every round by adding 6 or 8 sts per round until target circumference is reached). - Rnds 7 to 11 (12, 13, 14, 15): Ch 2, hdc in each st around, join. (48 (48, 54, 60, 60) hdc)
- Final Rnd: Ch 1, sc in each st around, join, FO and weave in ends. (48 (48, 54, 60, 60) sc)
Tail Feathers (Make 2 of each color: Maroon, Red, Orange, Gold)
Worked in rows.
* Row 1: Ch 6, sc in 2nd ch from hook, hdc in next 3 ch, 3 sc in last ch. Working down opposite side of foundation chain: hdc in next 3 ch, sc in last ch, join with sl st to first sc. (12 sts)
* Row 2: Ch 1, turn, sc in first st, inc in next st, hdc in next 2 sts, (inc) x 3 over next 3 sts, hdc in next 2 sts, inc in next st, sc in last st, FO leaving a long tail for sewing. (18 sts)
Beak (Bright Orange)
- Row 1: Ch 5, sc in 2nd ch from hook, hdc in next 2 ch, 3 sc in last ch. Working down opposite side: hdc in next 2 ch, sc in last ch, join. (10 sts)
- Row 2: Ch 1, turn, sc in each st around, join. FO leaving a long tail. (10 sc)
Wattle (Red)
- Row 1: Ch 7, 3 dc in 3rd ch from hook, 3 dc in each remaining ch down to end, FO leaving a long tail. This creates a natural twisting, bumpy wattle shape.
Assembly & Embroidery
- Eyes: Using white yarn and a yarn needle, embroider two small circular patches (about 4–5 sts apart) centered on the front of the beanie between Rnds 5 and 8. Add a tiny black French knot or satin stitch in the center of each white circle for the pupils.
- Beak & Wattle: Sew the folded orange beak just below the embroidered eyes. Position the red wattle overlapping the side of the base of the beak and stitch securely.
- Tail Feathers: Arrange the 8 feathers in a fan shape along the back of the hat (alternating Maroon, Red, Orange, Gold from back center outward). Overlap the bases slightly and whipstitch them securely to the lower-to-middle rows of the back of the beanie.
Size Customization Tips
- Adjusting Length: Add or subtract 1 to 2 straight hdc rounds before the final single crochet border to alter the depth of the hat.
- Adjusting Width: Adjust your hook size up for a looser fit or down for a snugger fit, keeping your tension even.
Care Instructions
Hand wash gently in cool water with mild wool detergent. Do not wring. Lay flat on a towel to dry in its original shape. Do not iron or tumble dry.
FAQ
Can I use safety eyes instead of embroidery?
For babies under 3 years old, safety eyes pose a choking hazard. We strongly recommend embroidering the eyes using yarn or embroidery floss as detailed in the pattern.
How do I change sizes easily?
You can scale this hat up or down by adding or omitting an increase round in the crown section, then adjusting the number of straight hdc rounds to match the desired height.
What if my gauge is too tight?
If your stitches are too compact and the hat measures smaller than the table, switch up to a 5.0 mm (US H/8) hook. If it’s too loose, drop down to a 4.0 mm hook.