











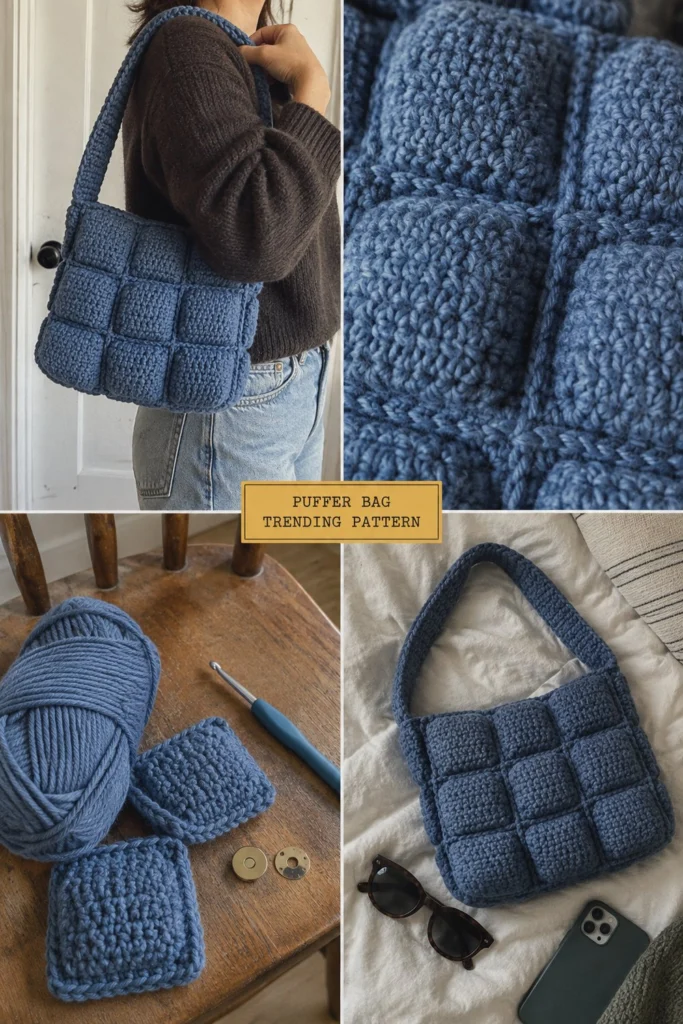
Puffer bags are everywhere this season, and this crochet version gives you that cozy, quilted look without needing any batting at all. By working two layers together and joining them in a grid, every square puffs out into a plush little pillow. Crocheted in a rich denim blue cotton, it is the ultimate weekend project that pairs effortlessly with your favorite jeans.
Free Crochet Puffer Bag Pattern: Puffy Quilted Look, No Batting
Quick Facts
- Skill level: Intermediate
- Finished size: 11 inches wide by 9 inches high by 3 inches deep (28 cm x 23 cm x 8 cm)
- Yarn: Worsted weight cotton yarn (Category 4), approx. 650 yards (595 meters)
- Hook: US H/8 (5.0 mm) crochet hook
- Stitches used: Chain (ch), single crochet (sc), half double crochet (hdc), slip stitch (slip st)
- Time to make: 6 to 8 hours
Size tips and customization options are included further down the page.
What Makes This Crochet Puffer Bag Special
This bag gets its signature pillowy texture from a clever double-layer construction. Instead of sewing separate squares together or using quilt batting, you work front and back panels simultaneously using half double crochet, then trap air pockets inside by slip-stitching a precise grid right through both layers. A sturdy single crochet strap and a hidden magnetic snap finish the piece for a polished, store-bought look.
Skill Level
- Working with two panels simultaneously and slip-stitching through both layers
- Maintaining even tension across grid lines
- Sewing a magnetic snap securely to crochet fabric
Don’t worry if you haven’t made a double-layered bag before—the step-by-step instructions below walk you through every join.
Finished Measurements
| Dimension | Inches | Centimeters |
|---|---|---|
| Width | 11 in | 28 cm |
| Height | 9 in | 23 cm |
| Depth | 3 in | 8 cm |
| Strap Length | 20 in | 51 cm |
Materials You Will Need
| Material | Color | Weight / Type | Quantity |
|---|---|---|---|
| Yarn | Denim Blue | Worsted (Category 4) 100% Cotton | 650 yards / 595 meters |
| Crochet Hook | – | US H/8 (5.0 mm) | 1 hook |
| Magnetic Snap | Bronze / Antique Brass | 18 mm bag snap | 1 set |
| Tapestry Needle | – | Large eye metal | 1 needle |
| Stitch Markers | Assorted | Locking stitch markers | 4 markers |
Yarn Suggestions
| Yarn Line | Skein Yardage | Notes |
|---|---|---|
| Lion Brand 24/7 Cotton | 186 yds / 170 m per skein (3.5 oz / 100 g) | Excellent stitch definition, mercerized sheen |
| Lily Sugar’n Cream | 120 yds / 109 m per skein (2.5 oz / 71 g) | Soft matte cotton, wide color range |
| Dishie by WeCrochet | 190 yds / 173 m per skein (3.5 oz / 100 g) | Durable tight spin, great for bags |
⚠️ Note: Avoid stretchy acrylic or fuzzy wool yarns for this pattern. Cotton yarn provides the necessary structure and weight so the puffer squares hold their shape without collapsing.
Gauge
- 14 hdc x 12 rows = 4 inches (10 cm) using a 5.0 mm hook.
Abbreviations
- ch: chain
- sc: single crochet
- hdc: half double crochet
- slip st: slip stitch
- st(s): stitch(es)
- rep: repeat
- rnd(s): round(s)
- RS: right side
- WS: wrong side
UK translation note: UK sc = US sc, UK hdc = US hdc, UK dc = US dc. This pattern uses US terms.
Special Stitches Explained
- Double-Layer Slip Stitch Join: Insert hook through the front panel stitch and the corresponding back panel stitch simultaneously, yarn over, pull through both loops on the hook, and pull through the loop on the hook.
Pattern Instructions
Pattern Notes
- The bag is made by creating two identical large flat rectangular panels (Front and Back), then placing them wrong sides together and working horizontal and vertical slip stitch grid lines to form the puffed pockets.
- Turning chains do not count as stitches unless explicitly stated.
Section 1: Front and Back Panels (Denim Blue, make 2)
Ch 39.
Row 1: Working in the back bumps of the foundation chain, hdc in 3rd ch from hook (skipped 2 ch count as first hdc), hdc in each ch across, turn (38 hdc)
Rows 2 to 36: Ch 2 (does not count as st here and throughout), hdc in each st across, turn (38 hdc)
Fasten off yarn for the Front Panel, leaving a short tail to weave in. Do not fasten off the Back Panel if you prefer, or fasten off both and join fresh yarn for the grid assembly.
✅ Checkpoint: You should have two identical flat rectangles measuring approximately 11 inches wide by 9 inches high.
Section 2: Grid Assembly and Puffer Pockets
Hold the Front Panel and Back Panel together with wrong sides facing inward (matching edges perfectly). Using Denim Blue and a 5.0 mm hook, join yarn through both layers at the bottom left corner.
Horizontal Join 1: Working through both layers simultaneously, work a row of slip stitches evenly across horizontally at Row 12, piercing both panels stitch-for-stitch (38 slip st). Fasten off.
Horizontal Join 2: Join yarn through both layers at Row 24 on the left edge. Slip st through both layers horizontally across (38 slip st). Fasten off.
This creates 3 horizontal sections (each 12 rows high). Now we add vertical joins to complete the 3×3 grid of puffs.
Vertical Join 1: Join yarn through both layers at the bottom edge, aligned 12.6 stitches in from the left edge (approx 1/3 across, align with the column of hdc). Working upwards through both layers, slip st vertically from bottom edge to top edge. Fasten off.
Vertical Join 2: Join yarn at the bottom edge, aligned 25.3 stitches in from the left edge (2/3 across). Slip st vertically through both layers from bottom edge to top edge. Fasten off.
💡 Designer Tip: As you complete the vertical lines, the fabric between the grid lines will naturally bow outward, creating the signature puffer pillowy effect.
Section 3: Side and Bottom Gussets
To give the bag its 3-inch depth, we will add a continuous gusset band around the bottom and sides.
Row 1: Join Denim Blue yarn at the bottom left corner of the joined panels. Working through the outer edge stitches of both panels together, sc evenly around the bottom, right side, and left side (leave the top open), placing 3 sc in each corner to turn smoothly (approx. 84 sc).
Rows 2 to 6: Ch 1, sc in each st around, working 3 sc in each corner point, join with slip st to first sc (approx. 104 sc by Row 6). Fasten off, leaving a 12-inch tail for securing any final ends.
Section 4: Shoulder Strap (Denim Blue, make 1)
Ch 8.
Row 1: Sc in 2nd ch from hook, sc in each ch across, turn (7 sc)
Rows 2 to 70: Ch 1, sc in each st across, turn (7 sc)
Fasten off, leaving a 12-inch tail for sewing.
Section 5: Assembly & Finishing
- Attach Strap: Pin both ends of the shoulder strap securely to the inside top edge of the bag (centered on the left and right sides, about 1.5 inches down from the opening rim). Using the tapestry needle and yarn tails, whipstitch the strap ends firmly to the inside reinforcement rows.
- Install Magnetic Snap: Position the two halves of the 18 mm magnetic snap centered on the inside top rim of the front and back panels (just below the opening edge). Insert the prongs through the crochet stitches, place the metal backing plate over the prongs, and bend the prongs flat. Ensure the snap aligns properly when the bag closes.
- Weaving Ends: Thread all remaining yarn tails onto the tapestry needle and weave them neatly into the wrong side of the fabric.
Size Customization Tips
- To make a wider bag, add multiples of 13 stitches to your starting chain. Each extra column adds one vertical puffer pocket (approx. 3.6 inches of width).
- To make a taller bag, add multiples of 12 rows to the panel height for an extra row of puffy squares.
Care Instructions
Hand wash gently in cool water with mild detergent. Press out excess water in a clean towel (do not wring or twist). Lay flat to dry in its natural shape. Do not iron or dry clean.
FAQ
Can I use acrylic yarn instead of cotton?
Cotton is strongly recommended because its lack of stretch helps the puffer pockets hold their shape. Acrylic yarn tends to stretch out and sag under the weight of the double layers.
Do I really not need batting inside the squares?
That is correct! The tension created by slip-stitching the two flat panels together in a grid traps air inside each compartment, making them puff up naturally like little pillows.
How do I wash this bag safely?
Because of the magnetic snap and lack of internal wire frames, hand washing in cool water and laying flat to dry is the best way to keep your puffer bag looking brand new.
Happy Crocheting!
I hope you love making your new puffer bag as much as I loved designing it. Save this pin on Pinterest to your favorite crochet boards, and leave a comment below letting me know what color denim blue you chose!
📄 Your free PDF pattern