











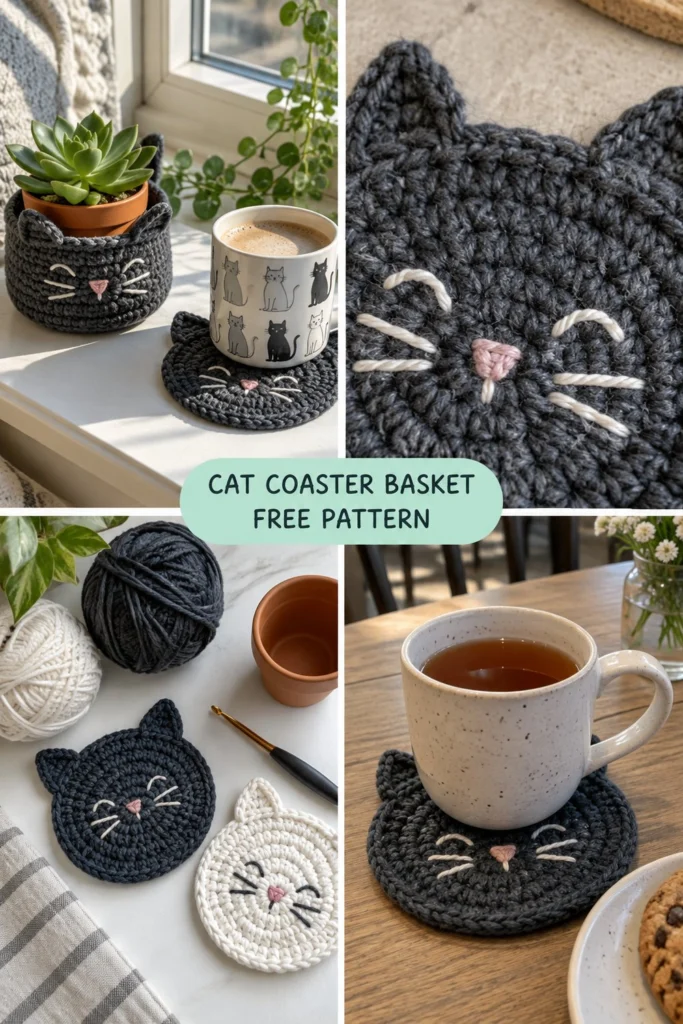
Add a touch of handmade feline charm to your home with this versatile crochet cat project! Stop after the flat base to create a darling drink coaster complete with pointed ears and embroidered whiskers, or keep going up to build a clever little basket sized just right for a small succulent or desk supplies.
Cute Crochet Cat Coaster – Free Pattern (Folds Into a Plant Basket)
Quick Facts
- Skill level: Easy Beginner
- Finished size: Coaster: 4.5 inches (11.5 cm) across; Basket: 4.5 inches wide by 3 inches (7.5 cm) high
- Yarn: Worsted weight cotton yarn in Charcoal Grey (Main Color) and a small scrap of Light Pink and White for the face embroidery
- Hook: US G/6 (4.0 mm) crochet hook
- Stitches used: Ch, sl st, sc, inc, BLO (Back Loop Only)
- Time to make: 1 to 2 hours per coaster/basket
Size customization tips and adjustments are included further down in the guide.
What Makes This Cat Coaster and Basket Special
This clever pattern uses a classic flat circle base that transforms into a 3D plant pot cover simply by working a single round in the back loops only. The pointed ears are built directly onto the final edge using simple shaping, and delicate embroidered features bring the sweet kitty face to life. The sturdy cotton yarn holds its shape beautifully whether flat on your table or holding your favorite mini plant.
Skill Level
- Basic crochet stitches (chain, single crochet, slip stitch)
- Working in continuous spiral rounds
- Working into the back loop only (BLO) to create a sharp edge
- Simple surface embroidery (straight stitch and satin stitch)
You don’t need any advanced techniques to complete this project—if you can make a flat circle, you can make this cute cat!
Finished Measurements
| Dimension | Coaster Size | Basket Size |
|---|---|---|
| Diameter | 4.5 in (11.5 cm) | 4.5 in (11.5 cm) |
| Height | 0.25 in (0.6 cm) | 3.0 in (7.5 cm) |
Materials You Will Need
| Material | Color / Description | Quantity |
|---|---|---|
| Worsted Weight Cotton Yarn | Charcoal Grey (MC) | approx. 45 yards (41 meters) |
| Worsted Weight Cotton Yarn | Light Pink (Scrap for nose) | 1 yard (1 meter) |
| Worsted Weight Cotton Yarn | White (Scrap for whiskers) | 2 yards (2 meters) |
| Crochet Hook | US G/6 (4.0 mm) | 1 hook |
| Notions | Tapestry needle, scissors, stitch marker | As needed |
Yarn Suggestions
| Yarn Line | Weight | Notes |
|---|---|---|
| Lily Sugar’n Cream | Worsted (4) | 100% cotton, firm structure, great stitch definition |
| Bernat Handicrafter Cotton | Worsted (4) | 100% cotton, sturdy and machine washable |
| Drops Paris | Worsted (4) | Soft unmercerized cotton, works up smoothly |
⚠️ Note: Avoid stretchy acrylic yarns for this project. Cotton yarn is recommended because it provides the stiffness needed for the basket walls to stand upright and protects tabletops from moisture.
Gauge
- Rnds 1 to 5 of the flat circle = 3.5 inches (9 cm) across using a 4.0 mm hook.
- Exact gauge is not critical for this project, but maintaining consistent tension ensures the basket walls stand up straight.
Abbreviations
- ch = chain
- sl st = slip stitch
- sc = single crochet
- inc = single crochet 2 in the same stitch (increase)
- BLO = back loop only
- st(s) = stitch(es)
- Rnd(s) = round(s)
- MC = main color (Charcoal Grey)
- [ ] = repeat instructions between brackets as directed
UK Conversion Note: UK terms use double crochet (dc) for US single crochet (sc).
Special Stitches Explained
- Magic Ring: Wrap yarn around your index finger twice to create a ring, insert hook into the ring, pull up a loop, ch 1, and work the required number of sc into the ring. Pull the tail to close securely.
- Back Loop Only (BLO): When instructed to work in the BLO, insert your hook under only the back loop of the designated stitch, leaving the front loop free to create a ridge.
Pattern Instructions
💡 Designer Tip: Work in continuous spiral rounds without joining with a slip stitch unless instructed. Place a stitch marker in the first stitch of each round and move it up as you go.
Section 1: Coaster / Basket Base (Charcoal Grey, make 1)
Rnd 1: Start 6 sc in a magic ring (6 sc)
Rnd 2: [inc] x 6 (12 sc)
Rnd 3: [1 sc, inc] x 6 (18 sc)
Rnd 4: [2 sc, inc] x 6 (24 sc)
Rnd 5: [3 sc, inc] x 6 (30 sc)
Rnd 6: [4 sc, inc] x 6 (36 sc)
Rnd 7: [5 sc, inc] x 6 (42 sc)
✅ Checkpoint: At the end of Rnd 7, your flat circle should measure about 4.5 inches across and lie completely flat.
If making the Coaster version: Skip to Section 2 (Ear Shaping).
If making the Basket version: Proceed to Section 3 (Basket Walls).
Section 2: Ear Shaping for Coaster
Note: If you just finished Rnd 7 of the base, continue directly into the ears here.
Ear 1:
– Row 1 (Right Side): Working along the edge of the circle, sc in next 4 sts, turn (4 sc)
– Row 2: Dec, dec, turn (2 sc)
– Row 3: Dec, fasten off leaving a 6-inch tail (1 sc).
Ear 2:
– Skip 13 unworked stitches along the outer edge of Rnd 7, attach Charcoal Grey in the 14th stitch.
– Row 1 (Right Side): sc in next 4 sts, turn (4 sc)
– Row 2: Dec, dec, turn (2 sc)
– Row 3: Dec, fasten off leaving a 6-inch tail (1 sc).
Section 3: Basket Walls (Charcoal Grey, continue from Rnd 7)
Rnd 8: Working in BLO only, sc in each st around (42 sc)
Rnds 9 to 14: sc in each st around (42 sc) (6 straight rounds)
Forming Basket Ears:
– Ear 1: sc in next 4 sts, turn (4 sc)
– Row 2: Dec, dec, turn (2 sc)
– Row 3: Dec, fasten off (1 sc).
– Ear 2: Skip 13 unworked stitches along the top edge of Rnd 14, attach Yarn in the 14th stitch. sc in next 4 sts, turn (4 sc)
– Row 2: Dec, dec, turn (2 sc)
– Row 3: Dec, fasten off (1 sc).
Section 4: Face Embroidery (All versions)
- Nose: Using Light Pink yarn and a tapestry needle, embroider a small triangular nose centered between Rnds 4 and 5, about 3 stitches wide. Fill it in with satin stitches.
- Eyes: Using White yarn, embroider two upward-curving crescent eyes or simple closed curved eyes on either side of the nose, positioned one round above the nose.
- Whiskers: Using White yarn, stitch three short straight whiskers radiating outward on each cheek extending from Rnds 4 and 5.
- Secure all yarn ends neatly on the wrong side of the work and trim.
Size Customization Tips
- To make a larger coaster or wider base, continue the circular increase rounds (+6 stitches per round) for as many rounds as desired before working the ear shaping or basket walls.
- Each additional increase round adds approximately 0.75 inches (2 cm) to the total diameter.
Care Instructions
- Hand wash in cool water with mild soap, or machine wash on a gentle cycle in a mesh laundry bag.
- Reshape while damp and allow to air dry completely on a flat surface. Do not tumble dry.
FAQ
Can I use acrylic yarn instead of cotton?
While you can use acrylic, cotton yarn is strongly recommended because it is stiffer, moisture-absorbent for a coaster, and helps the basket walls stand upright without collapsing.
How do I stop the basket from leaning sideways?
Make sure your tension is even throughout the straight rounds (Rnds 9 to 14). Giving the finished basket a light steam or blocking it with a small jar inside will help set the crisp vertical shape.
Are safety eyes safe for children’s toys?
Safety eyes are not recommended for items intended for children under 3 years old. For this pattern, embroidered yarn eyes are used instead, making it entirely child- and pet-safe!
Happy Crocheting!
I hope you enjoyed making this sweet cat coaster and basket set! Be sure to save this pin on Pinterest to share with your crafting friends, and leave a comment below letting me know what color kitty you decided to create. Happy crafting!
📄 Your free PDF pattern