











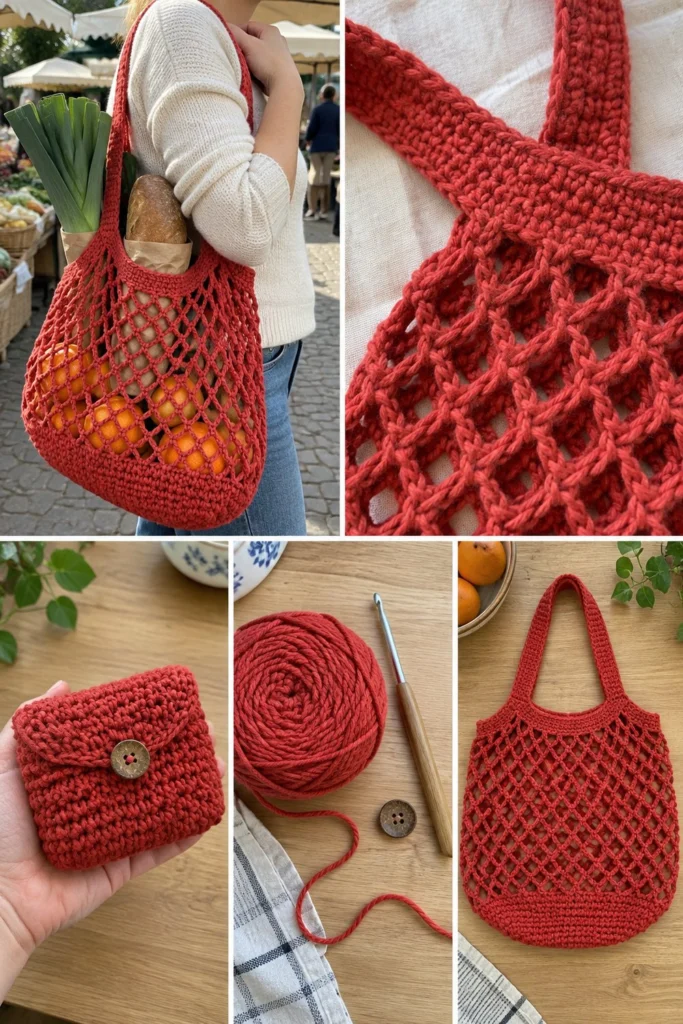
Crochet is wonderful because with just a hook and a skein of yarn, you can create something both beautiful and incredibly practical for your daily life. This foldable crochet market tote is designed to go everywhere with you, weighing almost nothing and folding down into its own tiny attached pouch that buttons shut right inside your bag.
Foldable Crochet Market Tote – Free Pattern (Fits in Your Purse)
Quick Facts
- Skill level: Intermediate
- Finished size: 13 inches (33 cm) wide x 15 inches (38 cm) high (excluding handles); handles measure 20 inches (51 cm) long
- Yarn: Red Heart Super Saver (100% acrylic, 7 oz / 198 g, 364 yards / 333 meters) in Cherry Red, 1 skein
- Hook: US H/8 (5.0 mm) crochet hook
- Stitches used: ch, sl st, sc, dc, inc, dec
- Time to make: A weekend project (approx. 6–8 hours)
Size customization tips are included further down in this guide.
What Makes This Market Tote Special
This bag features a sturdy, flat oval single crochet base that prevents items from sagging or falling through. The main body is built using an open mesh net structure made from alternating chain spaces and single crochets, giving it amazing stretch so it can expand around a full shop of groceries, bread, and produce. A firm single crochet band tops the bag, seamlessly transitioning into strong, non-stretching handles. Finally, a small accompanying button pouch is sewn inside the top edge, designed so the entire tote neatly folds up and buttons securely inside your purse.
Skill Level
- Working in joined rounds and continuous rounds
- Basic increasing and decreasing
- Creating chain-space mesh networks
- Simple sewing to attach handles and pouch
- Working buttonholes and attaching buttons
Don’t worry if you haven’t made a net bag before; every step is explained clearly below!
Finished Measurements
| Measurement | Inches | Centimeters |
|---|---|---|
| Tote Width (laid flat) | 13 in | 33 cm |
| Tote Height (excluding handles) | 15 in | 38 cm |
| Handle Length | 20 in | 51 cm |
| Pouch Size (folded open) | 4.5 in x 4.5 in | 11.5 cm x 11.5 cm |
Materials You Will Need
| Item | Description | Quantity / Amount |
|---|---|---|
| Yarn | Red Heart Super Saver (Cherry Red) | 1 skein (approx. 300 yards used) |
| Crochet Hook | US H/8 (5.0 mm) | 1 hook |
| Notions | 1 wooden button (approx. 1 inch / 25 mm wide) | 1 button |
| Notions | Tapestry needle for weaving ends | 1 needle |
| Notions | Stitch markers | 4 markers |
| Notions | Scissors | 1 pair |
Yarn Suggestions
| Yarn Line | Weight | Yardage per Skein | Notes |
|---|---|---|---|
| Red Heart Super Saver | 4 – Medium / Aran | 364 yds / 333 m | Durable, sturdy, holds its shape well. |
| Lion Brand Vanna’s Choice | 4 – Medium / Aran | 170 yds / 156 m | Soft acrylic; buy 2 skeins. |
| Bernat Super Value | 4 – Medium / Aran | 426 yds / 389 m | Excellent yardage, great stitch definition. |
⚠️ Note: Avoid novelty yarns, fuzzy mohair, or overly stretchy bamboo blends for this project. You need a sturdy worsted-weight acrylic or cotton yarn that will not sag under the weight of groceries.
Gauge
- Base Gauge: 16 sc x 18 rows = 4 in / 10 cm using a 5.0 mm hook.
- Net Body Gauge: 4 mesh repeats (ch 5, sc) x 4 rounds = 4 in / 10 cm.
Abbreviations
- ch: chain
- sl st: slip stitch
- sc: single crochet
- dc: double crochet
- inc: 2 sc in the same stitch
- dec: single crochet 2 stitches together (decrease)
- st(s): stitch(es)
- sp(s): space(s)
- sk: skip
- Rnd(s): round(s)
- Row(s): row(s)
- BLO: back loop only
- PM: place stitch marker
UK Terms Translation: sc = dc, hdc = htr, dc = tr.
Special Stitches Explained
- Magic Ring: Wrap yarn around your index finger twice, insert hook under both strands, pull up a loop, chain 1, and work the first round of stitches into the ring. Pull the tail to close tightly.
- Net Mesh Pattern: Created by working
ch 5, scinto the designated stitch or chain-space from the previous round, forming open diamond loops.
Pattern Instructions
Section 1: Tote Base
Working in joined rounds. Do not turn at the end of rounds unless specified; join each round with a sl st to the first st and ch 1.
* Foundation: Ch 30.
* Rnd 1: Work 2 sc in 2nd ch from hook, sc in next 27 chs, 4 sc in last ch. Working along the opposite side of the foundation chain, sc in next 27 chs, 2 sc in last ch. Join with sl st to first sc. (62 sc)
* Rnd 2: Ch 1, inc in first 2 sts, sc in next 27 sts, inc in next 4 sts, sc in next 27 sts, inc in last 2 sts. Join. (70 sc)
* Rnd 3: Ch 1, (1 sc, inc) twice, sc in next 27 sts, (1 sc, inc) 4 times, sc in next 27 sts, (1 sc, inc) twice. Join. (78 sc)
* Rnd 4: Ch 1, (2 sc, inc) twice, sc in next 27 sts, (2 sc, inc) 4 times, sc in next 27 sts, (2 sc, inc) twice. Join. (86 sc)
* Rnd 5: Ch 1, sc in each st around in BLO. Join. (86 sc)
* Rnds 6 to 7: Ch 1, sc in each st around. Join. (86 sc)
✅ Checkpoint: Your base should now measure approximately 11 inches long and 4 inches wide, forming a firm oval cup that sits flat.
Section 2: Net Body
- Rnd 8: Ch 1, sc in first st, ch 5, sk 3 sts, sc in next st around, ending with ch 2, dc in first sc to join (this places your working yarn in the center of the first ch-5 space). (42 sts total counting 21 ch-5 spaces and 21 sc)
- Rnd 9: Ch 1, sc in same ch-sp, ch 5, sc in next ch-5 sp around, ending with ch 2, dc in first sc to join. (42 sts total counting 21 ch-5 spaces and 21 sc)
- Rnds 10 to 22: Repeat Rnd 9 for 13 more rounds. (42 sts total counting 21 ch-5 spaces and 21 sc each round)
Section 3: Top Band and Handles
- Rnd 23: Ch 1, work 3 sc in each ch-5 sp around and 1 sc in each sc from the previous round. Join with sl st. (86 sc)
- Rnds 24 to 26: Ch 1, sc in each st around. Join. (86 sc)
- Rnd 27 (Handle Foundation): Sc in next 8 sts, ch 65, skip next 27 sts, sc in next 16 sts, ch 65, skip next 27 sts, sc in last 8 sts. Join. (48 sc, 130 chs)
- Rnd 28: Ch 1, sc in each sc and 1 sc in each ch across the handle chains. Join. (178 sc)
- Rnds 29 to 31: Ch 1, sc in each st around. Join. (178 sc)
Fasten off, weave in all ends securely.
Section 4: Attached Pouch
Worked in turned rows.
* Foundation: Ch 16.
* Row 1: Sc in 2nd ch from hook and in each ch across, turn. (15 sc)
* Rows 2 to 24: Ch 1, sc in each st across, turn. (15 sc)
* Row 25 (Buttonhole Row): Ch 1, sc in next 6 sts, ch 3, sk 3 sts, sc in last 6 sts, turn. (12 sc, 3 chs)
* Row 26: Ch 1, sc in each st and work 3 sc into the ch-3 sp, turn. (15 sc)
* Row 27: Ch 1, sc in each st across. Fasten off, leaving a 12-inch tail.
Assembly and Finishing
- Pouch Attachment: Fold the bottom 18 rows of the pouch upward to form a small pocket flap. Sew the side seams of the pouch using the yarn tail. Attach the top back edge of the pouch securely to the inside top band of the market tote (around Rnd 25) so it hangs inside the bag.
- Button Placement: Sew the wooden button onto the front flap of the pouch, aligning it with the buttonhole created in Row 25.
- Blocking: Lightly steam or damp-block the base and top band of the tote to ensure crisp lines. The net body will naturally stretch and relax with use.
Size Customization Tips
- To make the bag wider: Increase the starting chain length in multiples of 4, and adjust the oval base rounds accordingly. Keep the total stitch count divisible by 4 so the net body ch-5 repeats align evenly.
- To make the bag deeper: Simply work more rounds in Section 2 (Net Body) before starting the top band. Each extra 2 rounds adds about 1.5 inches to the depth.
Care Instructions
Machine wash gentle in cold water inside a mesh laundry bag. Lay flat to shape and air dry. Do not bleach or iron.
FAQ
Can I use cotton yarn instead of acrylic?
Yes! 100% cotton yarn like Lily Sugar’n Cream or Bernat Handicrafter is a fantastic, eco-friendly choice for market bags because it has zero stretch and handles heavy produce effortlessly.
How do I fold the bag into the pouch?
Simply lay the tote flat, fold the handles inward, roll the mesh body tightly from the bottom up toward the top band, and tuck the entire rolled bag inside the attached pouch, then button it shut!
Is this pattern suitable for complete beginners?
While it has some intermediate shaping on the base and handles, an ambitious beginner who knows basic single crochet and chains can easily complete this by following the step-by-step instructions.
Happy Crocheting!
I hope you love making and using your new foldable market tote! It is a wonderful eco-friendly companion for farmer’s markets, grocery runs, and spontaneous shopping trips. Save this pattern to your Pinterest board, and leave a comment below sharing what color yarn you are using for yours!
📄 Your free PDF pattern