











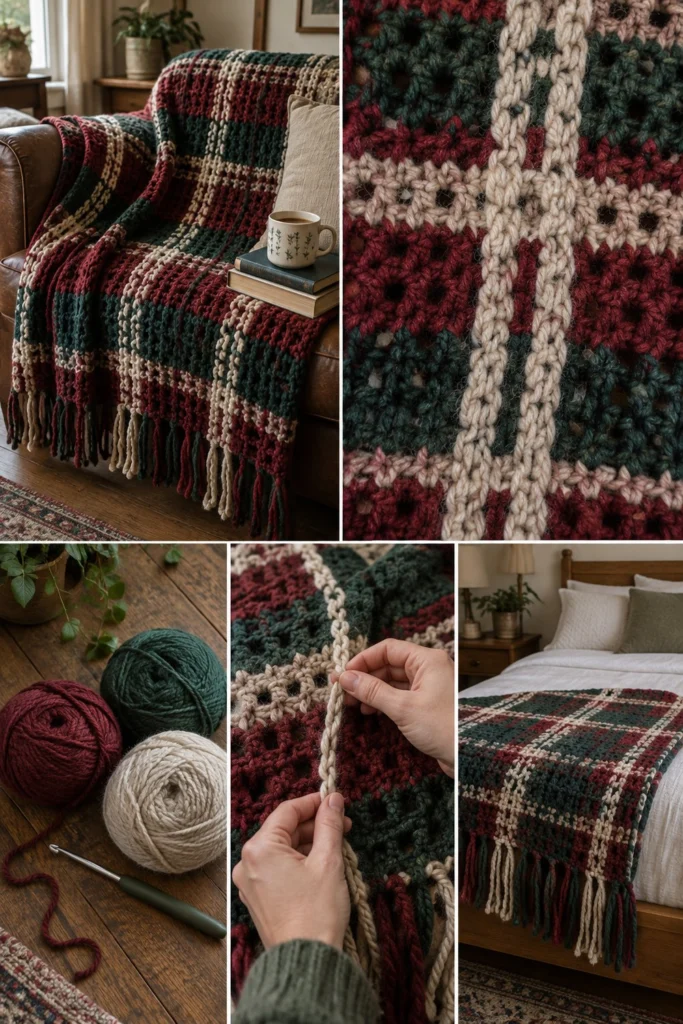
Nothing beats wrapping yourself in a handmade tartan throw when the cold weather sets in. This classic Christmas cabin blanket combines a traditional woven look with a straightforward crochet technique that results in a wonderfully thick, heirloom-quality piece.
Free Crochet Plaid Blanket Pattern: Tartan Look With Woven Stripes
Quick Facts
- Skill level: Intermediate
- Finished size: 120 cm x 150 cm (approx. 47 in x 59 in) excluding fringe
- Yarn: Chunky weight (Bulky / #5) yarn in Cranberry, Forest Green, and Oatmeal
- Hook: 6.5 mm (US K/10.5) crochet hook
- Stitches used: Ch, sc, dc, sk
- Time to make: Approx. 25–35 hours
Size adjustment tips are included further down in the guide.
What Makes This Crochet Plaid Blanket Special
Real tartan is woven on a loom, and this blanket mimics that exact structure by separating the process into two stages. First, you crochet a horizontal mesh foundation featuring alternating color stripes of cranberry, forest green, and oatmeal using double crochet and chain spaces. Next, you create long chains separately and weave them vertically up through the mesh chain spaces. This ingenious technique traps the long strands in place to create a true woven plaid effect without difficult color-work intarsia. A hand-tied chunky fringe finishes both short edges for that cozy cabin throw aesthetic.
Skill Level
- Working rows back and forth with color changes
- Creating chain spaces (mesh)
- Foundation chain and basic crochet stitches (ch, sc, dc)
- Simple surface weaving (pulling chains through existing mesh)
- Making and attaching fringe
Don’t worry if weaving sounds unfamiliar—the step photos and instructions below make it simple to follow.
Finished Measurements
| Dimension | Metric | Imperial |
|---|---|---|
| Width | 120 cm | 47 in |
| Length (excluding fringe) | 150 cm | 59 in |
| Fringe Length | 15 cm | 6 in |
Materials You Will Need
| Color Name | Yarn Type / Weight | Skeins / Amount | Yardage / Metrage |
|---|---|---|---|
| Cranberry | Bulky / Chunky (#5) | 6 skeins | 750 yds / 685 m |
| Forest Green | Bulky / Chunky (#5) | 5 skeins | 625 yds / 570 m |
| Oatmeal | Bulky / Chunky (#5) | 3 skeins | 375 yds / 345 m |
- Hook: 6.5 mm (US K/10.5) crochet hook
- Notions: Tapestry needle for weaving ends, sharp scissors, measuring tape, locking stitch markers
Yarn Suggestions
| Yarn Line | Weight | Skein Yardage | Notes |
|---|---|---|---|
| Lion Brand Hue + Me | Bulky (#5) | 137 yds / 125 m per 125g | Excellent stitch definition and gorgeous rich tones |
| Bernat Softee Chunky | Bulky (#5) | 108 yds / 99 m per 100g | Soft, budget-friendly, and machine washable |
| Paintbox Yarns Wool Mix Chunky | Bulky (#5) | 142 yds / 130 m per 100g | Lovely warmth with a classic woolly look |
⚠️ Note: Avoid novelty fuzzy yarns or lightweight DK/worsted yarns for this pattern. You need a true bulky weight yarn with good stitch structure so the mesh supports the woven vertical stripes without sagging.
Gauge
- 10 pattern blocks (each [dc, ch 1, sk 1]) x 9 rows = 10 cm x 10 cm (4 in x 4 in) using a 6.5 mm hook.
- Check your gauge: Making a small swatch before starting ensures your blanket dimensions match the final size.
Abbreviations (US Terms)
- ch = chain
- dc = double crochet
- rep = repeat
- sc = single crochet
- sk = skip
- sl st = slip stitch
- st(s) = stitch(es)
- YO = yarn over
- UK terms conversion: sc = dc, dc = tr.
Special Stitches Explained
There are no complex specialty stitches in this blanket! All work relies on standard double crochets, chain stitches, and simple surface weaving.
Pattern Instructions
Pattern Notes
- The turning chain 3 at the beginning of rows counts as a double crochet.
- Color changes happen at the end of designated stripe sections; carry yarn loosely up the side edge when changing rows within the same section.
- Vertical stripe chains are worked separately and woven in after the blanket body is complete.
Section 1: Blanket Foundation Mesh
Using Oatmeal, ch 121.
Row 1: Working in 4th ch from hook (counts as first dc and ch-1 space), *dc in next ch, ch 1, sk next ch; rep from * across to last ch, dc in last ch. Turn. *(119 total st count equivalent: 60 dc, 59 ch-1 spaces)*
Row 2: Ch 3 (counts as first dc here and throughout), sk first ch-1 space, *dc in next dc, ch 1, sk next ch-1 space; rep from * across, dc in top of turning ch-3. Turn. *(119 total st count equivalent: 60 dc, 59 ch-1 spaces)*
Rows 3 to 6: Rep Row 2 in Oatmeal. Fasten off Oatmeal. (119 total st count equivalent per row)
Cranberry Section
Join Cranberry at the beginning of Row 7.
Row 7: Ch 3, sk first ch-1 space, *dc in next dc, ch 1, sk next ch-1 space; rep from * across, dc in top of turning ch-3. Turn. *(119 total st count equivalent: 60 dc, 59 ch-1 spaces)*
Rows 8 to 18: Rep Row 7 in Cranberry. Fasten off Cranberry. (119 total st count equivalent per row)
Oatmeal Stripe Accent
Join Oatmeal at the beginning of Row 19.
Rows 19 to 20: Rep Row 2 in Oatmeal. Fasten off Oatmeal. (119 total st count equivalent per row)
Forest Green Section
Join Forest Green at the beginning of Row 21.
Rows 21 to 31: Rep Row 7 in Forest Green, substituting Forest Green yarn. Fasten off Forest Green. (119 total st count equivalent per row)
Oatmeal Stripe Accent
Join Oatmeal at the beginning of Row 32.
Rows 32 to 33: Rep Row 2 in Oatmeal. Fasten off Oatmeal. (119 total st count equivalent per row)
Cranberry Section
Join Cranberry at the beginning of Row 34.
Rows 34 to 44: Rep Row 7 in Cranberry. Fasten off Cranberry. (119 total st count equivalent per row)
Oatmeal Stripe Accent
Join Oatmeal at the beginning of Row 45.
Rows 45 to 46: Rep Row 2 in Oatmeal. Fasten off Oatmeal. (119 total st count equivalent per row)
Forest Green Section
Join Forest Green at the beginning of Row 47.
Rows 47 to 57: Rep Row 7 in Forest Green. Fasten off Forest Green. (119 total st count equivalent per row)
Oatmeal Stripe Accent
Join Oatmeal at the beginning of Row 58.
Rows 58 to 59: Rep Row 2 in Oatmeal. Fasten off Oatmeal. (119 total st count equivalent per row)
Cranberry Section
Join Cranberry at the beginning of Row 60.
Rows 60 to 70: Rep Row 7 in Cranberry. Fasten off Cranberry. (119 total st count equivalent per row)
Oatmeal Stripe Accent
Join Oatmeal at the beginning of Row 71.
Rows 71 to 72: Rep Row 2 in Oatmeal. Fasten off Oatmeal. (119 total st count equivalent per row)
Forest Green Section
Join Forest Green at the beginning of Row 73.
Rows 73 to 83: Rep Row 7 in Forest Green. Fasten off Forest Green. (119 total st count equivalent per row)
Oatmeal Stripe Accent
Join Oatmeal at the beginning of Row 84.
Rows 84 to 85: Rep Row 2 in Oatmeal. Fasten off Oatmeal. (119 total st count equivalent per row)
Cranberry Section
Join Cranberry at the beginning of Row 86.
Rows 86 to 96: Rep Row 7 in Cranberry. Fasten off Cranberry. (119 total st count equivalent per row)
Oatmeal Final Border Rows
Join Oatmeal at the beginning of Row 97.
Rows 97 to 102: Rep Row 2 in Oatmeal. Fasten off and weave in all horizontal ends. (119 total st count equivalent per row)
Section 2: Woven Vertical Stripes
To create the authentic tartan look, you will now crochet long chain strips and weave them vertically through the mesh holes.
Making the Vertical Chains (make 10):
Using Oatmeal and a 6.5 mm hook, leave a 20 cm (8 in) starting tail, ch 260. Fasten off, leaving a 20 cm (8 in) ending tail.
Weaving the Vertical Stripes:
1. Lay your blanket flat on a large surface, right side facing up.
2. Select vertical column paths aligned with your mesh ch-1 spaces (spacing them evenly across the width—about every 6 mesh holes).
3. Using two strands of your chain together for extra thickness (or single chains depending on your preference; the photo shows double strands pulled together), take a long chain and weave it in an alternating over-and-under pattern from the bottom hem to the top hem through the horizontal ch-1 spaces.
4. Secure the top and bottom ends by tying them neatly around the base stitches or weaving the tails securely into the turning rows on the back of the blanket.
Section 3: Fringe
Making the Fringe Tassels:
1. Cut lengths of Cranberry, Forest Green, and Oatmeal yarn measuring 35 cm (14 in) long.
2. Holding 3 strands together for each fringe bundle, fold them in half to create a loop.
3. Insert your crochet hook from the wrong side to the right side through every 2nd stitch along both the top and bottom blanket edges.
4. Catch the folded loop with your hook and pull it partially through the edge.
5. Draw the loose yarn ends through the loop and pull tight to form a secure lark’s head knot.
6. Trim all fringe ends evenly across both ends so they hang neatly to a length of 15 cm (6 in).
✅ Checkpoint: Lay your finished blanket flat. Check that all vertical woven stripes are pulled straight without puckering the fabric, and that your fringe is trimmed to an even length.
Size Customization Tips
- To make it wider: Foundation chain must be worked in a multiple of 2 stitches + 1 extra stitch. Each 12-stitch increase adds approximately 10 cm (4 in) to the blanket width.
- To make it longer: Add or subtract rows in identical increments within the color sections before adding the final border rows.
Care Instructions
- Hand wash gently in cold water with mild wool detergent, or machine wash on a delicate wool cycle inside a mesh laundry bag.
- Do not bleach or tumble dry.
- Lay flat on a clean towel to dry, shaping the edges and smoothing the woven stripes so they rest flat.
FAQ
Can I use a different yarn weight?
You can use any bulky or super bulky weight yarn, but keep in mind that changing the yarn weight will alter your overall blanket dimensions and gauge. Be sure to adjust your hook size to match the yarn recommendation.
How do I stop the woven vertical chains from shifting?
Once woven from top to bottom, anchor the top and bottom ends securely with a few whip stitches using a tapestry needle on the back side of the blanket hems.
Is this blanket suitable for beginners?
Yes! While the weaving technique looks advanced, it is entirely beginner-friendly because you are simply working basic double crochet mesh rows first and weaving straight chains through them afterward.
Happy Crocheting!
I hope you love creating your new tartan throw blanket as much as I loved designing it. Save this pin on Pinterest to save it for your next cozy crafting weekend, and leave a comment below to let me know what colors you chose for your cabin plaid!
📄 Your free PDF pattern