
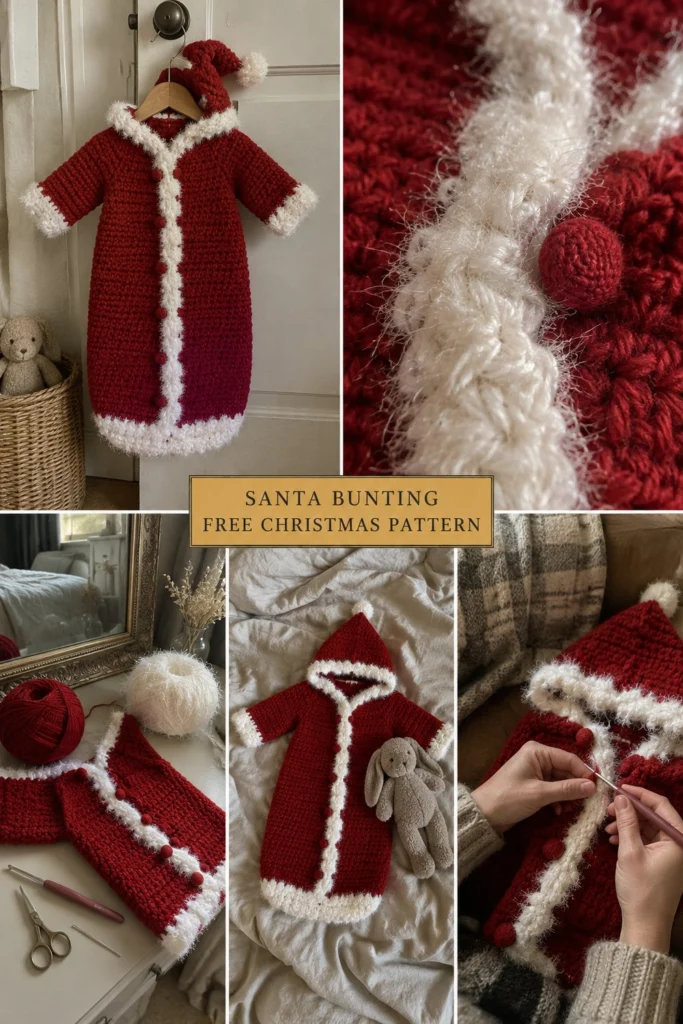
Baby’s very first Christmas photo just got completely adorable. This free crochet pattern makes a candy red and white baby bunting in newborn to 12 months with a fuzzy white trim, attached Santa hood and safe covered button closures down the front.
Free Crochet Baby Santa Bunting Pattern: First Christmas Photo Outfit
Quick Facts
- Skill level: Intermediate
- Finished size: Newborn (3-6 Months, 6-12 Months)
- Yarn: Worsted weight candy red yarn and fluffy eyelash white yarn
- Hook: 5.0 mm (H-8) crochet hook
- Stitches used: ch, sc, hdc, dc, inc, dec
- Time to make: 8 to 12 hours
Size tips and full chest measurements are included further down in the sizing section.
What Makes This Crochet Baby Santa Bunting Special
This charming Santa bunting is designed with little ones in mind, combining festive holiday spirit with practical newborn garment construction. The body is worked from the top down in rich candy red half double crochet for warmth and drape, while the hood grows right out of the neckline shaping. The characteristic fuzzy white trim uses an eyelash yarn worked directly onto the edges and front opening for an authentic Santa coat look without loose shedding fibers. Covered red buttons secure the front overlap securely, framed by matching white loops that keep baby snug and warm during winter photo shoots.
Skill Level
- Working in rows and rounds
- Top-down garment construction
- Simple increases and decreases
- Basic buttonhole loops
- Working with novelty eyelash yarn
Don’t worry if you are new to novelty yarns; the hook placement is clearly guided step by step!
Finished Measurements
| Size | Chest Width | Total Length (Head to Toe) | Sleeve Length | Recommended Age |
|---|---|---|---|---|
| Newborn | 10 in (25 cm) | 20 in (51 cm) | 5 in (13 cm) | 0–3 Months |
| 3-6 Months | 11 in (28 cm) | 22 in (56 cm) | 6 in (15 cm) | 3–6 Months |
| 6-12 Months | 12 in (30 cm) | 24 in (61 cm) | 7 in (18 cm) | 6–12 Months |
Note: Garment has approximately 2 inches of positive ease for comfort over baby clothes.
Materials You Will Need
| Material | Color | Type / Weight | Quantity |
|---|---|---|---|
| Yarn A | Candy Red | Worsted Weight (#4) Acrylic | 400 (450, 500) yds / 365 (410, 455) m |
| Yarn B | Snow White | Eyelash / Furry Novelty Yarn (#4) | 120 (140, 160) yds / 110 (128, 145) m |
| Yarn C | Candy Red (Buttons) | Worsted Weight (#4) Acrylic | Small scraps for 5 covered buttons |
| Hook | — | US H-8 (5.0 mm) Crochet Hook | 1 |
| Notions | — | Tapestry needle, scissors, stitch markers, 5 small flat buttons (0.5 in / 1.3 cm) | — |
Yarn Suggestions
- Caron Simply Soft (Candy Red) paired with Red Heart Holiday (White with Silver): Excellent stitch definition and gentle against baby skin.
- Lion Brand Vanna’s Choice (Scarlet) paired with Lion Brand Go For Faux (Snow Leopard or White): Ultra-soft luxury finish.
⚠️ Note: Avoid scratchy wool blends for infant garments. Stick to washable acrylics and polyester novelty yarns.
Gauge
14 hdc and 11 rows = 4 in (10 cm) using a 5.0 mm hook with Yarn A.
Abbreviations
- ch: chain
- sc: single crochet
- hdc: half double crochet
- dc: double crochet
- inc: increase (work 2 sts in same st)
- dec: decrease (work 2 sts together)
- sl st: slip stitch
- st(s): stitch(es)
- BLO: back loop only
- RS: right side
- WS: wrong side
- rep: repeat
UK conversion: sc = dc, hdc = htr, dc = tr.
Special Stitches Explained
- Fuzzy Trim Edging (Yarn B): Working with eyelash yarn can make individual stitches hard to see; feel for the stitch bumps with your fingers and work standard sc into each indicated space.
- Covered Button: Wrap a small amount of Yarn A tightly around a flat plastic button, securing with sc stitches all around the outer rim until fully covered, then fasten off.
Pattern Instructions
Note: Turning chains 1 and 2 do not count as stitches unless specifically noted. Always join rounds with a sl st to the first st.
Section 1: Hood
Using Yarn A and 5.0 mm hook, ch 42 (46, 50).
Row 1 (RS): Working in back bumps of foundation chain, hdc in 3rd ch from hook (skipped chs count as first hdc), hdc in each ch across, turn (41 (45, 49) hdc).
Rows 2 to 12: Ch 2, hdc in each st across, turn (41 (45, 49) hdc).
Fold the rectangle in half matching the short ends. Seam the back edge of the hood from top down to the neck opening, leaving the bottom straight edge open. Fasten off Yarn A.
Section 2: Bunting Body
With RS facing, join Yarn A at the bottom neck edge of the hood.
Row 1: Ch 2, distribute 46 (50, 54) hdc evenly along the neck opening, turn (46 (50, 54) hdc).
Row 2 (Inc Row): Ch 2, hdc in next 3 sts, inc across, turn (57 (62, 67) hdc).
Rows 3 to 35 (39, 43): Ch 2, hdc in each st across, turn (57 (62, 67) hdc).
At the final row, switch to Yarn B for the bottom hem trim.
Hem Row: Ch 1, sc in BLO of each st across, fasten off (57 (62, 67) sc).
✅ Checkpoint: Total length from hood crown to bottom hem should measure approximately 20 (22, 24) inches.
Section 3: Sleeves (Make 2)
Join Yarn A around one armhole opening on the upper body.
Rnd 1: Ch 2, work 28 (30, 32) hdc evenly around the arm opening, join with sl st (28 (30, 32) hdc).
Rnds 2 to 12 (14, 16): Ch 2, hdc in each st around, join (28 (30, 32) hdc).
Cuff Rnd: Switch to Yarn B, ch 1, sc in BLO of each st around, join, fasten off (28 (30, 32) sc).
Section 4: Front Opening and Hood Trim
Join Yarn B at the bottom right front corner of the bunting.
Row 1: Working up the right front opening, around the hood edge, and down the left front opening, work 120 sc evenly spaced around the entire perimeter. Form 5 evenly spaced button loops (ch 5, skip 1 st) down the right front placket. Fasten off (120 sc).
Section 5: Finishing and Pom-Pom
- Make 1 small pom-pom using Yarn B and attach securely to the tip of the hood.
- Make 5 covered buttons using Yarn C and sew them securely along the left front placket to match the button loops.
- Weave in all loose ends securely on the wrong side using your tapestry needle.
Size Customization Tips
Every extra 5 stitches added to the initial foundation chain adds approximately 1.2 inches to the total chest width. Adjust row counts accordingly for taller babies.
Care Instructions
Hand wash gently in cold water using mild baby detergent. Lay flat to dry on a clean towel. Do not tumble dry or iron the furry trim.
FAQ
Can I use standard worsted weight yarn for the trim instead of eyelash yarn?
Yes, standard white acrylic works fine if you prefer a classic smooth look, though eyelash yarn provides the authentic fluffy Santa texture shown in the photo.
How do I adjust this pattern for a newborn preemie?
Decrease the starting chain for the hood to 36 stitches and work 4 fewer rows on the body length.
For babies under 3 years old, securely sewn fabric-covered buttons or embroidered knots are always recommended instead of hard plastic buttons to prevent choking hazards.
Happy Crocheting!
I hope you love making this adorable holiday bunting as much as I loved designing it for you. Be sure to save this pattern to your Pinterest board and leave a comment below sharing what holiday colors you chose!
📄 Your free PDF pattern