
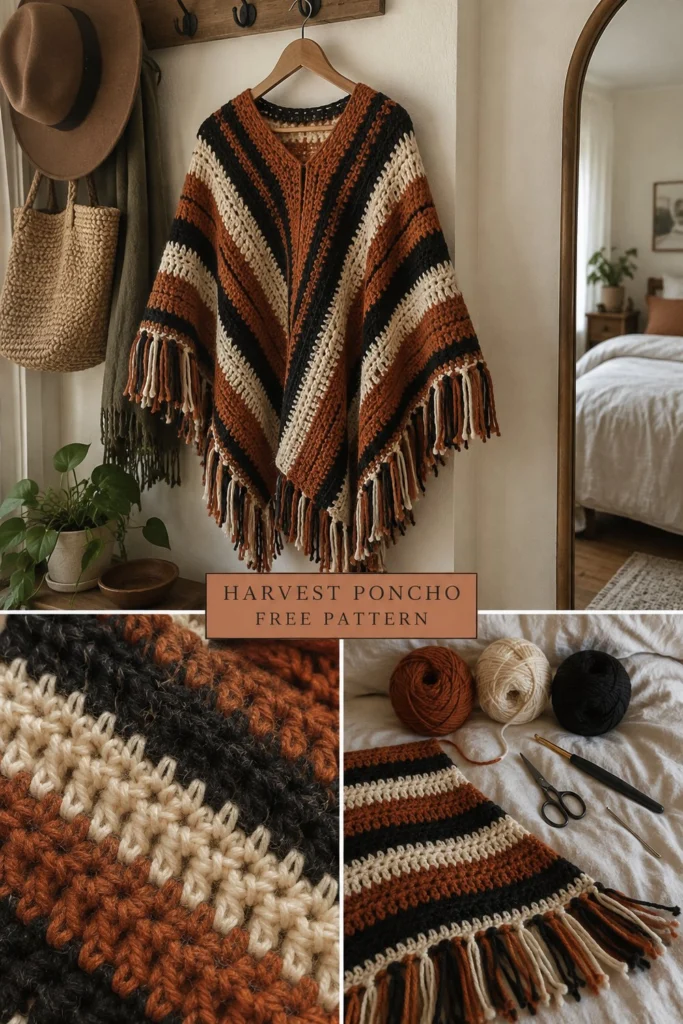
Wrap yourself in the rustic warmth of the changing seasons with this easy handmade layer. Featuring rich stripes of burnt orange, deep black, and soft cream, this garment brings cozy autumn style to any wardrobe.
Free Crochet Harvest Poncho Pattern: Two Rectangles, Fall Colors
Quick Facts
- Skill level: Easy Beginner
- Finished size: Sizes S (M, L, XL, 2XL, 3XL) — designed with generous, comfortable drape
- Yarn: Worsted weight (#4) acrylic/wool blend in Burnt Orange, Black, and Cream
- Hook: US J/10 (6.0 mm) crochet hook
- Stitches used: Chain (ch), Half Double Crochet (hdc), Slip Stitch (sl st)
- Time to make: Weekend project (approx. 10–12 hours)
Size tips and customization options are included further down the page.
What Makes This Crochet Harvest Poncho Special
This poncho is built using a clever, beginner-friendly construction: two identical rectangular panels worked flat in simple half double crochet stripes. By seaming the top edge of one rectangle to the side edge of the other, you create an effortless asymmetrical drape with a stunning chevron-like visual effect. Long, textured fringe along the lower edges adds a classic bohemian finish that moves beautifully as you walk.
Skill Level
- Basic crochet stitches (chain, half double crochet)
- Working in rows and changing colors
- Basic seaming with a yarn needle
- Applying knotted fringe
💡 Designer Tip: If you are new to color changes, carry your unused yarn loosely along the side edges when working short stripe sections to weave in fewer ends later!
Finished Measurements
| Size | Width Across Shoulders (in / cm) | Total Length (in / cm) |
|---|---|---|
| S | 22 in / 56 cm | 26 in / 66 cm |
| M | 24 in / 61 cm | 27 in / 68 cm |
| L | 26 in / 66 cm | 28 in / 71 cm |
| XL | 28 in / 71 cm | 29 in / 74 cm |
| 2XL | 30 in / 76 cm | 30 in / 76 cm |
| 3XL | 32 in / 81 cm | 31 in / 79 cm |
Materials You Will Need
| Material | Description | Amount / Details |
|---|---|---|
| Yarn A | Burnt Orange (Worsted Weight #4) | Approx. 450 (500, 550, 600, 650, 700) yards / 410 (457, 503, 548, 594, 640) meters |
| Yarn B | Black (Worsted Weight #4) | Approx. 350 (400, 450, 500, 550, 600) yards / 320 (365, 411, 457, 503, 548) meters |
| Yarn C | Cream (Worsted Weight #4) | Approx. 350 (400, 450, 500, 550, 600) yards / 320 (365, 411, 457, 503, 548) meters |
| Hook | US J/10 (6.0 mm) crochet hook | Standard crochet hook |
| Notions | Tapestry needle, measuring tape, locking stitch markers, sharp scissors | For weaving ends, measuring gauge, and attaching fringe |
Yarn Suggestions
| Yarn Line | Weight | Notes |
|---|---|---|
| Lion Brand Heartland | Worsted (#4) | Excellent stitch definition, wonderful earthy color palette (use Mount Rainier for Cream, Cuyahoga Valley for Black, Joshua Tree or Mesa Verde for Burnt Orange). |
| Caron Simply Soft | Worsted (#4) | Soft sheen, wide range of matching autumn shades. |
| Red Heart Super Saver | Worsted (#4) | Budget-friendly, extremely durable, holds fringe shape well. |
⚠️ Note: Avoid novelty yarns with eyelash textures or heavy fuzz for this project; they obscure the clean stripe definition and make counting hdc rows difficult.
Gauge
12 hdc sts x 9 rows = 4 in / 10 cm using a 6.0 mm hook.
Abbreviations
- ch: chain
- hdc: half double crochet
- sl st: slip stitch
- st(s): stitch(es)
- rep: repeat
- RS: right side
- WS: wrong side
- A: Burnt Orange
- B: Black
- C: Cream
UK terms equivalent: sc = dc, hdc = htr, dc = tr.
Special Stitches Explained
There are no complex specialty stitches in this pattern! Everything is worked using standard half double crochet (hdc) stitches and simple color changes.
Pattern Instructions
Pattern Notes
- Turning chains (ch 2) do not count as a stitch throughout.
- Color changes are made on the final yarn-over of the last stitch of the previous row.
- The poncho is made from two identical rectangular panels.
Section 1: Rectangular Panels (Make 2)
Using Yarn A (Burnt Orange), ch 67 (73, 79, 85, 91, 97).
Row 1 (RS): Working in the 3rd ch from hook (skipped chs do not count as st), hdc in each ch across, turn. (65 [71, 77, 83, 89, 95] hdc)
Row 2: Ch 2, hdc in each st across, turn. (65 [71, 77, 83, 89, 95] hdc)
Follow this strict color stripe sequence for the entire panel:
– Rows 1 to 4: Yarn A (Burnt Orange)
– Rows 5 to 6: Yarn B (Black)
– Rows 7 to 8: Yarn C (Cream)
– Rows 9 to 12: Yarn A (Burnt Orange)
– Rows 13 to 14: Yarn B (Black)
– Rows 15 to 16: Yarn C (Cream)
– Rows 17 to 20: Yarn A (Burnt Orange)
– Rows 21 to 22: Yarn B (Black)
– Rows 23 to 24: Yarn C (Cream)
– Rows 25 to 28: Yarn A (Burnt Orange)
– Rows 29 to 30: Yarn B (Black)
– Rows 31 to 32: Yarn C (Cream)
– Rows 33 to 36: Yarn A (Burnt Orange)
– Rows 37 to 38: Yarn B (Black)
– Rows 39 to 40: Yarn C (Cream)
– Rows 41 to 44: Yarn A (Burnt Orange)
– Rows 45 to 46: Yarn B (Black)
– Rows 47 to 48: Yarn C (Cream)
– Rows 49 to 52: Yarn A (Burnt Orange)
– Rows 53 to 54: Yarn B (Black)
– Rows 55 to 56: Yarn C (Cream)
– Rows 57 to 60: Yarn A (Burnt Orange)
Fasten off, leaving a long tail of about 20 in / 50 cm for seaming Panel 1 to Panel 2. Repeat the exact same stripe sequence and row count to create the second identical rectangle.
✅ Checkpoint: Both panels should measure approximately 22 (24, 26, 28, 30, 32) inches wide by 26 (27, 28, 29, 30, 31) inches long before seaming.
Section 2: Assembly
- Lay Panel 1 flat horizontally in front of you. Lay Panel 2 vertically beside it to form an “L” shape where the top edge of Panel 1 meets the side edge of Panel 2.
- Align the top edge of Panel 1 (starting at the outer corner) across the side edge of Panel 2, leaving a centered opening of about 10 inches for the head/neck opening.
- Using the long tail from Panel 1 and a tapestry needle, whipstitch or mattress stitch the shoulder seam securely. Repeat on the opposite side to join the second shoulder seam, creating the classic poncho silhouette with an open front and back slit.
Section 3: Finishing & Fringe
- Fringe Preparation: Cut strands of yarn in Yarn A, Yarn B, and Cream measuring 12 inches / 30 cm long.
- Attaching Fringe: Working along the lower horizontal edges of both panels, take 3 strands of yarn (matching the color of the stripe edge where they are attached), fold them in half to form a loop, push the loop through the edge stitch using your crochet hook, pull the tails through the loop, and pull tight to secure.
- Space fringe evenly along every lower edge, placing one fringe bundle in every other stitch across the bottom hem.
- Trim the ends cleanly with sharp scissors so all fringe hangs evenly at about 5.5 inches / 14 cm long.
- Weave in all remaining loose yarn ends securely on the wrong side.
Size Customization Tips
- To adjust length: Add or subtract rows in blocks of 4 rows of Yarn A, keeping the 2-row black and cream stripe cadence symmetrical.
- To adjust width: Add or subtract foundation chains in multiples of 2 stitches.
Care Instructions
Hand wash gently in cool water with mild wool detergent. Do not wring or twist. Lay flat on a clean towel, shape to measurements, and allow to air dry completely. Do not iron or tumble dry.
FAQ
Can I use cotton yarn instead of acrylic/wool blend?
Yes, you can use a worsted weight cotton yarn (such as Lion Brand 24/7 Cotton). Keep in mind that cotton has more drape and weight, so the poncho will feel slightly heavier and stretch a bit longer over time.
How do I make this poncho larger for plus sizes?
To scale up beyond 3XL, simply add 6 foundation chains for every extra 2 inches of desired width, and add extra 4-row blocks of Yarn A to increase the overall length proportionally.
Can I machine wash this garment?
If you use machine-washable acrylic yarn (like Red Heart Super Saver), you can machine wash on a gentle, cold cycle in a mesh laundry bag, then lay flat to dry. Always check your specific yarn ball band instructions first.
Happy Crocheting!
I hope you love making your new Harvest Poncho as much as I loved designing it for you! Be sure to save this pin to your favorite crochet boards on Pinterest so you can find it easily later. Leave a comment below to share what color combinations you used for your fall wardrobe!
📄 Your free PDF pattern