









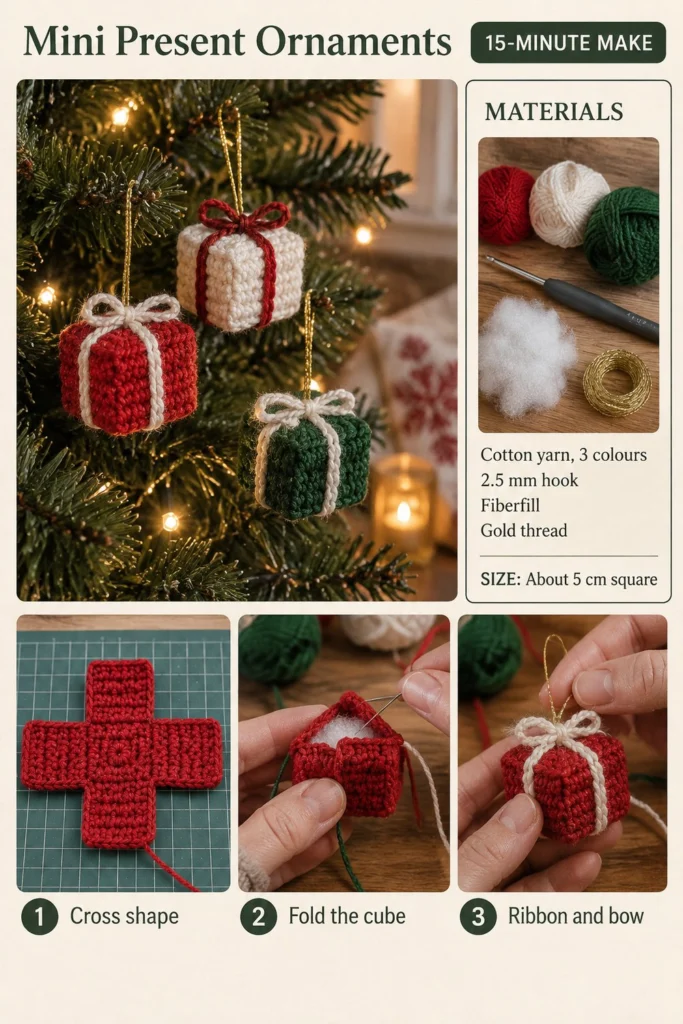
Crocheting tiny holiday decorations is one of my absolute favorite ways to use up yarn scraps while getting into the festive spirit. Today, I am so excited to share how to make these adorable mini crochet wrapped present ornaments that look just like real gifts hanging from your Christmas tree. With a clever cross-shaped construction that folds right into a cute little cube, they work up in just 15 minutes each.
Mini Crochet Wrapped Present Ornaments Free Pattern (Scrap Yarn)
Quick Facts
- Skill level: Easy Beginner
- Finished size: About 5 cm (2 inches) square
- Yarn: Sport or DK weight cotton yarn in 3 colours (Red, White, Green), plus Gold thread for hanging
- Hook: 2.5 mm crochet hook
- Stitches used: Chain (ch), single crochet (sc), slip stitch (sl st), surface slip stitch
- Time to make: 15 minutes per ornament
Size customization tips are included further down in the article to help you adjust your presents if you use different yarn weights.
What Makes This Mini Crochet Gift Box Special
Instead of working in the round and trying to stuff a tiny square evenly, this design uses a single flat cross-shaped piece. When you fold the six square panels together around a puff of fiberfill, the shape instantly transforms into a crisp, three-dimensional cube. Adding a contrasting surface slip stitch creates the look of gift ribbon wrapped tightly around the package, finished off with a sweet little handmade bow on top.
Skill Level
- Basic familiarity with single crochet
- Working back and forth in flat rows and turning
- Simple surface slip stitching and folding
- If you can make a flat square and seam it, you have all the skills you need for this project!
Finished Measurements
| Dimension | Inches | Centimeters |
|---|---|---|
| Width | 2.0 in | 5.0 cm |
| Height | 2.0 in | 5.0 cm |
| Depth | 2.0 in | 5.0 cm |
Materials You Will Need
| Material | Description | Amount / Details |
|---|---|---|
| Yarn Colour 1 | Red Cotton Yarn (Sport/DK) | ~10 yards (9 meters) |
| Yarn Colour 2 | White Cotton Yarn (Sport/DK) | ~10 yards (9 meters) |
| Yarn Colour 3 | Green Cotton Yarn (Sport/DK) | ~10 yards (9 meters) |
| Hook | 2.5 mm Crochet Hook | US C/2 or equivalent |
| Notions | Fiberfill Stuffing | Small handful |
| Notions | Gold Thread or Cord | ~6 inches (15 cm) per ornament |
| Notions | Yarn Needle & Scissors | For weaving ends and assembly |
Yarn Suggestions
| Yarn Line | Weight | Notes |
|---|---|---|
| Schachenmayr Catania | Sport / Fine (2) | 100% mercerized cotton, gorgeous stitch definition |
| Hobbii Rainbow Cotton 8/4 | Fingering / Sport (2) | Wide range of holiday reds, whites, and greens |
| Drops Safran | Sport / Fine (2) | Soft, durable, and holds its sharp cube shape well |
⚠️ Note: Avoid fluffy or fuzzy acrylic yarns for this project. Smooth cotton yarn is essential so that the individual sc stitches stay crisp and give your present clean, sharp corners.
Gauge
- 20 sts x 22 rows = 4 inches (10 cm) in single crochet using a 2.5 mm hook.
- Each individual square panel is 10 stitches wide and 10 rows high, measuring about 2 cm square.
Abbreviations
- ch: chain
- sc: single crochet
- sl st: slip stitch
- st(s): stitch(es)
- rep: repeat
- BLO: back loop only
- WS: wrong side
- RS: right side
(UK terms: sc = dc)
Special Stitches Explained
- Surface Slip Stitch: Insert your hook from the outside to the inside of the crochet fabric, yarn over with the working yarn behind the piece, pull a loop through to the front, then pull that loop directly through the active loop on your hook.
Pattern Instructions
Pattern Notes
- The present is worked as a single flat cross-shaped piece made of six connected 10 x 10 sc squares.
- Ch 1 at the beginning of a row does not count as a stitch unless stated otherwise. Always place your first sc in the very first stitch.
Section 1: Cross-Shape Base (Make 1 per Present in Red, White, or Green)
We will crochet the cross shape in three horizontal sections: the left arm, the central vertical column (which includes the bottom, center, and top squares), and the right arm.
Row 1: Ch 31, working in the 2nd ch from the hook, work 1 sc in each ch across, turn (30 sc).
Rows 2 to 10: Ch 1, 1 sc in each st across, turn (30 sc).
(You now have a long horizontal strip 30 stitches wide and 10 rows high, representing three squares side by side.)
Row 11: Ch 1, work 1 sc in each of the first 10 sts, leave the remaining 20 sts unworked, turn (10 sc).
Rows 12 to 20: Ch 1, 1 sc in each st across, turn (10 sc).
(You have now extended the central square upwards to form the top arm of the cross.) Fasten off yarn, leaving a short tail to weave in.
Row 1 (Bottom extension): Reattach yarn to the opposite end of the central strip (skipping 10 stitches for the left arm area, working into the 21st stitch from the left edge), ch 1, work 1 sc in each of the next 10 sts, turn (10 sc).
Rows 2 to 9: Ch 1, 1 sc in each st across, turn (10 sc).
(You have now extended the bottom arm of the cross downwards so it matches the 10-row height of the other arms.) Fasten off and weave in all starting and ending tails on the flat cross shape.
✅ Checkpoint: You should now have a flat fabric cross consisting of 6 adjoining squares (left, right, top, bottom, plus the center base square).
Section 2: Folding and Stuffing the Cube
- Lay your flat cross shape on a flat surface with the right side facing up.
- Fold the four outer side arms upward along the edges of the central base square so they meet at the top to form an open-topped box.
- Insert a small puff of fiberfill stuffing inside the cube so it holds its plump shape without bulging too much.
- Fold the top flap down to close the cube. Using a length of matching yarn and your yarn needle, whip stitch along the open edges to secure the cube shape firmly.
Section 3: Ribbon, Bow, and Hanging Loop
- Ribbon: Using your second contrast colour (e.g., White yarn for a Red present), create a surface slip stitch grid around the four sides of the cube, crossing over the center of the top and bottom to mimic wrapped ribbon.
- Bow: Separately, crochet a small simple bow (ch 15, sl st into 1st ch to form a loop, pinch in the middle, wrap yarn around the center to form a bow shape) or tie a small fabric-style bow using leftover yarn strands, and sew it securely to the top center of the present.
- Hanging Loop: Cut a 6-inch (15 cm) piece of gold thread, fold it in half to form a loop, knot the ends securely together, and anchor the knot firmly into the top corner of the present underneath the bow.
💡 Designer Tip: For extra crisp edges, gently steam press your flat cross shape with an iron before folding and stitching it into a cube.
Size Customization Tips
- Larger Presents: If you want a 3-inch present, work each square as 15 sts wide by 15 rows high. Each extra 5 stitches per panel increases the final cube size by approximately 1 inch.
- Miniature Presents: Use embroidery floss and a 1.5 mm hook to create tiny half-inch presents to tuck into holiday cards or use as dollhouse decor.
Care Instructions
- Spot clean gently with a damp cloth if needed. Do not submerge in water due to the fiberfill stuffing inside.
FAQ
Can I use acrylic yarn instead of cotton?
Yes, you can use acrylic yarn, but cotton yarn gives much crisper edges and cleaner corners, which makes the little gift box look much more structured.
How do I keep my cube from looking lumpy?
Make sure not to over-stuff your cube. Just a light puff of fiberfill is plenty to give it shape without distorting the square sides.
Are these safe for young children?
These ornaments are lightweight and soft, making them very child-friendly for tree decorating. Just ensure the gold hanging thread is securely tied so little hands don’t pull it loose.
Happy Crocheting!
I hope you love making these charming mini present ornaments as much as I do! They are addictive to hook up in batches while watching holiday movies. Be sure to save this pin on Pinterest and leave a comment below letting me know which colour combinations you chose for your tree this year!
📄 Your free PDF pattern