










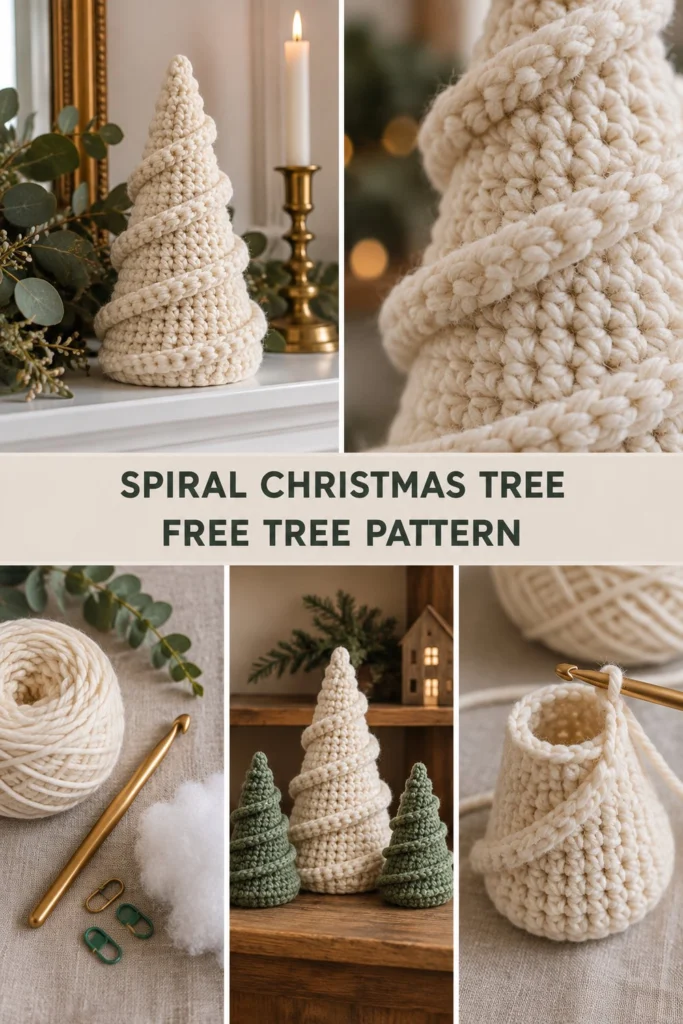
Bring a soft, snowy warmth to your holiday mantel with this chunky cream crochet tree. Featuring a clever back-loop technique and a plush spiraling ridge, this minimalist winter project works up quickly into a sturdy, eye-catching centerpiece. Whether styled on its own or alongside green accent trees, it adds instant cozy texture to your seasonal decor.
Quick Facts
- Skill level: Easy / Advanced Beginner
- Finished size: Approx. 8.5 in (21.5 cm) tall x 4 in (10 cm) base diameter
- Yarn: Bulky / Chunky Weight (Category 5) in Cream / Off-White
- Hook: 6.0 mm (US J/10)
- Stitches used: Single crochet (sc), Half double crochet (hdc), Back Loop Only (BLO), Front Loop Only / Unused Front Loops (FLO)
- Time to make: 2 to 3 hours
Note: Detailed size customization guidelines and scaling tips are provided further down in the article.
What Makes This Chunky Cream Spiral Christmas Tree Special
This chunky crochet christmas tree uses a smart structural design: the main body is crocheted in continuous rounds using back loops only (BLO). Working into the back loop leaves a continuous spiral of exposed front loops wrapping around the tree cone from base to tip.
Once the main cone is stuffed and finished, you reattach yarn at the bottom and work a continuous row of half double crochet stitches into those unworked loops. The result is a raised, snowy ridge that coils seamlessly up the body, giving your cream crochet tree three-dimensional depth without requiring complex sewing or joining.
Skill Level
This project is suitable for an adventurous beginner who is comfortable with single crochet increases and decreases in continuous rounds.
– Working in continuous spiral rounds (amigurumi style)
– Working in Back Loops Only (BLO)
– Working into exposed front loops from previous rounds
– Basic stuffing and shaping techniques
If you have basic control over your stitch tension, this christmas tree crochet pattern will be a delightful, quick weekend project.
Finished Measurements
| Measurement | Inches | Centimeters |
|---|---|---|
| Height (Base to Tip) | 8.5 in | 21.5 cm |
| Base Diameter | 4.0 in | 10.0 cm |
| Base Circumference | 12.5 in | 31.5 cm |
Materials You Will Need
| Material | Details | Quantity |
|---|---|---|
| Cream Yarn | Bulky Weight (Category 5), 100% Acrylic or Wool Blend | Approx. 110 yds / 100 m (100g) |
| Crochet Hook | 6.0 mm (US J/10) aluminum or ergonomic hook | 1 hook |
| Stuffing | Premium polyester fiberfill | Approx. 2 oz / 50g |
| Stitch Markers | Locking stitch markers (for marking rounds) | 2 to 3 markers |
| Tapestry Needle | Large eye yarn needle for weaving ends | 1 needle |
| Scissors | Small yarn snips or standard scissors | 1 pair |
Yarn Suggestions
| Yarn Brand | Fiber Content | Skein Weight / Length | Notes |
|---|---|---|---|
| Paintbox Yarns Simply Chunky | 100% Premium Acrylic | 100g / 149 yds (136 m) | Crisp stitch definition, excellent structure. |
| Lion Brand Wool-Ease Chunky | 80% Acrylic, 20% Wool | 140g / 153 yds (140 m) | Soft fleece feel with subtle winter texture. |
| Premier Yarns Puzzle | 100% Soft Acrylic | 200g / 328 yds (300 m) | Smooth yarn that shows the spiral ridge clearly. |
⚠️ Note: Avoid using fuzzy roving or eyelash yarns for this pattern. The exposed front loops must be clean and clearly visible so you can easily locate them when adding the spiral ridge detail.
Gauge
| Gauge Type | Measurement | Stitch Count |
|---|---|---|
| Swatting Gauge (BLO sc) | 4 x 4 in (10 x 10 cm) | 12 stitches x 12 rounds |
| Base Circle (Flat) | Rnds 1–6 (Base Circle) | 4.0 in (10.0 cm) across |
Abbreviations
| Abbreviation | US Term Definition |
|---|---|
| ch | Chain |
| sc | Single crochet |
| hdc | Half double crochet |
| inc | Single crochet increase (2 sc in same stitch) |
| dec | Single crochet decrease (sc2tog) |
| BLO | Back Loop Only |
| FLO | Front Loop Only / Unused Front Loop |
| sl st | Slip stitch |
| st(s) | Stitch(es) |
| rnd(s) | Round(s) |
| MR | Magic Ring |
UK Translation: UK sc = dc, UK hdc = htr, UK dec = dc2tog.
Special Stitches Explained
1. Magic Ring (MR)
Create a yarn loop around your fingers, insert hook, yarn over and pull up a loop, ch 1, then work the specified number of single crochet stitches directly into the adjustable loop. Pull the tail tight to close the center hole.
2. Back Loop Only (BLO)
Instead of inserting the hook under both top loops of the stitch, insert your hook only under the loop furthest away from you (the back loop). This leaves the front loop exposed on the outside of your fabric.
3. Working into Unused Front Loops
When working the spiral ridge, insert your hook under the single exposed front loop left open from a previous BLO round. Yarn over and complete your half double crochet stitch normally.
Pattern Instructions
Pattern Notes
- The entire cone body is worked in continuous rounds without joining at the end of each round. Do not chain 1 at the start of rounds unless directed.
- Always use a stitch marker in the first stitch of each round to keep track of your position.
- Crucial Technique: From Round 7 onward, every single stitch on the main cone is worked in BLO. This creates a unbroken, continuous spiral track of front loops from the bottom to the tip.
- Stuff the tree firmly as you go, especially through the upper cone, so it holds a crisp geometric shape.
Section 1: Tree Base and Cone Body (Cream)
Starting with Cream Yarn and 6.0 mm hook.
Rnd 1: 6 sc in Magic Ring (6 sc)
Rnd 2: inc in each st around (12 sc)
Rnd 3: (1 sc, inc) x 6 (18 sc)
Rnd 4: (2 sc, inc) x 6 (24 sc)
Rnd 5: (3 sc, inc) x 6 (30 sc)
Rnd 6: (4 sc, inc) x 6 (36 sc)
✅ Checkpoint: You should now have a flat circular base measuring 4 inches (10 cm) across with 36 stitches.
Now transitioning to the cone walls. All remaining rounds of the body are worked in BLO.
Rnd 7: Working in BLO, sc in each st around (36 sc)
Rnd 8: Working in BLO, sc in each st around (36 sc)
Rnd 9: Working in BLO, (4 sc, dec) x 6 (30 sc)
Rnd 10: Working in BLO, sc in each st around (30 sc)
Rnd 11: Working in BLO, sc in each st around (30 sc)
Rnd 12: Working in BLO, (3 sc, dec) x 6 (24 sc)
Rnd 13: Working in BLO, sc in each st around (24 sc)
Rnd 14: Working in BLO, sc in each st around (24 sc)
Rnd 15: Working in BLO, (2 sc, dec) x 6 (18 sc)
Rnd 16: Working in BLO, sc in each st around (18 sc)
Rnd 17: Working in BLO, sc in each st around (18 sc)
💡 Designer Tip: Pause here and add polyester fiberfill stuffing to the lower half of the tree cone. Press the stuffing firmly toward the outer edges so the bottom stays flat while the walls maintain a neat conical slope.
Rnd 18: Working in BLO, (1 sc, dec) x 6 (12 sc)
Rnd 19: Working in BLO, sc in each st around (12 sc)
Rnd 20: Working in BLO, sc in each st around (12 sc)
Rnd 21: Working in BLO, (dec) x 6 (6 sc)
Rnd 22: Working in BLO, sc in each st around (6 sc)
Fasten off, leaving a 6-inch (15 cm) yarn tail. Add final stuffing into the upper cone. Thread the tail through the front loops of the final 6 stitches with a tapestry needle, pull tight to seal the tip, and weave in the end inside the cone.
Section 2: Spiral Ridge Detail (Cream)
To craft the signature dimensional spiral, you will now work into the continuous line of unworked front loops that climb from Round 7 up to Round 22.
- Turn the stuffed cone so the base faces downward and the tip points up.
- Locate the very first unworked front loop from Round 7 near the base edge.
- Join Cream yarn into this front loop with a slip stitch, ch 1.
Spiral Row: Work 1 hdc into EVERY unworked front loop, spiraling continuously from Round 7 at the bottom up to Round 22 near the tip (336 hdc total).
✅ Checkpoint: The ridge should form a raised, thick cord spiraling smoothly around your tree. If the ridge feels too tight or buckles the cone, relax your tension slightly.
When you reach the top front loop near Round 22, sl st into the top tip stitch, fasten off, and weave the tail securely inside the tree peak using your tapestry needle.
Assembly and Stuffing
Because this free crochet pattern is worked in one continuous structure, minimal assembly is required:
1. Base Flatness: Ensure the fiberfill is pushed outward against the walls rather than mounded in the middle of the base circle so the tree sits straight without rocking.
2. Ridge Alignment: Gently run your thumb along the half double crochet spiral from top to bottom to orient the stitches forward and crisp up the textured ridges.
If you love building a cozy winter forest display, you can pair this cream version with our emerald green spiral christmas tree pattern for a classic holiday combination.
Finishing
- Inspect the top tip and base rim for any visible gaps. Use your yarn needle to tidy any starting knots or loose threads.
- Lightly steam-block the spiral ridge with a garment steamer if needed (hold steamer 2 inches away from yarn; do not press iron directly onto synthetic fibers).
For a warm textured look across your mantel, mix it with the rustic alpine spiral christmas tree!
Size Customization Tips
You can easily adjust the height and width of your crochet spiral christmas tree using basic math based on your gauge:
- Larger Tree (Approx. 11 in / 28 cm tall): Expand the flat base circle to 42 sts (Rnd 7:
(5 sc, inc) x 6). Begin the BLO section on Rnd 8, and space decrease rounds every 3 rounds instead of every 2 to 3 rounds. - Smaller Accent Tree (Approx. 5.5 in / 14 cm tall): Stop base increases at 24 sts (Rnd 4). Work BLO cone decrease rounds every 2nd round down to 6 sts.
- Tonal Forest Display: You can also complement your holiday display with the modern forest spiral christmas tree for a serene tonal arrangement.
Care Instructions
- Cleaning: Spot clean gently with cold water and mild soap. Do not wring or submerge fully into water, as fiberfill can clump.
- Storage: Store flat in a dry storage box away from direct sunlight. Reshape by gently fluffing the interior fiberfill when taking it out next holiday season.
FAQ
Can I make this tree with worsted weight yarn instead of bulky yarn?
Yes! Working with Medium Weight (Category 4) yarn and a 4.0 mm hook will produce a scaled-down, delicate tree approximately 5.5 inches tall. Follow the exact same pattern instructions.
Why is my tree base bowing outward instead of sitting flat?
Bowing happens if too much stuffing is stuffed directly against the center of Round 1. Push the stuffing outward toward the cone walls, leaving the base center flat. Alternatively, cut a small circle of heavy cardboard or plastic canvas and drop it into the bottom before stuffing.
Do I need to count every single stitch when making the spiral ridge?
Not necessarily! The most important part of the spiral ridge is following the natural helical line created by the unworked front loops. Simply place 1 hdc into each exposed loop until you reach the tip.
Happy Crocheting!
Enjoy making your crochet holiday decor! Save this project to your Christmas board on Pinterest, and share your finished trees on your favorite craft showcase!
📄 Your free PDF pattern