
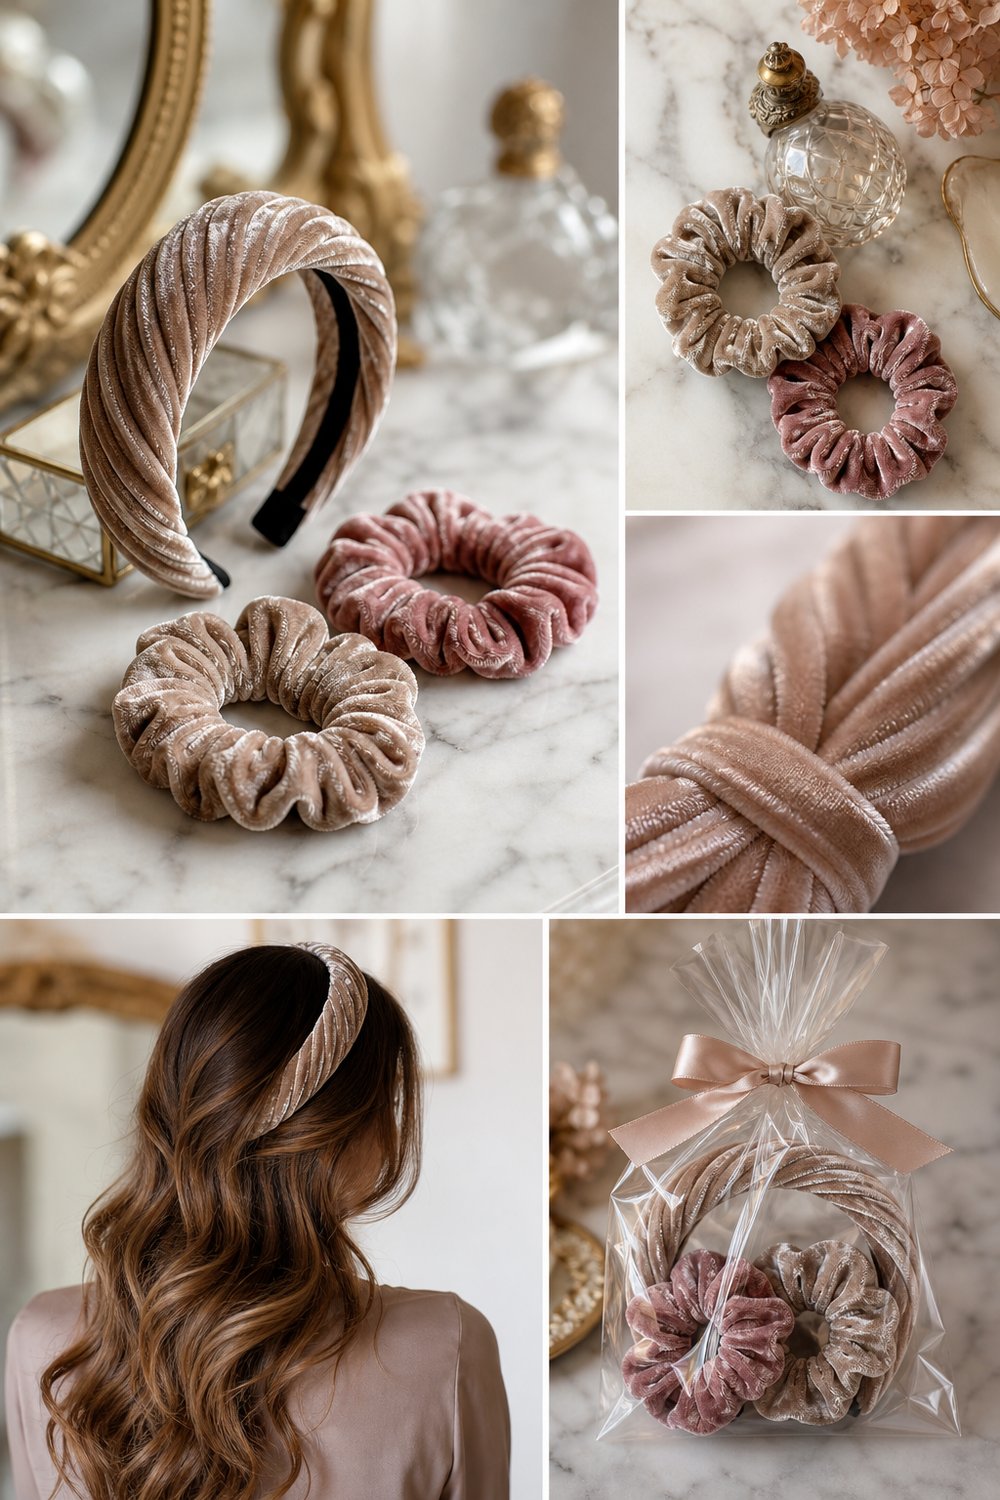
There is nothing quite like the soft, tactile luxury of plush velvet chenille resting against your hair, elevating an everyday vanity routine into a moment of pure self-care. This matching luxury hair accessory set—featuring a plush velvet chenille twist headband and two ruffled scrunchies displayed effortlessly on a white marble vanity—makes for an exquisite, thoughtful gift that comes together in less than an evening.
Velvet Scrunchie and Headband Duo Free Quick Gift Pattern
Quick Facts
- Stitches Used: Chain (ch), Slip Stitch (sl st), Single Crochet (sc), Half Double Crochet (hdc), Double Crochet (dc), Front Post Double Crochet (fpdc), Back Post Double Crochet (bpdc)
- Size Fit: Adult One Size Fits Most (easily customizable)
- Estimated Time to Complete: 1.5 to 2.5 hours for the complete set
- Gift-Appeal Framing: A quick, budget-friendly handmade luxury gift set that looks high-end when packaged in a clear cellophane bag with a satin ribbon.
Easy sizing customization tips are included later in this pattern to help you tailor the fit for children or those with larger head circumferences.
What Makes This Velvet Scrunchie and Headband Duo Special
The magic of this set lies entirely in the sumptuous choice of yarn and clever structural manipulation. Because velvet chenille yarn has a dense pile and a lustrous sheen, working standard stitches can sometimes hide your loops; this pattern utilizes simplified, tactile-friendly shaping methods that highlight the yarn’s rich texture without getting lost in the fluff. The scrunchies are worked with a high stitch-to-foundation ratio over elastic hair ties to create an ultra-abundant, ruffled fringe. Meanwhile, the headband utilizes a clever central twist technique—formed by folding and seaming a simple rectangular band—that creates a polished, boutique-quality knot detail at the front without requiring complex advanced knitting or crochet maneuvers.
Skill Level
- Level: Beginner-Friendly Intermediate
- Required Skills: Working in the round around a hair elastic, basic increases, maintaining consistent tension with plush novelty yarn, and a simple mattress or whip stitch for the headband seam.
- Reassurance Line: If you can master feeling for your stitches rather than strictly seeing them in the fuzz, you will breeze right through this pattern in a single afternoon!
Finished Measurements
| Component | US Imperial | Metric |
|---|---|---|
| Twisted Headband (Flat) | 4 inches wide x 19 inches long (unstretched) | 10 cm wide x 48 cm long (unstretched) |
| Scrunchie (Relaxed) | 5 inches outer diameter | 13 cm outer diameter |
Materials You Will Need
- Yarn Weight: Bulky / #5 Velvet Chenille
- Hook: US J/10 (6.0 mm) crochet hook
- Notions: Tapestry needle for weaving ends, two 2-inch (5 cm) seamless hair elastics, stitch markers (optional)
| Color Order | Color Name | Yarn Weight | Yardage / Meters Needed |
|---|---|---|---|
| Color 1 | Champagne | Bulky (#5) Velvet | 45 yds / 41 m |
| Color 2 | Dusty Rose | Bulky (#5) Velvet | 45 yds / 41 m |
Yarn Suggestions
| Yarn Brand & Line Name | Weight | Yardage per Skein | Notes |
|---|---|---|---|
| Bernat Velvet | Bulky (#5) | 315 yds / 288 m per 300g ball | Incredible plush luster; highly durable. |
| Premier Yarns Retro Velvet | Bulky (#5) | 131 yds / 120 m per 150g ball | Excellent sheen, minimal shedding. |
| Hobby Lobby Yarn Bee Velvet Luxe | Bulky (#5) | 155 yds / 142 m per 100g ball | Ultra-soft, lightweight drape. |
⚠️ Note: Avoid using overly thin “micro” velvet yarns or novelty eyelash yarns for this specific project, as they lack the structural plushness required to hold the headband’s twist shape.
Gauge
Gauge is not overly critical for this project due to the flexible nature of chenille and elastic, but meeting the general tension ensures your yardage requirements and drape are accurate.
| Measurement Type | Stitch / Row Count | Finished Size |
|---|---|---|
| Headband Gauge | 12 hdc x 9 rows | 4 inches x 4 inches (10 cm x 10 cm) |
| Scrunchie Ruffle Gauge | 4 dc worked into elastic per 1 inch | N/A |
💡 Designer Tip: Chenille yarn can stretch over time. Keep your stitches slightly snug to ensure your headband retains its elasticity and shape after repeated wear.
Abbreviations
| Abbreviation | Full Term |
|---|---|
| ch | Chain |
| sl st | Slip Stitch |
| sc | Single Crochet |
| hdc | Half Double Crochet |
| dc | Double Crochet |
| fpdc | Front Post Double Crochet |
| bpdc | Back Post Double Crochet |
| st(s) | Stitch(es) |
| rep | Repeat |
| FO | Fasten Off |
Special Stitches Explained
- Working Around Elastic (Wp-El): Hold the elastic hair tie parallel to your working line. Insert hook through the center hole of the elastic, yarn over, pull up a loop, yarn over, and pull through both loops on the hook to complete the specified stitch over the core of the elastic.
- Twist Seam Assembly: Folding a rectangular band in half lengthwise, bringing the short ends together in an interlocking “C” shape fold before whipstitching them closed to create a permanent front twist.
Pattern Instructions
Section 1: The Ruffled Scrunchies (Make 2 – One in Champagne, One in Dusty Rose)
Using Color 1 (Champagne), join yarn to your first seamless hair elastic with a sl st.
- Round 1: Ch 2 (does not count as st here and throughout). Work 60 hdc directly around the core of the elastic ring, packing stitches closely together to create a dense ruffle. Join with a sl st to the top of the first hdc. (60 hdc)
✅ Checkpoint: Count your stitches carefully around the elastic to ensure your ruffle has enough volume. If it looks sparse, gently slide the stitches together and add 5-10 more hdc.
- Round 2: Ch 3 (counts as 1 dc here and throughout). Work 2 dc in the same st. Work 3 dc in every hdc around the entire elastic. Join with a sl st to the top of the initial ch-3. (180 dc)
- Finishing: FO, leaving a 6-inch tail. Use a tapestry needle to weave in all loose ends securely into the interior of the scrunchie ruffle. Repeat this entire section for the second scrunchie using Color 2 (Dusty Rose).
Section 2: The Velvet Twist Headband (Made in Dusty Rose or Champagne)
Using your chosen headband color, ch 13 loosely.
- Row 1: Working in the back bumps of the foundation chain, hdc in the 2nd ch from the hook and in each ch across, turn. (12 hdc)
- Row 2: Ch 1 (does not count as st). Working in the third loop only (or standard back loops if preferred for stability) of each hdc across, hdc in each st across, turn. (12 hdc)
- Rows 3–48: Rep Row 2 until your rectangular band measures approximately 19 inches (48 cm) in length, or until it comfortably wraps around your head with a slight negative ease. FO, leaving a long 12-inch tail for seaming.
Section 3: Headband Assembly and Twist Seam
Lay your long rectangular headband flat in front of you like a scarf.
- Step 1: Bring the two short ends together. Fold each end in half lengthwise so they resemble two interlocking “C” shapes or the loops of a taco shell.
- Step 2: Slide the two folded ends into one another so they interlock like links in a chain.
- Step 3: Using your 12-inch yarn tail and a tapestry needle, whipstitch securely across all four layers of fabric edges.
- Step 4: Fasten off securely and weave in ends. Turn the headband right-side out; the interior seam will naturally roll inward, revealing a gorgeous, professional twisted knot at the center.
Size Customization Tips
- To Adjust Headband Length: Simply work fewer rows (approx. 40-42 rows) for a child’s size (reducing circumference by ~2 inches / 5 cm), or add 4-6 more rows for a larger adult fit.
- To Adjust Scrunchie Volume: If you prefer a subtler, less dramatic scrunchie, reduce Round 1 to 40 hdc and work 2 dc per stitch in Round 2 instead of 3.
Care Instructions
To keep your velvet chenille accessories looking plush and lustrous:
– Hand wash gently in cool water using a mild wool detergent.
– Do not wring or twist aggressively; gently press out excess water using a clean towel.
– Lay flat to dry completely away from direct heat and sunlight.
– Avoid ironing, as high heat will melt and flatten the synthetic velvet pile.
Velvet Scrunchie and Headband Duo Free Quick Gift Pattern
I hope you had an absolute blast stitching up this luxurious set! Whether you are gifting it to a best friend, a teacher, or keeping it for your own daily vanity routine, nothing beats the satisfaction of handmade velvet warmth. I would love to see your finished creations! Be sure to snap a photo, tag me on social media, save this project to your favorite Pinterest boards for later, and leave a comment below letting me know which color combination you chose!