
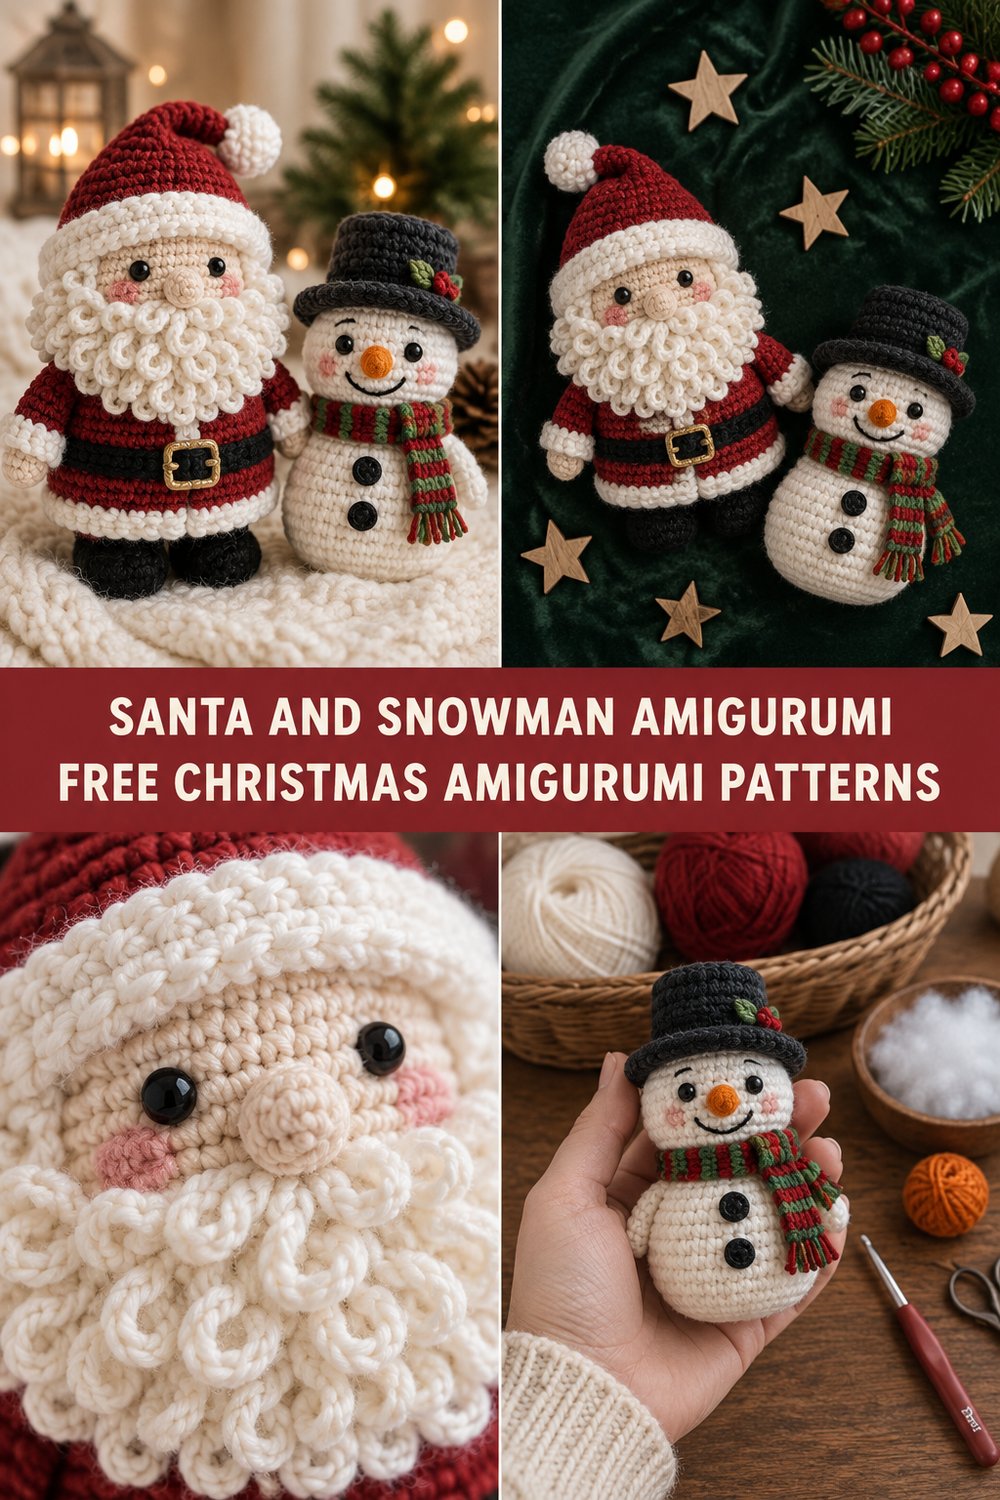
Get ready to infuse your holiday season with handmade cheer! Imagine these charming little figures nestled among your decorations, bringing smiles and a touch of cozy festivity. These santa amigurumi and snowman amigurumi patterns are designed to be quick, delightful projects that capture the heartwarming spirit of Christmas.
Cute Santa & Snowman Amigurumi Free Patterns
This project features a plump little Santa with a cranberry suit, a white bobble-trim hat, black belt, and a long curly white beard, alongside a cheerful snowman sporting a tiny striped scarf and a dapper charcoal top hat. Both figures are worked in continuous rounds using basic crochet stitches, making them ideal easy christmas amigurumi projects. They’re perfect for handmade gifts, festive decor, or even as delightful crochet christmas toys for loved ones. You can expect to complete each figure in approximately 4-6 hours, making them excellent last-minute gifts!
Want to adjust their size? I’ve included tips on customizing your amigurumi later in the pattern!
What Makes This Santa & Snowman Amigurumi Special
What sets these adorable amigurumi apart is the thoughtful combination of classic techniques and special details. The Santa’s iconic curly white beard is created using a simple yet effective loop stitch, giving it that authentic voluminous texture seen in the photos. His rosy cheeks and expressive eyes are carefully embroidered, adding character without the need for small plastic parts, making them safer for little hands. The snowman’s tiny carrot nose is crocheted separately and securely attached, while his striped scarf is worked in simple rows, adding a pop of color. Both figures are constructed in continuous rounds (spiral method) for a seamless finish, giving them a smooth, toy-like appearance, perfectly capturing the classic rounded silhouette of beloved Christmas figures.
Skill Level
This pattern is suitable for adventurous beginners and intermediate crocheters.
- Magic Ring
- Single Crochet (sc)
- Increase (inc)
- Decrease (dec)
- Slip Stitch (sl st)
- Chain (ch)
- Half Double Crochet (hdc)
- Loop Stitch (lp st) (explained in detail)
- Basic Embroidery Skills (for eyes, mouth, and rosy cheeks)
- Working in continuous rounds
- Attaching amigurumi parts
If you’re comfortable with these fundamental crochet techniques and ready to learn a fun new stitch, you’ll love creating these festive friends!
Finished Measurements
| Figure | Height (inches) | Height (cm) |
|---|---|---|
| Santa | 5.5 | 14 |
| Snowman | 5 | 12.5 |
Materials You Will Need
| Color | Yarn Type & Weight | Yardage (approx.) |
|---|---|---|
| Cranberry | Worsted Weight (Category 4) Acrylic or Cotton Yarn | 60 yds / 55 m |
| White | Worsted Weight (Category 4) Acrylic or Cotton Yarn | 50 yds / 46 m |
| Black | Worsted Weight (Category 4) Acrylic or Cotton Yarn | 15 yds / 14 m |
| Charcoal | Worsted Weight (Category 4) Acrylic or Cotton Yarn | 10 yds / 9 m |
| Orange | Worsted Weight (Category 4) Acrylic or Cotton Yarn | 5 yds / 4.5 m |
| Red | Worsted Weight (Category 4) Acrylic or Cotton Yarn | 5 yds / 4.5 m |
Hook: 3.0mm (US D/3) crochet hook
Additional Tools:
* Yarn needle
* Stitch markers
* Scissors
* Fiberfill stuffing
* Black embroidery floss (or thin black yarn)
* Pink blush/makeup (for rosy cheeks, optional)
* Small amount of craft glue (for securing hat, optional)
Yarn Suggestions
When choosing your yarn, look for a smooth, tightly twisted worsted weight yarn for best stitch definition and durability, perfect for crochet santa pattern and crochet snowman projects.
| Brand/Line | Weight | Yardage per Skein (approx.) | Notes |
|---|---|---|---|
| Lion Brand Vanna’s Choice | Worsted (4) | 170 yds / 156 m | Durable, wide color range, good for amigurumi. |
| Red Heart Super Saver | Worsted (4) | 364 yds / 333 m | Economical, readily available, slightly stiffer texture. |
| Loops & Threads Impeccable | Worsted (4) | 285 yds / 261 m | Soft, good stitch definition, works up nicely for toys. |
⚠️ Note: Avoid fluffy or super bulky yarns as they can obscure stitch definition and make it difficult to achieve the neat, compact amigurumi look required for these figures.
Gauge
For Santa & Snowman Body:
4 inches / 10 cm = 10 sc stitches
4 inches / 10 cm = 10 sc rows
💡 Designer Tip: Your gauge is important for achieving the intended size and look. If your amigurumi are much larger or smaller, adjust your hook size accordingly (go down for smaller, up for larger). Always make a swatch before you begin!
Abbreviations
| Abbreviation | Meaning |
|---|---|
| ch | chain |
| sc | single crochet |
| hdc | half double crochet |
| inc | single crochet increase (2 sc in one stitch) |
| dec | single crochet decrease (sc 2 stitches together) |
| sl st | slip stitch |
| st(s) | stitch(es) |
| yo | yarn over |
| R | Round |
| lp st | loop stitch |
| rep | repeat |
| fo | fasten off |
| (__) | stitch count |
| * ** | repeat instructions between asterisks |
Special Stitches Explained
Loop Stitch (lp st):
This stitch creates a fluffy, textured loop on the right side of your work, perfect for Santa’s beard.
1. Insert hook into the indicated stitch.
2. Bring yarn from back to front over your non-working index finger.
3. Hold loop firmly against the hook with your thumb.
4. Yarn over (with the yarn from your working ball, not the loop on your finger) and draw up a loop through the stitch.
5. You now have three loops on your hook (one from the stitch, one from the yarn over, and the one from your finger).
6. Yarn over and pull through all three loops on your hook. This completes one loop stitch. Remove your finger from the loop.
💡 Designer Tip: Practice this stitch a few times until you get a consistent loop length. The longer the loop you pull over your finger, the longer and curlier the beard will be!
Pattern Instructions
We will start with the santa amigurumi, followed by the snowman amigurumi. Work in continuous rounds unless otherwise stated. Use a stitch marker to keep track of your first stitch in each round.
SANTA AMIGURUMI
Section 1: Santa’s Head (White)
Begin with White yarn.
R1: 6 sc in Magic Ring. (6 sc)
R2: *Inc* 6 times. (12 sc)
R3: *Sc, inc* 6 times. (18 sc)
R4: *2 sc, inc* 6 times. (24 sc)
R5: *3 sc, inc* 6 times. (30 sc)
R6: *4 sc, inc* 6 times. (36 sc)
R7-R13: Sc in each st around. (7 rounds) (36 sc)
✅ Checkpoint: You should have 36 stitches at the end of R13. The head should be a neat, firm sphere.
R14: *4 sc, dec* 6 times. (30 sc)
R15: *3 sc, dec* 6 times. (24 sc)
Start stuffing the head firmly. Continue to stuff as you go.
R16: *2 sc, dec* 6 times. (18 sc)
R17: *Sc, dec* 6 times. (12 sc)
R18: *Dec* 6 times. (6 sc)
Fo, leaving a long tail. Weave tail through front loop of remaining 6 sts and pull tight to close. Weave in end.
Section 2: Santa’s Body (Cranberry)
Begin with Cranberry yarn.
R1: 6 sc in Magic Ring. (6 sc)
R2: *Inc* 6 times. (12 sc)
R3: *Sc, inc* 6 times. (18 sc)
R4: *2 sc, inc* 6 times. (24 sc)
R5: *3 sc, inc* 6 times. (30 sc)
R6: *4 sc, inc* 6 times. (36 sc)
R7-R16: Sc in each st around. (10 rounds) (36 sc)
✅ Checkpoint: You should have 36 stitches at the end of R16. The body should be cylindrical.
R17: *4 sc, dec* 6 times. (30 sc)
Start stuffing the body firmly.
R18: Sc in each st around. (30 sc)
R19: *3 sc, dec* 6 times. (24 sc)
R20: Sc in each st around. (24 sc)
Fo, leaving a long tail for sewing. Finish stuffing firmly.
Section 3: Santa’s Arms (Make 2 – Cranberry & White)
Start with Cranberry yarn.
R1: 6 sc in Magic Ring. (6 sc)
R2: *Inc* 6 times. (12 sc)
R3-R5: Sc in each st around. (3 rounds) (12 sc)
Change to White yarn.
R6-R9: Sc in each st around. (4 rounds) (12 sc)
Lightly stuff the hand portion.
R10: *Dec* 6 times. (6 sc)
Fo, leaving a long tail for sewing. Close opening by weaving through front loops of remaining 6 sts and pulling tight.
Section 4: Santa’s Hat (Cranberry & White)
Start with Cranberry yarn.
R1: 4 sc in Magic Ring. (4 sc)
R2: *Sc, inc* 2 times. (6 sc)
R3: Sc in each st around. (6 sc)
R4: *2 sc, inc* 2 times. (8 sc)
R5: Sc in each st around. (8 sc)
R6: *3 sc, inc* 2 times. (10 sc)
R7: Sc in each st around. (10 sc)
R8: *4 sc, inc* 2 times. (12 sc)
R9: Sc in each st around. (12 sc)
R10: *5 sc, inc* 2 times. (14 sc)
R11: Sc in each st around. (14 sc)
R12: *6 sc, inc* 2 times. (16 sc)
R13: Sc in each st around. (16 sc)
R14: *7 sc, inc* 2 times. (18 sc)
R15: Sc in each st around. (18 sc)
R16: *2 sc, inc* 6 times. (24 sc)
R17: *3 sc, inc* 6 times. (30 sc)
R18: *4 sc, inc* 6 times. (36 sc)
R19: Sc in each st around. (36 sc)
Change to White yarn.
R20: Working in back loops only (BLO), sc in each st around. (36 sc)
R21: Sc in each st around. (36 sc)
Fo, weave in ends.
Pom-pom: With White yarn, make a small pom-pom and attach it to the tip of the hat.
Section 5: Santa’s Belt (Black & Yellow/Gold)
With Black yarn.
Ch 25. Sl st in 2nd ch from hook and each ch across. (24 sl st)
Fo, leaving a tail for sewing.
Belt Buckle: With Yellow/Gold yarn, embroider a small square buckle onto the center of the belt.
Section 6: Santa’s Beard (White)
With White yarn.
Ch 15.
R1: Starting in 2nd ch from hook, make 14 lp st. (14 lp st)
Fo, leaving a long tail for sewing.
Section 7: Assembly of Santa
- Head to Body: Sew the head to the body, ensuring it’s centered and secure.
- Arms: Attach the arms to the sides of the body, just below the neck seam.
- Hat: Place the hat on Santa’s head. You can lightly tack it down with a few stitches or a dot of craft glue if you prefer.
- Beard: Position the beard just under the face, with the loops facing outwards. Sew securely across the top edge.
- Belt: Wrap the belt around Santa’s waist, centered. Sew the ends together at the back, then tack the belt in place with a few stitches at the front and sides.
- Facial Features:
- Using Black embroidery floss, embroider two small eyes between R9 and R10 of the head, about 5-6 stitches apart.
- Embroider a small smile below the eyes.
- For rosy cheeks, use a small amount of pink blush or makeup applied gently with a cotton swab or brush.
SNOWMAN AMIGURUMI
Section 1: Snowman’s Body (White)
Begin with White yarn.
R1: 6 sc in Magic Ring. (6 sc)
R2: *Inc* 6 times. (12 sc)
R3: *Sc, inc* 6 times. (18 sc)
R4: *2 sc, inc* 6 times. (24 sc)
R5: *3 sc, inc* 6 times. (30 sc)
R6: *4 sc, inc* 6 times. (36 sc)
R7-R14: Sc in each st around. (8 rounds) (36 sc)
✅ Checkpoint: You should have 36 stitches at the end of R14. This will be the widest part of the body.
R15: *4 sc, dec* 6 times. (30 sc)
R16: Sc in each st around. (30 sc)
Start stuffing the body firmly.
R17: *3 sc, dec* 6 times. (24 sc)
R18: Sc in each st around. (24 sc)
R19: *2 sc, dec* 6 times. (18 sc)
R20: Sc in each st around. (18 sc)
R21: *Sc, dec* 6 times. (12 sc)
R22: Sc in each st around. (12 sc)
R23: *Dec* 6 times. (6 sc)
Fo, leaving a long tail. Weave tail through front loop of remaining 6 sts and pull tight to close. Finish stuffing firmly. Weave in end.
Section 2: Snowman’s Hat (Charcoal)
Begin with Charcoal yarn.
R1: 6 sc in Magic Ring. (6 sc)
R2: *Inc* 6 times. (12 sc)
R3: Sc in each st around. (12 sc)
R4: Working in back loops only (BLO), sc in each st around. (12 sc)
R5-R8: Sc in each st around. (4 rounds) (12 sc)
R9: Working in front loops only (FLO), *sc, inc* 6 times. (18 sc)
R10: *2 sc, inc* 6 times. (24 sc)
R11: Sc in each st around. (24 sc)
Fo, weave in ends.
Section 3: Snowman’s Carrot Nose (Orange)
Begin with Orange yarn.
R1: 4 sc in Magic Ring. (4 sc)
R2: Sc in each st around. (4 sc)
R3: *Sc, inc* 2 times. (6 sc)
R4: Sc in each st around. (6 sc)
Fo, leaving a long tail for sewing. Lightly stuff or leave unstuffed.
Section 4: Snowman’s Scarf (White & Red)
With White yarn, ch 35.
R1: Starting in 2nd ch from hook, sc in each ch across. (34 sc)
Change to Red yarn.
R2: Ch 1, turn. Sc in each st across. (34 sc)
Change to White yarn.
R3: Ch 1, turn. Sc in each st across. (34 sc)
Change to Red yarn.
R4: Ch 1, turn. Sc in each st across. (34 sc)
Fo, weave in ends.
Section 5: Assembly of Snowman
- Hat: Place the hat on the snowman’s head. You can lightly tack it down with a few stitches or a dot of craft glue if you prefer.
- Carrot Nose: Sew the carrot nose onto the center of the snowman’s face.
- Facial Features:
- Using Black embroidery floss, embroider two small eyes above the nose, between R5 and R6 of the head.
- Embroider a small dashed smile below the nose.
- For rosy cheeks, use a small amount of pink blush or makeup applied gently with a cotton swab or brush.
- Scarf: Tie the scarf around the snowman’s neck.
Size Customization Tips
💡 Designer Tip: You can easily change the size of your amigurumi by using a different yarn weight and corresponding hook size.
* To make a larger amigurumi: Use a thicker yarn (e.g., bulky weight) and a larger hook (e.g., 4.0mm or 5.0mm). This will result in an increase of approximately 2-3 inches (5-7.5 cm) in height for each figure.
* To make a smaller amigurumi: Use a thinner yarn (e.g., sport or fingering weight) and a smaller hook (e.g., 2.0mm or 2.5mm). This will result in a decrease of approximately 1-2 inches (2.5-5 cm) in height for each figure.
Remember to always adjust your hook size to maintain a tight gauge that prevents stuffing from showing through.
Care Instructions
For best results and to maintain the shape of your amigurumi, I recommend hand washing with mild soap and cold water. Gently squeeze out excess water (do not wring) and air dry flat. Avoid machine washing or drying, as this can distort the shape and damage the stuffing.
Cute Santa & Snowman Amigurumi Free Patterns
I hope you’ve enjoyed creating these festive little friends! They’re sure to bring a touch of handmade warmth to your holiday season. I’d love to see your finished christmas amigurumi creations – please share them on social media and tag me! Don’t forget to save this free crochet pattern to your Pinterest boards for next year. Happy crocheting!