
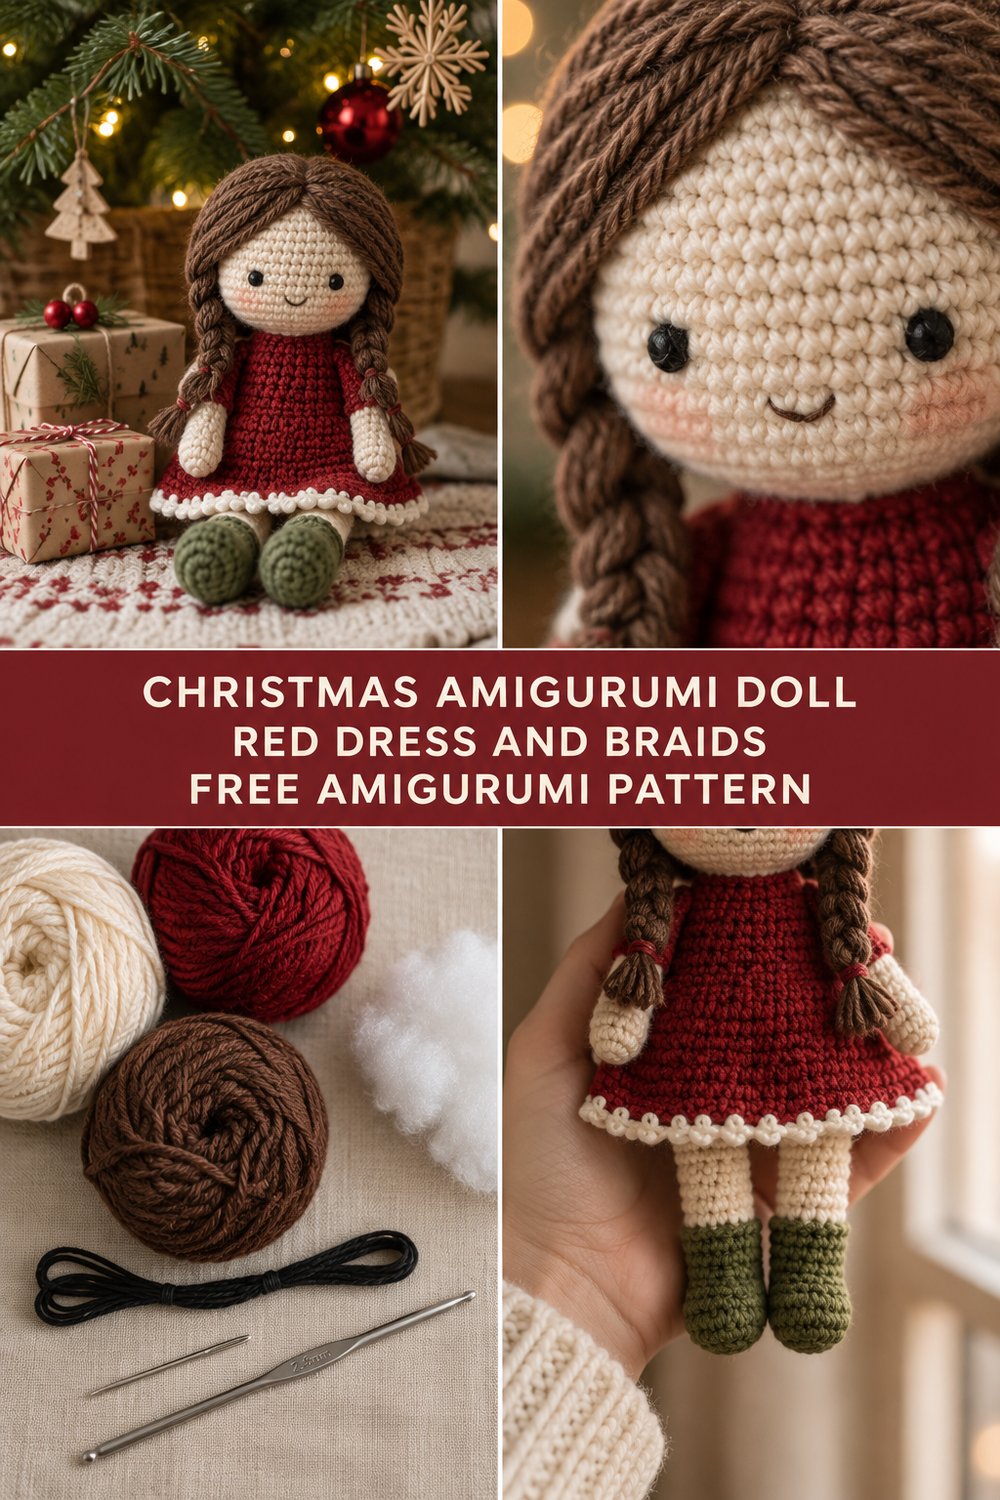
There is something utterly magical about a small, handmade friend resting under the Christmas tree, waiting patiently to be unwrapped on Christmas morning. This delightful crochet christmas doll brings classic heirloom charm to your holiday crafting, combining a soft cream body, a rich cranberry dress, and sweet braided hair. Grab your hook, settle in by the warmth of the window, and let’s bring this charming christmas amigurumi to life together.
Crochet Christmas Doll — Free Amigurumi Tutorial
Quick Facts
- Stitches Used: Single crochet, increase, decrease, slip stitch, picot, surface crochet, French knot, embroidery straight stitch
- Size Fit / Finished Height: Approximately 9 inches (23 cm) tall
- Estimated Hours to Complete: 6–8 hours
- Gift-Appeal Framing: Perfect as a treasured holiday keepsake, a child-safe toy (no plastic eyes), or a festive mantle decoration.
💡 Designer Tip: Detailed size customization tips are included further down if you’d like to adjust your doll’s final height.
What Makes This Crochet Christmas Doll Special
This free amigurumi pattern is designed to look like a timeless European holiday toy, avoiding the overly synthetic look of mass-produced crafts. We achieve this by using tight, continuous rounds of single crochet (sc) to create a firm, durable fabric that holds its stuffing without stretching or showing fiber stuffing. The facial features are entirely hand-embroidered using cotton floss—delicate French knots for the eyes and a soft backstitch for the smile—making this completely safe for infants and toddlers. The cranberry dress features a clean, delicate picot hem that adds vintage flair, while the green boots and rich brown braided yarn hair complete her classic Christmas look.
Skill Level
- Intermediate Amigurumi
- Required Skills:
- Working in continuous spiral rounds (amigurumi style)
- Increasing (
inc) and invisible decreasing (inv-dec) - Basic embroidery stitches (French knot, straight stitch)
- Changing yarn colors cleanly
- Basic sewing to attach limbs and hair
⚠️ Note: If you are comfortable working basic amigurumi shapes like spheres and cylinders, you will find this crochet doll tutorial very approachable.
Finished Measurements
| Size / Component | Inches | Centimeters |
|---|---|---|
| Total Doll Height | 9.0 in | 23.0 cm |
| Body Circumference (At Dress) | 6.5 in | 16.5 cm |
| Head Circumference | 7.0 in | 18.0 cm |
| Arm Length | 2.5 in | 6.4 cm |
Materials You Will Need
- Yarn Weight: Sport (#2 Fine) or light DK yarn recommended for clean, crisp stitch definition.
- Hook: 2.5 mm steel crochet hook.
- Notions: Polyester fibrefill stuffing, yarn needle, stitch markers, black embroidery floss, tapestry needle, sharp embroidery scissors.
| Color Order | Yarn Color Name | Yarn Weight / Fiber | Yardage Needed |
|---|---|---|---|
| 1 | Cream | Sport / 100% Cotton | 80 yds (73 m) |
| 2 | Brown | Sport / 100% Acrylic or Wool blend | 40 yds (37 m) |
| 3 | Cranberry Red | Sport / 100% Cotton | 60 yds (55 m) |
| 4 | Green | Sport / 100% Cotton | 20 yds (18 m) |
Yarn Suggestions
| Brand & Line Name | Yarn Weight | Skein Yardage | Notes |
|---|---|---|---|
| Schachenmayr Catania | Sport (Fine #2) | 137 yds (125 m) / 50g | Excellent stitch definition, wide color range. |
| Hobbii Friends Cotton 8/4 | Sport (Fine #2) | 175 yds (160 m) / 50g | Very smooth mercerized cotton, ideal for amigurumi. |
| Knit Picks CotLin | DK (Light #3) | 123 yds (112 m) / 50g | Linen-cotton blend for a lovely rustic matte texture. |
⚠️ Note: Avoid fluffy novelty yarns, mohair, or loosely spun single-ply wool for this christmas crochet toy, as they obscure stitch counts and make embroidery difficult.
Gauge
- Stitch Gauge: 7 sts = 1 inch (2.5 cm) over single crochet in the round.
- Row Gauge: 8 rounds = 1 inch (2.5 cm).
- Note: Amigurumi gauge doesn’t need to match standard garment metrics precisely, but it must be worked tightly enough to prevent fibrefill stuffing from poking through. Always swatch first!
| Measurement Type | Over 4 Inches (10 cm) |
|---|---|
| Single Crochet Stitches | 28 sts |
| Single Crochet Rounds | 32 rnds |
Abbreviations
| Abbreviation | Full Term |
|---|---|
| ch | Chain |
| sc | Single crochet |
| inc | Single crochet increase (2 sc in one stitch) |
| inv-dec | Invisible single crochet decrease (sc next 2 sts together through front loops only) |
| sl st | Slip stitch |
| picot | Ch 3, sl st in first ch |
| BLO | Back loop only |
| FLO | Front loop only |
| st(s) | Stitch(es) |
| rnd(s) | Round(s) |
| FO | Fasten off |
Special Stitches Explained
- Invisible Decrease (
inv-dec): Insert hook into the front loop only of the next stitch, then immediately insert hook into the front loop only of the following stitch. Yarn over, pull through both front loops, yarn over and pull through remaining 2 loops on hook. - Picot: Chain 3, then insert hook into the very first chain made and pull yarn through both the chain and the loop on your hook to form a tiny decorative point.
- French Knot: Bring embroidery needle up from back to front of work. Wrap floss around the needle 2–3 times, then insert the needle back down very close to where it emerged, holding the working thread taut until a neat knot forms on the surface.
Pattern Instructions
Section 1: Legs and Body (Continuous Rounds)
Using Green yarn:
– Rnd 1: Work 6 sc in a magic ring. (6 sc)
– Rnd 2: [1 inc, 1 sc] around. (9 sc)
– Rnd 3: Working in BLO, sc in each st around. (9 sc)
– Rnds 4–5: Sc in each st around. (9 sc)
– FO green yarn on first leg. Make a second leg identical to Rnds 1–5, but do not FO yarn on the second leg.
Connecting Legs and Body:
– Rnd 6: From second leg, ch 3, join to first leg with 1 sc, sc remaining 8 sts around first leg, work 3 sc along the chain, sc 8 sts around second leg, work 3 sc along the other side of the chain. Switch to Cream yarn on last st. (24 sts)
✅ Checkpoint: Count your stitches carefully at the end of Rnd 6. You should have 24 stitches total around the torso foundation.
- Rnds 7–12: Sc in each st around. (24 sts)
- Rnd 13:
[2 sc, 1 inv-dec]around. (18 sc) - Rnds 14–15: Sc in each st around. (18 sc)
- Rnd 16:
[1 sc, 1 inv-dec]around. (12 sc) - Rnd 17: Sc in each st around. (12 sc)
Section 2: Head
Continuing directly from the neck (Rnd 17 of body) using Cream yarn:
– Rnd 18: [1 sc, 1 inc] around. (18 sc)
– Rnd 19: [2 sc, 1 inc] around. (24 sc)
– Rnd 20: [3 sc, 1 inc] around. (30 sc)
– Rnd 21: [4 sc, 1 inc] around. (36 sc)
– Rnds 22–29: Sc in each st around. (36 sc)
– Embroider facial features now between Rnds 25 and 26, leaving 4 stitches space between the French knot eyes. Embroider a small curved smile centered 2 rows below the eyes.
– Rnd 30: [4 sc, 1 inv-dec] around. (30 sc)
– Rnd 31: [3 sc, 1 inv-dec] around. (24 sc)
– Rnd 32: [2 sc, 1 inv-dec] around. (18 sc)
– Stuff the head firmly with fibrefill.
– Rnd 33: [1 sc, 1 inv-dec] around. (12 sc)
– Rnd 34: [1 inv-dec] 6 times. (6 sc)
– FO, leaving a long tail to weave closed through front loops.
Section 3: Arms (Make 2)
Using Cream yarn:
– Rnd 1: Work 5 sc in a magic ring. (5 sc)
– Rnd 2: [1 inc] around. (10 sc)
– Rnds 3–10: Sc in each st around. (10 sc)
– Lightly stuff the lower half of the arm. Flatten opening and sew closed across the top.
– FO, leaving a long tail for sewing to shoulders.
Section 4: Cranberry Dress
Working from the waist down in Cranberry Red yarn:
– Attach yarn to the unworked loops or waist stitches around Rnd 10 of the body.
– Rnd 1: [3 sc, 1 inc] around. (30 sc)
– Rnds 2–4: Sc in each st around. (30 sc)
– Rnd 5: [4 sc, 1 inc] around. (36 sc)
– Rnds 6–8: Sc in each st around. (36 sc)
– Rnd 9: [5 sc, 1 inc] around. (42 sc)
– Rnds 10–12: Sc in each st around. (42 sc)
– Rnd 13 (Picot Hem): [1 sc, picot, skip 1 st] around. Sl st to first st. (21 picots)
– FO and weave in ends.
Section 5: Hair and Assembly
Using Brown yarn:
– Cut numerous strands of brown yarn measuring approximately 12 inches long.
– Latch-hook or attach strands along the top and back of the head to form a wig cap foundation.
– Divide the long strands into two sections on either side and braid tightly, securing the ends with matching brown yarn ties. Trim ends evenly.
– Sew arms securely to the upper shoulders just below the neck.
– Weave in all remaining yarn tails inside the body.
Size Customization Tips
- Scaling Up: To make a larger 12-inch doll, switch to a DK or light Worsted weight yarn with a 3.5 mm crochet hook, repeating all pattern rounds as written.
- Scaling Down: To create a tiny 6-inch ornament doll, use embroidery thread or thread weight yarn (Size 10) with a 1.5 mm steel hook.
Care Instructions
- Hand wash gently in lukewarm water using mild wool soap.
- Do not bleach or tumble dry.
- Press flat gently with a towel to remove excess moisture and dry flat in the shade.
Crochet Christmas Doll — Free Amigurumi Tutorial
I hope you had an absolute joy crafting this handmade christmas doll! There is nothing quite like seeing your completed doll sitting proudly under the holiday tree.
If you enjoyed this crochet doll tutorial, please save this page to your Pinterest boards, share your finished photos online, and tag your makes with #CrochetChristmasDoll and #FreeAmigurumiPattern. Leave a comment below and let me know what color dress your little holiday friend is wearing! Happy holidays and happy crocheting!