
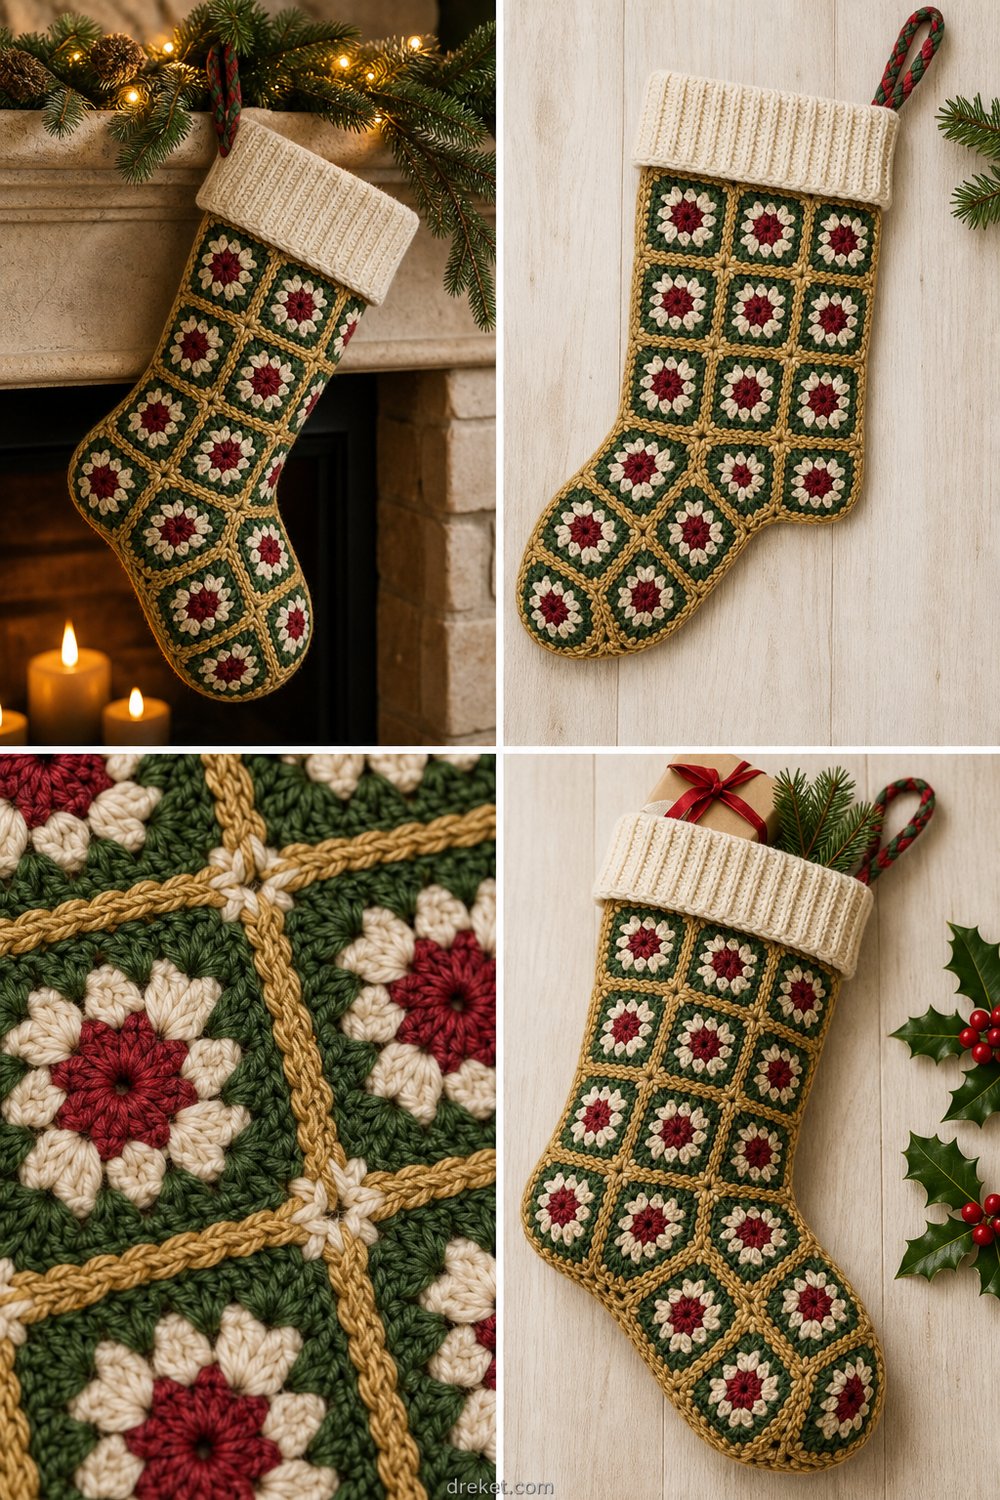
There is nothing quite like the soft glow of fairy lights dancing across a stone mantelpiece on a quiet winter evening, especially when it illuminates a handcrafted heirloom waiting patiently for Santa. Bringing together vintage charm and modern cozy texture, this project turns classic motifs into a cherished holiday staple that your family will pull out of storage year after year.
Festive Granny Square Holiday Stocking Free Crochet Pattern
Quick Facts
- Stitches Used: Chain, single crochet, half double crochet, double crochet, slip stitch
- Size Fit: One size standard holiday stocking (customization tips included for larger or smaller versions)
- Estimated Time to Complete: 6–8 hours
- Gift-Appeal Framing: An exquisite, heirloom-quality handmade gift that looks stunning styled on a mantel with real pine garland or hung at the foot of a bed.
Detailed sizing customization tips are included later in this post to help you tailor the stocking to your exact holiday decor needs.
What Makes This Festive Granny Square Holiday Stocking Special
This design relies on a clever traditional-meets-modern construction method. Instead of working flat from the toe up, the stocking is built from a grid of compact, 3-inch solid granny squares that give it crisp structural integrity and distinct color-blocking potential. We use an understated whip-stitch join to seam the squares together, laying a neat flat seam that allows the cranberry red, forest green, cream, and gold colorways to pop against one another. The wide, plush folded-over cuff is worked directly onto the top edge in rich cream half double crochets, providing a sturdy anchor for the braided two-tone hanging loop.
Skill Level
- Skill Level: Intermediate
- Required Skills:
- Working in the round and joining new yarn colors
- Standard granny square construction
- Whip-stitching crochet squares with a tapestry needle
- Picking up stitches along a raw edge for ribbed or textured cuffs
- Basic braiding for the hanging loop
💡 Designer Tip: If you are comfortable joining squares and basic double crochet clusters, you will breeze through this pattern while enjoying a relaxing weekend project.
Finished Measurements
| Measurement | Inches | Centimeters |
|---|---|---|
| Total Length (Toe to Top Cuff) | 18 in | 45.5 cm |
| Foot Length (Toe to Heel Back) | 10.5 in | 26.5 cm |
| Cuff Circumference (Folded) | 14 in | 35.5 cm |
| Individual Granny Square | 3 x 3 in | 7.5 x 7.5 cm |
Materials You Will Need
- Yarn: Worsted weight (Category 4) 100% cotton yarn for crisp stitch definition and durability.
- Hook: US G/6 (4.0 mm) crochet hook.
- Notions: Tapestry needle for weaving ends and whip-stitching, locking stitch markers, measuring tape, and scissors.
| Colorway | Yarn Weight / Type | Estimated Yardage Needed |
|---|---|---|
| Cranberry Red | Worsted Weight / 100% Cotton | 75 yds (68 m) |
| Forest Green | Worsted Weight / 100% Cotton | 65 yds (60 m) |
| Cream | Worsted Weight / 100% Cotton | 110 yds (100 m) |
| Gold | Worsted Weight / 100% Cotton | 30 yds (28 m) |
Yarn Suggestions
To capture the crisp, matte texture shown in the product imagery, choose a high-quality mercerized or non-mercerized cotton yarn that holds its shape well under the weight of stocking stuffers.
| Yarn Brand & Line | Weight | Yardage per Skein | Notes |
|---|---|---|---|
| Lion Brand Re-Spun Cotton | Worsted (4) | 194 yds / 177 m | Great stitch definition, eco-friendly fiber. |
| Knit Picks Dishie | Worsted (4) | 190 yds / 174 m | Excellent durability with rich, vibrant color options. |
| Drops Paris | Worsted (4) | 82 yds / 75 m | 100% combed cotton, soft yet structured. |
⚠️ Note: Avoid using overly stretchy acrylic or fuzzy novelty yarns (like mohair or boucle) for this project, as they obscure the geometric edges of the granny squares and can cause the stocking to sag under weight.
Gauge
| Gauge Type | Measurement |
|---|---|
| Single Square Gauge | One finished square measures exactly 3 in x 3 in (7.5 cm x 7.5 cm) using a US G/6 (4.0 mm) hook. |
| Cuff Texture Gauge | 16 hdc and 12 rows = 4 in (10 cm) square. |
💡 Designer Tip: Always make a test square before beginning your panels. If your square is too large, drop down a hook size; if too small, go up a hook size.
Abbreviations
| Abbreviation | Full Term |
|---|---|
| ch | Chain |
| sc | Single crochet |
| hdc | Half double crochet |
| dc | Double crochet |
| sl st | Slip stitch |
| st(s) | Stitch(es) |
| sp(s) | Space(s) |
| sk | Skip |
| RS | Right side |
| WS | Wrong side |
| rep | Repeat |
| FO | Fasten off |
Special Stitches Explained
- Solid Granny Square (worked in rounds): A compact square motif built with concentric rounds of double crochet clusters and solid corner spaces, ensuring no large holes appear in the body of the stocking.
- Whip-Stitch Join: A sewing technique utilizing the tapestry needle to bind adjacent squares together by catching the back loops only, creating a clean, flat, low-profile seam.
- Stacked Double Crochet (St-dc): An alternative to starting a round with a turning chain; insert hook into first st, yarn over and pull up a loop, yarn over and pull through 2 loops, yarn over and pull through remaining 2 loops.
Pattern Instructions
Section 1: Crocheting the Granny Squares
You will need a total of 12 solid granny squares to assemble the main body (toe, foot, heel, and leg).
– Color Distribution: Make 4 squares with Cranberry Red centers and Gold borders; make 4 squares with Forest Green centers and Gold borders; make 4 solid Cream squares with Gold borders.
Round 1: With Color A (Center color), start with a magic ring, ch 3 (counts as 1 dc here and throughout), work 2 dc into the ring, ch 2, 3 dc into ring, ch 2; rep from * 2 more times, join with a sl st to top of beg ch-3. (12 dc, 4 ch-2 sps)*
Round 2: Sl st into next 2 dc and into the corner ch-2 sp. St-dc (or ch 3), (2 dc, ch 2, 3 dc) in same corner ch-2 sp. Ch 1, (3 dc, ch 2, 3 dc) in next corner ch-2 sp; rep from * around, ch 1, join with sl st to top of beg st-dc. (24 dc, 4 ch-1 sps, 4 ch-2 sps)*
Round 3: Sl st into next 2 dc and into corner ch-2 sp. Switch to Gold yarn. St-dc (or ch 3), (2 dc, ch 2, 3 dc) in same corner ch-2 sp. (Ch 1, 3 dc in next ch-1 sp) twice, ch 1, (3 dc, ch 2, 3 dc) in next corner ch-2 sp; rep from * around ending with ch 1, join with sl st to top of beg st-dc. (36 dc, 8 ch-1 sps, 4 ch-2 sps)*. FO, leaving a 6-inch tail for weaving.
✅ Checkpoint: Measure your finished square at this stage. It should measure precisely 3 inches across. Block lightly if necessary before joining.
Section 2: Assembly and Seaming
Arrange your 12 squares in a standard flat stocking layout grid (4 squares wide by 3 squares high when folded and seamed, following the classic L-shaped stocking silhouette with a heel turn).
1. Lay the squares flat with the Right Sides facing up.
2. Using Cream yarn and your tapestry needle, join the squares using a secure whip-stitch through the back loops only.
3. Fold the connected grid along the designated heel and toe fold lines to form the 3D stocking shape.
4. Whip-stitch the side seams of the foot, toe, and back of the heel closed securely from the WS. Turn stocking right side out.
Section 3: The Cuff and Hanging Loop
Round 1: With RS facing, attach Cream yarn to the top opening of the assembled square grid. Working evenly around the top perimeter, ch 2 (does not count as st), work hdc in each st and chain space around, join with sl st to first hdc. (48 hdc)
Rounds 2–6: Ch 2, working in the third loop only (camel stitch) for a knit-like ribbed texture, hdc in each st around, join with sl st to first hdc. (48 hdc)
Round 7: Sl st loosely in each st around to create a clean finished edge. FO and weave in all ends. Fold the 4-inch cuff downward over the outside of the stocking.
Hanging Loop: Cut three 18-inch strands of Cranberry Red and three 18-inch strands of Forest Green. Braid them tightly together into a 6-inch braid, knot both ends securely, and attach firmly to the inside back seam of the stocking cuff.
✅ Checkpoint: Pull gently on the hanging loop to ensure it is securely anchored to the structural seam of the cuff before styling.
Size Customization Tips
- To Make a Larger Stocking: Add one extra 3-inch granny square to the circumference of the leg and foot grid (bringing the total squares per round to 5), and add 2 extra rounds to the cuff height. This increases the overall foot length by approximately 3 inches and calf circumference by 3.5 inches.
- To Make a Smaller Stocking: Use Sport weight (Category 2 or 3) yarn with a 3.0 mm hook, which will shrink each individual square down to roughly 2.25 inches, creating a charming miniature holiday stocking perfect for mantel decor or gift card holders.
Care Instructions
- Hand wash gently in cool water using a mild wool-safe detergent.
- Do not bleach or wring out the fabric.
- Reshape carefully while damp and lay flat to dry completely on a towel away from direct heat to preserve the cotton structure.
- Store flat in a breathable cotton bag during the off-season.
Festive Granny Square Holiday Stocking
I hope you adore crocheting this festive holiday stocking as much as I loved designing it for your home! There is nothing more rewarding than seeing your handmade touches bring warmth to your holiday decor.
If you make this project, please share your creations with me! Tag me on social media using #FestiveGrannyStocking, save this project to your holiday boards on Pinterest, and leave a comment below to let me know which color combination you chose for your mantel!