
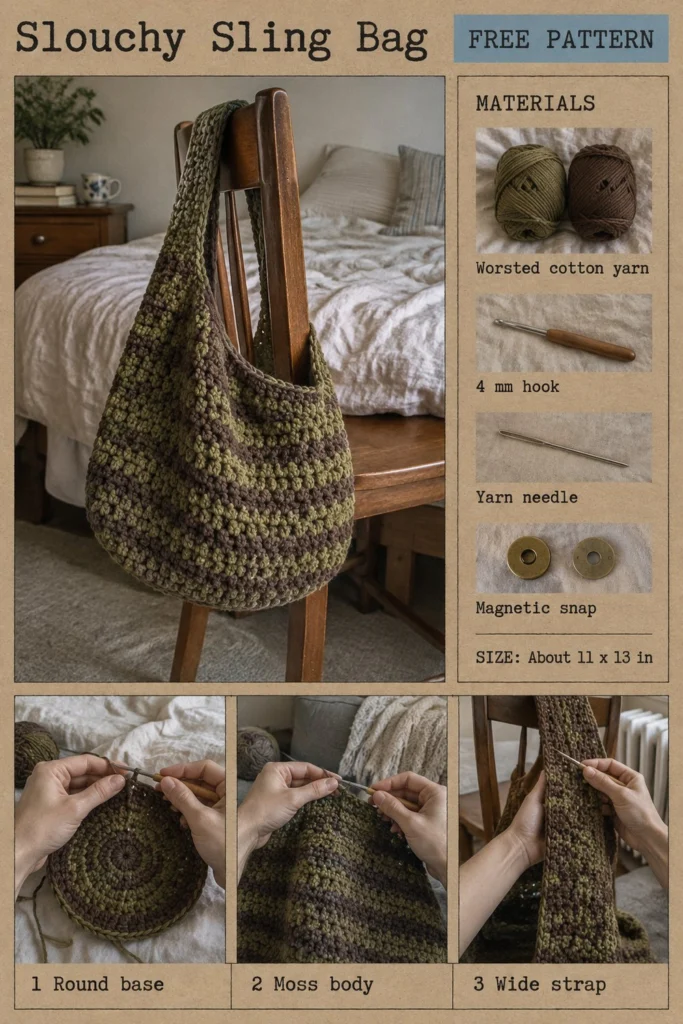
The slouchy sling bag is a stylish, effortless accessory that holds a whole day of essentials while resting comfortably against your hip. Designed in calming olive and chocolate worsted cotton yarn, this bag features a classic round base, a textured moss stitch body, and a wide, reinforced strap that prevents stretching. Whether you are running errands or heading out for a casual day, this beginner-friendly project works up quickly with basic stitches and minimal finishing.
Free Crochet Slouchy Sling Bag Pattern: One Strap, Everyday Size
Quick Facts
- Skill level: Easy Beginner
- Finished size: About 11 inches wide by 13 inches tall (excluding strap)
- Yarn: Worsted weight cotton yarn (Olive and Chocolate)
- Hook: 4 mm (US G/6) crochet hook
- Stitches used: Chain (ch), single crochet (sc), half double crochet (hdc), slip stitch (sl st)
- Time to make: Approximately 6 to 8 hours
Detailed size tips and customization options are included further down in the guide.
What Makes This Slouchy Sling Bag Special
This bag is built for real-world functionality. The firm single crochet round base provides a stable platform so your items don’t slip through. The body utilizes the moss stitch (granite stitch), which creates a dense, beautiful texture with lovely drape that hugs your body when worn. Finally, the wide strap is constructed with reinforced rows and tightly worked stitches to eliminate unwanted sagging and shoulder strain.
Skill Level
- Basic understanding of crochet terminology
- Working in the round (joined rounds) and working in turned rows
- Basic sewing skills to attach the magnetic snap
With just basic stitches and clear photo guides, adventurous beginners can easily complete this project.
Finished Measurements
- Width: 11 inches (28 cm) laid flat
- Height: 13 inches (33 cm) from base to top edge
- Strap Length: 28 inches (71 cm) long by 3 inches (7.6 cm) wide
Materials You Will Need
| Material | Description | Amount |
|---|---|---|
| Worsted Cotton Yarn (Color A: Olive) | 100% cotton worsted weight | 350 yards (320 meters) |
| Worsted Cotton Yarn (Color B: Chocolate) | 100% cotton worsted weight | 250 yards (230 meters) |
| Crochet Hook | 4 mm (US G/6) | 1 hook |
| Tapestry Needle | For weaving ends and sewing | 1 needle |
| Magnetic Snap | 18 mm metal magnetic clasp set | 1 set |
| Stitch Markers | Removable locking markers | 3 markers |
Yarn Suggestions
| Yarn Line | Skein Yardage | Notes |
|---|---|---|
| Lily Sugar’n Cream | 120 yards / 71 g | Affordable, highly durable, and crisp stitch definition. |
| Drops Paris | 82 yards / 50 g | Soft unmercerized cotton with a wonderful natural drape. |
| Lion Brand 24/7 Cotton | 186 yards / 100 g | Mercerized cotton with a slight sheen and excellent strength. |
⚠️ Note: Avoid loose acrylic yarns for this project, as they stretch excessively under weight. Stick to sturdy cotton or cotton blends to keep your bag structured and secure.
Gauge
- Base Gauge: Rnds 1 to 6 of the round base = 4 inches (10 cm) across using a 4 mm hook.
- Moss Stitch Gauge: 18 sts and 18 rows = 4 inches (10 cm) in moss stitch.
Abbreviations
- ch: chain
- sc: single crochet
- hdc: half double crochet
- sl st: slip stitch
- inc: increase (work 2 sc in the same st)
- st(s): stitch(es)
- BLO: back loop only
- Rnd: round
- Row: row
- rep: repeat
- sk: skip
- [ ]: work instructions within brackets as directed
Note: UK terms equivalent: sc = double crochet (dc), hdc = half treble crochet (htr), sl st = slip stitch.
Special Stitches Explained
- Moss Stitch (Granite Stitch): Worked over an even number of stitches. [1 sc, ch 1, sk 1 st] repeated across, working the sc into the ch-1 space of the previous row.
- Invisible Join: Cut yarn leaving a 6-inch tail, thread onto a tapestry needle, skip the first stitch and sew under both loops of the second stitch, then anchor back through the center of the final stitch to create a seamless finish.
Pattern Instructions
General Notes
- Do not turn at the end of rounds unless specified.
- Join each round with a sl st to the first stitch and ch 1 to begin the next round (the ch 1 does not count as a stitch).
- Carry your yarns or change colors smoothly according to the stripe sequence.
Section 1: Round Base (Olive and Chocolate)
Using Color A (Olive), create a magic ring.
- Rnd 1: Work 6 sc into the magic ring, join with sl st to first sc. (6 sc)
- Rnd 2: Ch 1, inc in each st around, join. (12 sc)
- Rnd 3: Ch 1, [1 sc, inc] 6 times, join. (18 sc)
- Rnd 4: Switch to Color B (Chocolate). Ch 1, [2 sc, inc] 6 times, join. (24 sc)
- Rnd 5: Ch 1, [3 sc, inc] 6 times, join. (30 sc)
- Rnd 6: Switch to Color A (Olive). Ch 1, [4 sc, inc] 6 times, join. (36 sc)
- Rnd 7: Ch 1, [5 sc, inc] 6 times, join. (42 sc)
- Rnd 8: Switch to Color B (Chocolate). Ch 1, [6 sc, inc] 6 times, join. (48 sc)
- Rnd 9: Ch 1, [7 sc, inc] 6 times, join. (54 sc)
- Rnd 10: Switch to Color A (Olive). Ch 1, [8 sc, inc] 6 times, join. (60 sc)
- Rnd 11: Ch 1, [9 sc, inc] 6 times, join. (66 sc)
- Rnd 12: Switch to Color B (Chocolate). Ch 1, [10 sc, inc] 6 times, join. (72 sc)
- Rnd 13: Ch 1, [11 sc, inc] 6 times, join. (78 sc)
- Rnd 14: Switch to Color A (Olive). Ch 1, [12 sc, inc] 6 times, join. (84 sc)
- Rnd 15: Ch 1, working in BLO for this round only, sc in each st around, join. (84 sc)
✅ Checkpoint: Your flat base should measure approximately 9 inches across and sit flat before the walls begin to rise.
Section 2: Moss Body (Alternating Stripes)
Now transition into the moss body pattern. You will work alternating 2-round stripes of Color A (Olive) and Color B (Chocolate).
- Rnd 1 (Color A): Ch 1, *sc in next st, ch 1, sk 1 st*; rep from * around, join to first sc. *(42 sc, 42 ch-1 spaces)*
- Rnd 2 (Color A): Sl st into the first ch-1 space, ch 1, sc in same space, *ch 1, sc in next ch-1 space*; rep from * around, ending with ch 1, join to first sc. *(42 sc, 42 ch-1 spaces)*
- Rnds 3 to 4 (Color B): Rep Rnd 2 using Color B. (42 sc, 42 ch-1 spaces)
- Rnds 5 to 6 (Color A): Rep Rnd 2 using Color A. (42 sc, 42 ch-1 spaces)
- Rnds 7 to 8 (Color B): Rep Rnd 2 using Color B. (42 sc, 42 ch-1 spaces)
- Rnds 9 to 10 (Color A): Rep Rnd 2 using Color A. (42 sc, 42 ch-1 spaces)
- Rnds 11 to 12 (Color B): Rep Rnd 2 using Color B. (42 sc, 42 ch-1 spaces)
- Rnds 13 to 14 (Color A): Rep Rnd 2 using Color A. (42 sc, 42 ch-1 spaces)
- Rnds 15 to 16 (Color B): Rep Rnd 2 using Color B. (42 sc, 42 ch-1 spaces)
- Rnds 17 to 18 (Color A): Rep Rnd 2 using Color A. (42 sc, 42 ch-1 spaces)
- Rnds 19 to 20 (Color B): Rep Rnd 2 using Color B. (42 sc, 42 ch-1 spaces)
- Rnds 21 to 22 (Color A): Rep Rnd 2 using Color A. (42 sc, 42 ch-1 spaces)
- Rnds 23 to 24 (Color B): Rep Rnd 2 using Color B. (42 sc, 42 ch-1 spaces)
- Rnds 25 to 26 (Color A): Rep Rnd 2 using Color A. (42 sc, 42 ch-1 spaces)
- Rnd 27 (Color B): Ch 1, working 1 sc in each sc and 1 sc in each ch-1 space around, join. (84 sc)
- Rnd 28 (Color B): Ch 1, sc in each st around, join. Fasten off with an invisible join. (84 sc)
Section 3: Wide Strap (Olive and Chocolate)
The strap is worked in flat rows directly anchored to opposite sides of the bag rim to ensure structural integrity and prevent stretching.
- Row 1: Count 12 stitches across the top opening of the bag. Join Color A at the first marked stitch, ch 1, work 12 sc across the 12 stitches, turn. (12 sc)
- Row 2: Ch 1, sc in each st across, turn. (12 sc)
- Rows 3 to 4 (Color B): Ch 1, sc in each st across, turn. (12 sc)
- Rows 5 to 6 (Color A): Ch 1, sc in each st across, turn. (12 sc)
- Rows 7 to 8 (Color B): Ch 1, sc in each st across, turn. (12 sc)
- Rows 9 to 10 (Color A): Ch 1, sc in each st across, turn. (12 sc)
- Rows 11 to 12 (Color B): Ch 1, sc in each st across, turn. (12 sc)
- Rows 13 to 14 (Color A): Ch 1, sc in each st across, turn. (12 sc)
- Rows 15 to 16 (Color B): Ch 1, sc in each st across, turn. (12 sc)
- Rows 17 to 18 (Color A): Ch 1, sc in each st across, turn. (12 sc)
- Rows 19 to 20 (Color B): Ch 1, sc in each st across, turn. (12 sc)
- Rows 21 to 22 (Color A): Ch 1, sc in each st across, turn. (12 sc)
- Rows 23 to 24 (Color B): Ch 1, sc in each st across, turn. (12 sc)
- Rows 25 to 26 (Color A): Ch 1, sc in each st across, turn. (12 sc)
- Rows 27 to 28 (Color B): Ch 1, sc in each st across, turn. (12 sc)
- Rows 29 to 30 (Color A): Ch 1, sc in each st across, turn. (12 sc)
- Rows 31 to 32 (Color B): Ch 1, sc in each st across, turn. (12 sc)
- Rows 33 to 34 (Color A): Ch 1, sc in each st across, turn. (12 sc)
- Rows 35 to 36 (Color B): Ch 1, sc in each st across, turn. (12 sc)
- Rows 37 to 38 (Color A): Ch 1, sc in each st across, turn. (12 sc)
- Rows 39 to 40 (Color B): Ch 1, sc in each st across, turn. (12 sc)
- Rows 41 to 42 (Color A): Ch 1, sc in each st across, turn. (12 sc)
- Rows 43 to 44 (Color B): Ch 1, sc in each st across, turn. (12 sc)
- Rows 45 to 46 (Color A): Ch 1, sc in each st across, turn. (12 sc)
- Rows 47 to 48 (Color B): Ch 1, sc in each st across, turn. (12 sc)
- Rows 49 to 50 (Color A): Ch 1, sc in each st across, turn. (12 sc)
- Rows 51 to 52 (Color B): Ch 1, sc in each st across, turn. (12 sc)
- Rows 53 to 54 (Color A): Ch 1, sc in each st across, turn. (12 sc)
- Rows 55 to 56 (Color B): Ch 1, sc in each st across, turn. (12 sc)
- Rows 57 to 58 (Color A): Ch 1, sc in each st across, turn. (12 sc)
Align the final row of the strap directly opposite the starting point across the bag opening. Fasten off, leaving a 20-inch tail. Use the tapestry needle to whipstitch the final strap row securely to the corresponding 12 stitches on the bag rim.
Assembly
- Magnetic Snap Installation: Locate the exact inside center under the bag opening on opposite inner walls. Insert the prongs of the magnetic snap through the fabric, place the metal backing washer over the prongs, and fold the prongs flat using pliers. Repeat for the second snap piece directly opposite.
- Weaving Ends: Thread all remaining yarn tails onto your tapestry needle and weave them securely through the reverse side of the stitches. Trim close to the work.
Finishing
Give your finished bag a gentle steam blocking or light spray with water to relax the cotton fibers and let the moss stitch drape naturally into its iconic slouchy shape.
Size Customization Tips
- Making it wider: Add more rounds to your flat base by continuing the increase pattern (e.g., [12 sc, inc] x 6), making sure to adjust your moss body starting stitch count to match the new multiple.
- Adjusting strap length: Add or subtract even rows of strap length before attaching it to the opposite side of the bag.
Care Instructions
Hand wash in cool water with mild detergent. Lay flat to dry out of direct sunlight. Do not machine dry to prevent cotton shrinkage.
FAQ
Can I use acrylic yarn instead of cotton?
While you can use acrylic yarn, it tends to stretch significantly more under the weight of items carried in a sling bag. Cotton or cotton-blend yarns offer the best structure and durability.
How do I make the bag deeper?
To make the bag taller, simply add more 2-row repeat blocks in the moss stitch body section before working the final solid sc rounds.
Is this pattern suitable for complete beginners?
Yes! The pattern uses only basic stitches (single crochet, half double crochet, and chains). Taking your time with the magic ring and row counts will ensure a smooth project.
Happy Crocheting!
I hope you love making your new Slouchy Sling Bag as much as I loved designing it! Be sure to save this pattern pin on Pinterest for later, and leave a comment below letting me know what color combination you chose for yours. Happy crafting!
📄 Your free PDF pattern