
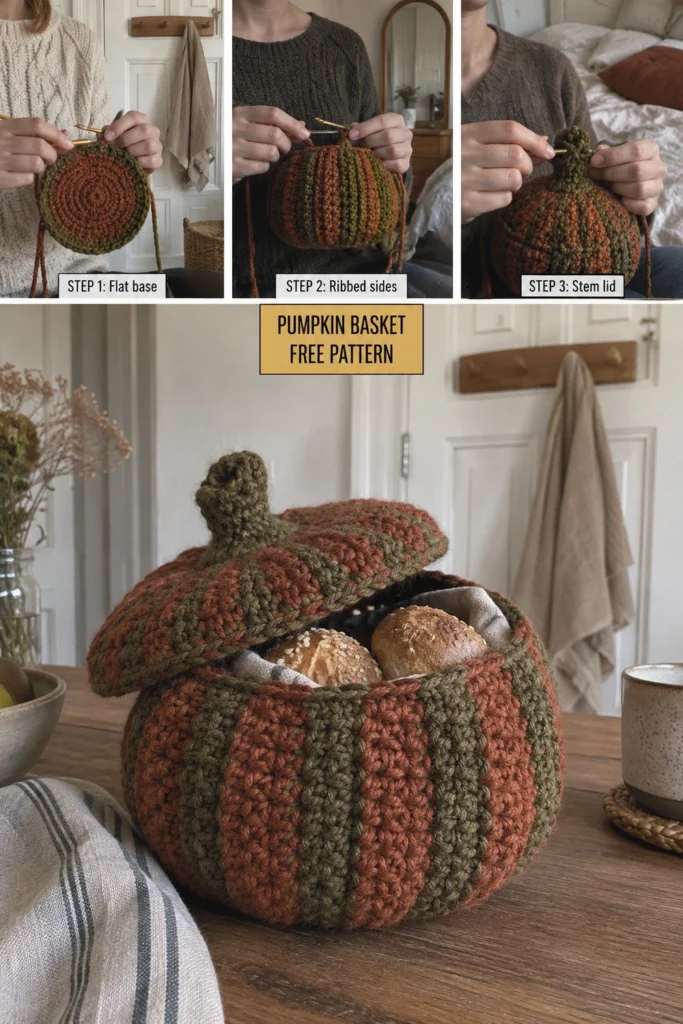
This cozy, textured pumpkin basket brings instant autumn warmth to any table while serving a practical purpose—holding dinner rolls or bread warm during family meals. Featuring firm ribbed post-stitch sides and a matching stem lid, this project works up surprisingly fast in two contrasting rustic shades of yarn.
Free Crochet Pumpkin Basket Pattern: Holds Rolls at the Table
Quick Facts
- Skill level: Easy
- Finished size: Approximately 8 inches wide and 7 inches tall (including stem)
- Yarn: Worsted weight yarn in Rust and Olive Green
- Hook: 5.0 mm (H-8) crochet hook
- Stitches used: ch, sl st, sc, hdc, dc, bpdc (back post double crochet)
- Time to make: 4 to 6 hours
Size customization tips are included further down in this guide.
What Makes This Crochet Pumpkin Basket Special
Unlike standard soft amigurumi pumpkins, this basket is constructed with sturdy stitches and thick tension to hold its shape independently, even when loaded with dinner rolls or fruit. The clever use of back post double crochet creates distinct, prominent ribs that mimic a real heirloom pumpkin, while the flat base ensures it sits securely on a table without wobbling.
Skill Level
- Working in the round and in rows
- Basic increases and decreases
- Front and back post crochet techniques (explained below)
💡 Designer Tip: Don’t worry if the base curls slightly while you are working the initial flat rounds; switching to the post-stiches for the body will naturally pull the sides upward into a firm, self-supporting wall.
Finished Measurements
- Width: 8 inches / 20 cm across the widest part of the body
- Height: 5 inches / 13 cm for the basket body (7 inches / 18 cm including the lid and stem)
- Base Diameter: 6 inches / 15 cm
Materials You Will Need
| Material | Detail | Amount |
|---|---|---|
| Yarn A (Rust) | Worsted Weight (#4) | 180 yards / 165 meters |
| Yarn B (Olive Green) | Worsted Weight (#4) | 120 yards / 110 meters |
| Crochet Hook | 5.0 mm (US H-8) | 1 hook |
| Notions | Stitch markers, tapestry needle, polyester fiberfill (small amount for stem) | As needed |
Yarn Suggestions
| Yarn Line | Weight | Skein Yardage | Notes |
|---|---|---|---|
| Red Heart Super Saver | Worsted (#4) | 364 yards | Budget-friendly, holds firm shape well |
| Caron One Pound | Worsted (#4) | 812 yards | Durable with great stitch definition |
| Lion Brand Wool-Ease | Worsted (#4) | 197 yards | Adds a lovely wool texture and warmth |
⚠️ Note: Avoid novelty yarns, roving yarns, or overly soft bamboo blends, as they will not provide the structural stiffness needed for a functional basket.
Gauge
- 13 sts x 12 rows = 4 inches / 10 cm in standard single crochet.
- Rnds 1 to 6 of the flat base circle = 4.5 inches across.
Abbreviations
- ch = chain
- sl st = slip stitch
- sc = single crochet
- hdc = half double crochet
- dc = double crochet
- bpdc = back post double crochet
- inc = increase (work 2 sc in the same st)
- dec = decrease (sc2tog)
- st(s) = stitch(es)
- BLO = back loop only
- Rnd = round
- Row = row
- rep = repeat
- [ ] = work instructions within brackets as directed
UK terms equivalent: sc = dc, hdc = htr, dc = tr.
Special Stitches Explained
- Magic Ring: Wrap yarn around your fingers to form a loop, insert hook, pull up a loop, and work your initial stitches into the center of the ring. Pull tight to close.
- Back Post Double Crochet (bpdc): Yarn over, insert your hook from back to front to back around the post of the specified stitch from the previous row, yarn over, pull up a loop, [yarn over and pull through 2 loops] twice.
Pattern Instructions
Pattern Notes
- Rounds are joined with a slip stitch unless otherwise noted; turning chains do not count as stitches unless specified.
- Use stitch markers to keep track of your rounds.
Section 1: Flat Base (Olive Green and Rust)
Using Olive Green, make a magic ring.
Rnd 1: 6 sc in magic ring, join with sl st to first sc. (6 sc)
Rnd 2: Ch 1, inc in each st around, join. (12 sc)
Rnd 3: Ch 1, [1 sc, inc] x 6, join. (18 sc)
Switch to Rust.
Rnd 4: Ch 1, [2 sc, inc] x 6, join. (24 sc)
Rnd 5: Ch 1, [3 sc, inc] x 6, join. (30 sc)
Rnd 6: Ch 1, [4 sc, inc] x 6, join. (36 sc)
Switch to Olive Green.
Rnd 7: Ch 1, [5 sc, inc] x 6, join. (42 sc)
Rnd 8: Ch 1, [6 sc, inc] x 6, join. (48 sc)
Rnd 9: Ch 1, [7 sc, inc] x 6, join. (54 sc)
Switch to Rust.
Rnd 10: Ch 1, [8 sc, inc] x 6, join. (60 sc)
Rnd 11: Ch 1, [9 sc, inc] x 6, join. (66 sc)
Rnd 12: Ch 1, [10 sc, inc] x 6, join. (72 sc)
✅ Checkpoint: Base is complete, measuring approximately 6 inches across.
Section 2: Ribbed Basket Body (Rust and Olive Green)
Rnd 1: Ch 2 (does not count as st here and throughout), working in BLO, dc in each st around, join with sl st to first dc. (72 dc)
Rnd 2: Ch 2, work 5 dc in the next 5 sts, 1 bpdc around each of the next 3 sts x 9, join. (72 sts)
Rnds 3 to 8: Repeat Rnd 2, alternating color bands every 2 rounds if desired for striped pumpkin segments (4 bands of Rust, 4 bands of Olive Green). (72 sts)
Rnd 9: Ch 1, working through both loops, [dec, 10 sc] x 6, join. (66 sc)
Rnd 10: Ch 1, [dec, 9 sc] x 6, join. (60 sc)
Rnd 11: Ch 1, [dec, 8 sc] x 6, join. (54 sc)
Fasten off, weave in all ends securely.
Section 3: Stem Lid (Olive Green and Rust)
Start with Rust, making a smaller flat base mirroring the basket base.
Rnd 1: Magic ring, 6 sc in ring, join. (6 sc)
Rnd 2: Ch 1, inc in each st around, join. (12 sc)
Rnd 3: Ch 1, [1 sc, inc] x 6, join. (18 sc)
Rnd 4: Ch 1, [2 sc, inc] x 6, join. (24 sc)
Rnd 5: Ch 1, [3 sc, inc] x 6, join. (30 sc)
Rnd 6: Ch 1, [4 sc, inc] x 6, join. (36 sc)
Switch to Olive Green.
Rnd 7: Ch 1, working in BLO, dc in each st around, join. (36 dc)
Rnd 8: Ch 2, work 4 dc in next 4 sts, 1 bpdc around next 2 sts x 6, join. (36 sts)
Rnds 9 to 10: Repeat Rnd 8. (36 sts)
Rnd 11: Ch 1, [dec, 4 sc] x 6, join. (30 sc)
Rnd 12: Ch 1, [dec, 3 sc] x 6, join. (24 sc)
Rnd 13: Ch 1, [dec, 2 sc] x 6, join. (18 sc)
Rnd 14: Ch 1, [dec, 1 sc] x 6, join. (12 sc)
Stuff the lid firmly with polyester fiberfill.
Rnds 15 to 18: Ch 1, sc in each st around, join. (12 sc)
Rnd 19: Ch 1, [dec] x 6, join. (6 sc)
Fasten off, leaving a long tail. Thread tail through remaining front loops, pull tight to close the stem top, and secure.
Assembly & Finishing
- Place the stem lid on top of the filled basket body. The ribbed texture of the lid should align naturally with the vertical ridges of the body sides.
- No extra assembly is required; the lid is designed to rest securely on top of the basket opening.
Size Customization Tips
To make a larger pumpkin basket, continue increasing the flat base in increments of 6 stitches per round (e.g., 78 sc, 84 sc), keeping your post-stitch repeat counts divisible by 8 for the body. Each extra round on the base adds approximately 0.75 inches to the overall diameter.
Care Instructions
Spot clean with a damp cloth and mild soap as needed. Avoid machine washing or drying to maintain the structural firmness of the post stitches.
FAQ
Can I use cotton yarn instead of acrylic?
Yes! Cotton yarn provides fantastic stitch definition and makes the basket even sturdier, though it has slightly less stretch than acrylic.
How do I make the basket hold its shape better?
Ensure your tension is firm throughout the post-stitch rounds. If you need extra rigidity, you can work a strand of clear nylon cord or fishing line alongside your yarn during the body rounds.
Is this pattern suitable for beginners?
While it uses post-stitches, the step-by-step construction is straightforward. If you are comfortable working basic increases and double crochet, you will master this project easily.
Happy Crocheting!
I hope you enjoy making this festive pumpkin basket for your seasonal table. Be sure to save this pin on Pinterest to your crochet boards, and leave a comment below sharing what colors you decided to use for yours!
📄 Your free PDF pattern