
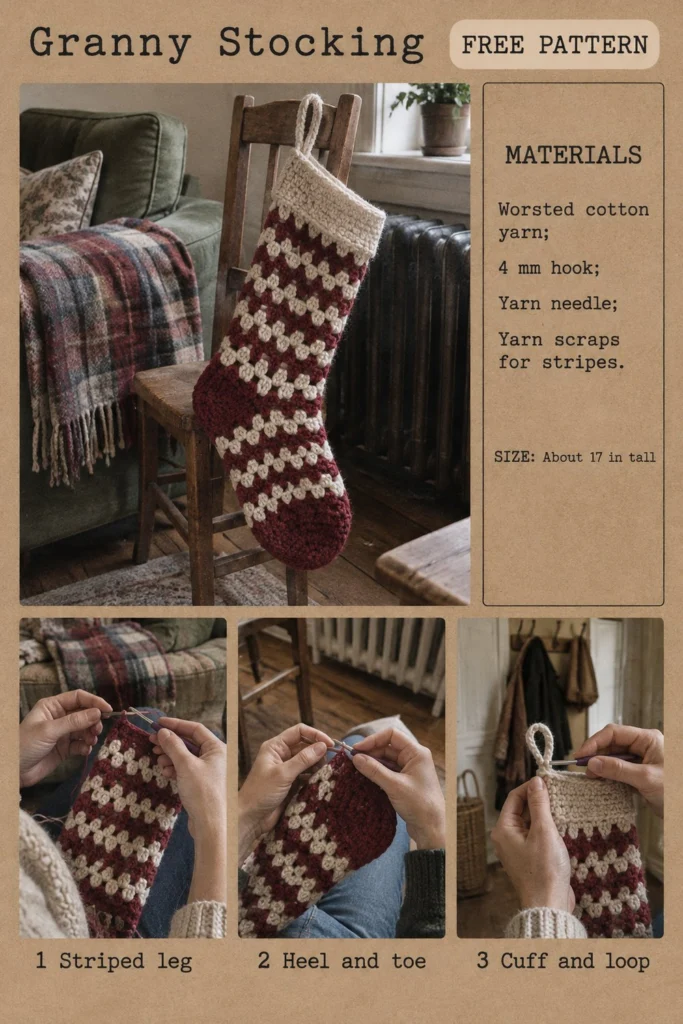
Add a handmade touch to your holiday mantel with this festive holiday heirloom. The classic design combines cranberry red and natural oatmeal cotton in textured granny-stitch stripes with a solid heel, toe, and top cuff complete with a sturdy hanging loop.
Free Crochet Granny Christmas Stocking Pattern: Stash-Busting Stripes
Quick Facts
- Skill level: Easy
- Finished size: About 17 inches tall and 7 inches wide at the widest point of the foot
- Yarn: Worsted weight cotton yarn (Cranberry red and Oatmeal)
- Hook: 4 mm (US G/6) crochet hook
- Stitches used: Ch, sl st, sc, dc, granny cluster (3 dc)
- Time to make: Weekend project (approx. 5 to 7 hours)
💡 Designer Tip: Size customization tips are included further down to help you adjust the length or width of your stocking if desired.
What Makes This Stocking Special
Working granny-stitch clusters in round rows creates the iconic vintage look you see in the photos. Alternating two contrasting colors gives you clean, sharp stripes that pop. Working the heel and toe in solid cranberry red anchors the design, while the textured ribbed cuff folded over the top provides a polished finish.
Skill Level
- Basic crochet stitches (chain, slip stitch, single crochet, double crochet)
- Working in joined rounds
- Changing colors between rounds
- Following a photo-guided construction order: Striped leg, Heel and toe, Cuff and loop.
Don’t worry if you are relatively new to granny stitch in the round—each step uses basic repetitions that are easy to memorize!
Finished Measurements
| Dimension | Inches | Centimeters |
|---|---|---|
| Height (Top of cuff to bottom of toe) | 17 in | 43 cm |
| Width (Leg section flat) | 6.5 in | 16.5 cm |
| Foot length (Back of heel to toe tip) | 8 in | 20 cm |
Materials You Will Need
| Material / Color | Yarn Weight | Type | Estimated Yardage | Meters |
|---|---|---|---|---|
| Cranberry Red | Worsted (4) | 100% Cotton | 130 yds | 119 m |
| Oatmeal | Worsted (4) | 100% Cotton | 110 yds | 101 m |
- Hook: 4 mm (US G/6) crochet hook
- Notions: Yarn needle, locking stitch markers, scissors
Yarn Suggestions
| Brand | Yarn Line | Skein Yardage | Notes |
|---|---|---|---|
| Lion Brand | Rewind or 24/7 Cotton | 186 yds / 100g | 100% cotton with great stitch definition |
| Paintbox Yarns | Cotton Aran | 93 yds / 50g | Excellent color range for holiday shades |
| Lily | Sugar ‘n Cream | 120 yds / 70g | Budget-friendly classic cotton |
⚠️ Note: Avoid novelty, fuzzy, or acrylic yarns if you want the crisp stitch definition and structured look shown in the sample photos. Cotton provides the ideal crisp drape for a sturdy holiday stocking.
Gauge
- 16 sts and 8 rows = 4 in (10 cm) in granny cluster pattern using a 4 mm hook.
- Check your gauge: Adjust your hook size if necessary to obtain the correct tension so your stocking holds its shape properly.
Abbreviations
- ch: chain
- sl st: slip stitch
- sc: single crochet
- dc: double crochet
- st(s): stitch(es)
- sp(s): space(s)
- sk: skip
- rep: repeat
- Rnd: round
- Cranberry: Cranberry Red yarn
- Oatmeal: Oatmeal yarn
UK conversion note: In UK terminology, sc = dc, hdc = htr, dc = tr.
Special Stitches Explained
- Granny Cluster: Work 3 double crochet stitches into the designated space or stitch.
- Cluster Grouping: Work (3 dc, ch 2, 3 dc) into a single ch-2 space for corner turns, or 3 dc into ch-1 / ch-2 spaces for body rounds.
Pattern Instructions
Section 1: Striped Leg
Note: The leg is worked from the top down in joined rounds. Join each round with a sl st to the first st unless otherwise noted.
With Oatmeal, ch 48, join with sl st to form a ring, taking care not to twist.
Rnd 1: Ch 3 (counts as first dc), work 1 dc in each ch around, join with sl st to top of beg ch-3. (48 dc)
Rnd 2: Ch 1, sc in same st, sc in each dc around, join. (48 sc)
Rnd 3: Ch 3, sk next st, work 2 dc in next st (counts as first cluster group start), *sk 2 sts, 3 dc in next st* rep from * around, join with sl st to top of beg ch-3. *(16 clusters)*
Rnds 4 to 16: Sl st into the next ch-space, ch 3, work 2 dc in same space, *3 dc in next ch-space* rep from * around, join. Alternate colors every 2 rounds:
– Rnds 4-5: Cranberry
– Rnds 6-7: Oatmeal
– Rnds 8-9: Cranberry
– Rnds 10-11: Oatmeal
– Rnds 12-13: Cranberry
– Rnds 14-16: Oatmeal (ending with 3 rounds of Oatmeal to transition to heel)
✅ Checkpoint: At the end of Rnd 16, you will have completed the upper striped leg section. Fasten off Oatmeal.
Section 2: Heel and Toe
Note: The heel is worked back and forth in rows over half of the stitches, then joined back into rounds.
Heel (Worked in rows with Cranberry):
Attach Cranberry at the designated heel edge (spanning 8 granny clusters / 24 sts).
Row 1: Ch 1, work sc in each st across the 24 heel sts, turn. (24 sc)
Row 2: Ch 1, sc2tog, sc in next 20 sts, sc2tog, turn. (22 sc)
Row 3: Ch 1, sc2tog, sc in next 18 sts, sc2tog, turn. (20 sc)
Row 4: Ch 1, sc2tog, sc in next 16 sts, sc2tog, turn. (18 sc)
Row 5: Ch 1, sc2tog, sc in next 14 sts, sc2tog, turn. (16 sc)
Fold the heel flap in half and seam the bottom edges together using a slip stitch seam from the wrong side, or leave open to join in the round. Fasten off.
Foot and Toe (Worked in rounds):
Re-attach Cranberry or continue working the foot stripes, resuming granny clusters around the remaining unworked leg stitches and the heel opening.
Work 6 rounds of granny clusters for the foot, alternating colors every 2 rounds:
– Rnds 1-2: Cranberry
– Rnds 3-4: Oatmeal
– Rnds 5-6: Cranberry
Toe Shaping:
With Cranberry, work 2 final rounds of single crochet, decreasing evenly by working sc2tog across opposite sides every few stitches until 12 sts remain. Fasten off leaving a 10-inch tail. Thread tail through remaining stitches and pull tightly to close the toe. Weave in all ends.
Section 3: Cuff and Loop
Cuff:
Attach Oatmeal to the top edge of the stocking (Rnd 1 foundation edge).
Rnd 1: Ch 1, work sc evenly around the top opening. Join. (48 sc)
Rnds 2 to 6: Ch 2 (does not count as st), work Front Post dc and Back Post dc alternately around for a ribbed cuff texture, join. (48 sts)
Fasten off and weave in ends. Fold the cuff over toward the outside of the stocking.
Hanging Loop:
Attach Oatmeal securely to the inner back seam of the cuff. Chain 16, sl st back into the same base stitch to form a secure loop. Fasten off and weave in the remaining yarn tail securely on the inside.
Assembly & Finishing
- Weave in any remaining loose ends on the inside of the stocking using your yarn needle.
- Block lightly with steam if desired to set the cotton stitches flat.
Size Customization Tips
- To make it longer: Add 2 to 4 extra rounds of granny clusters to the leg section before starting the heel. Each 2-round stripe adds about 1 inch of length.
- To make it wider: Increase your starting foundation chain in multiples of 3 stitches.
Care Instructions
Hand wash in cool water with mild detergent. Lay flat to dry on a towel, reshaping gently while damp. Do not bleach or tumble dry.
FAQ
Can I use acrylic yarn instead of cotton?
Yes, acrylic yarn works wonderfully if you prefer a softer texture, though cotton holds its shape better when hung filled with small gifts.
How do I adjust the stocking for a smaller size?
Start with a foundation chain divisible by 3 that is shorter than 48 stitches (such as 36 or 42 chs) and work fewer cluster groups around.
Is this pattern suitable for complete beginners?
Yes! As long as you are comfortable with basic double crochet clusters and changing yarn colors, the steps are straightforward and clearly laid out.
Happy Crocheting!
I hope you love creating your new holiday stocking. Save this pattern to your Pinterest board, and let me know what color combinations you choose in the comments below!
📄 Your free PDF pattern