
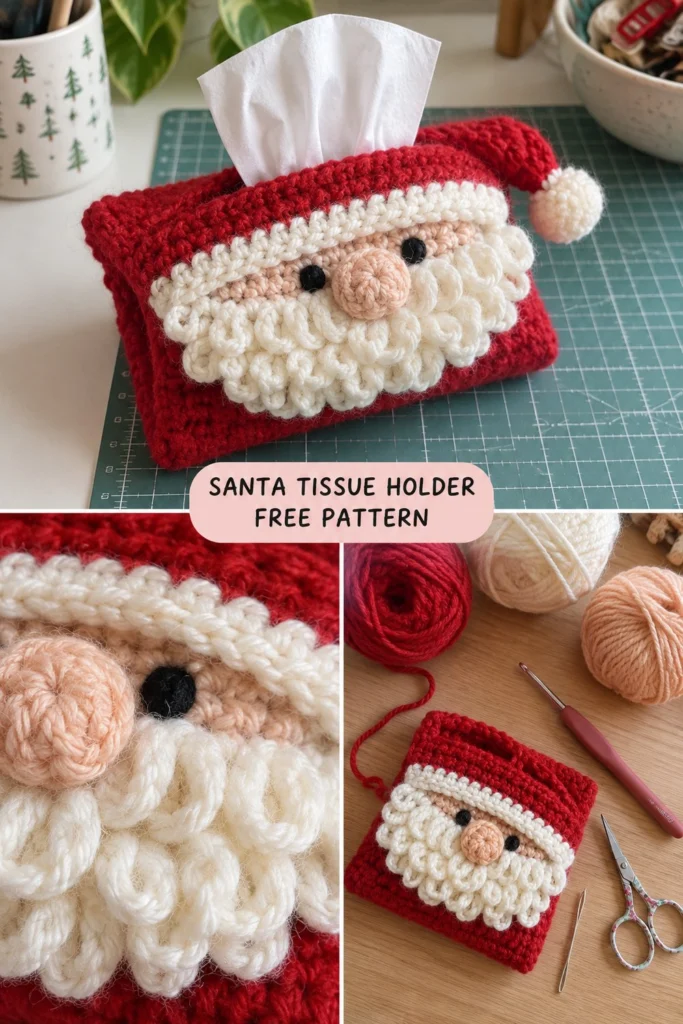
Get into the festive spirit with this adorable and practical pocket-sized Santa tissue holder! The crochet tutorial guides you step-by-step through creating a cozy red pouch with a classic Santa beard flap, designed to dispense standard pocket-sized tissue packs with ease.
Pocket-Sized Crochet Santa Tissue Holder – Free Christmas Pattern
Quick Facts
- Skill level: Easy
- Finished size: Approximately 5 inches wide by 3.5 inches tall
- Yarn: Medium weight (Worsted / #4) acrylic yarn in Red, Cream, and Peach
- Hook size: 4.0 mm (US G/6) crochet hook
- Stitches used: Chain (ch), single crochet (sc), double crochet (dc), slip stitch (sl st), front loop only (FLO), back loop only (BLO), puff stitch
- Time to make: 1 to 2 hours
💡 Designer Tip: Size adjustment tips are included further down if your pocket tissue packs run larger or smaller!
What Makes This Pocket-Sized Crochet Santa Tissue Holder Special
This charming design combines a flat crocheted pouch with clever flap shaping to wrap your pocket tissues in holiday cheer. The textured white beard is built using raised stitches and puff loops to mimic Santa’s fluffy facial hair, while a sweet peach nose and black beaded or embroidered eyes bring his cheerful face to life. A miniature red and white pom-pom hat sits perched on the corner, completing the festive look.
Skill Level
- Basic stitches (ch, sc, dc, sl st)
- Working in rows and continuous rounds
- Basic assembly and sewing parts together
- Reassurance line: If you can make a simple rectangular pouch, you can easily complete this project!
Finished Measurements
| Dimension | Inches | Centimeters |
|---|---|---|
| Width | 5.0 in | 12.7 cm |
| Height | 3.5 in | 8.9 cm |
Materials You Will Need
| Color | Yarn Type / Weight | Yards | Meters |
|---|---|---|---|
| Red | Worsted weight acrylic | 45 yds | 41 m |
| Cream | Worsted weight acrylic | 25 yds | 23 m |
| Peach | Worsted weight acrylic | 5 yds | 5 m |
| Black (small amount) | Worsted weight acrylic or embroidery floss | 2 yds | 2 m |
- Hook: 4.0 mm (US G/6) crochet hook
- Notions: Yarn needle, scissors, stitch markers, small amount of polyester stuffing for the nose and hat pom-pom
Yarn Suggestions
| Yarn Line | Weight | Skein Yardage | Notes |
|---|---|---|---|
| Red Heart Super Saver | Worsted (#4) | 364 yds / 333 m | Durable, excellent stitch definition, wide color range |
| Caron Simply Soft | Worsted (#4) | 315 yds / 288 m | Soft sheen, smooth texture |
| Lion Brand Vanna’s Choice | Worsted (#4) | 170 yds / 156 m | Great structure for small pouches |
⚠️ Note: Avoid novelty fuzzy yarns for the main pouch, as they make stitch counting difficult; stick to smooth worsted weight yarns for clean lines and clear texture.
Gauge
- 16 sc x 18 rows = 4 in / 10 cm using a 4.0 mm crochet hook.
Abbreviations
- ch: chain
- sc: single crochet
- hdc: half double crochet
- dc: double crochet
- tr: treble crochet
- sl st: slip stitch
- st(s): stitch(es)
- BLO: back loop only
- FLO: front loop only
- inc: increase (work 2 sc in the same st)
- dec: decrease (work 2 sc together)
- puff: puff stitch
UK conversions: sc = dc, hdc = htr, dc = tr.
Special Stitches Explained
- Puff Stitch: [Yarn over, insert hook into stitch, yarn over, pull up a loop] 4 times in the same stitch (9 loops on hook), yarn over, pull through all 9 loops on hook, chain 1 to secure.
- Invisible Decrease: Insert hook into the front loop only of the next two stitches, yarn over, pull through both front loops, yarn over and pull through remaining two loops on hook.
Pattern Instructions
Pattern Notes
- The pouch is worked in joined rows or continuous rounds as specified per section.
- Use a stitch marker to keep track of your rounds where applicable.
Section 1: Main Pouch (Red)
With Red yarn, ch 22.
– Row 1: Working in the 2nd ch from hook, sc in each ch across, turn (21 sc)
– Row 2: Ch 1, sc in each st across, turn (21 sc)
– Rows 3 to 24: Repeat Row 2 (21 sc per row)
– Fasten off, leaving a long tail for sewing the side seams. Fold the rectangle into a pouch shape overlapping the ends slightly to create the tissue opening slit, and sew the side seams closed.
Section 2: Santa Beard Flap (Cream and Peach)
With Cream yarn, attach to the top front edge of the pouch.
– Row 1: Ch 1, work 21 sc evenly across the edge, turn (21 sc)
– Row 2: Ch 1, (1 sc, puff st) across to last st, sc in last st, turn (21 sc)
– Row 3: Ch 1, sc in each st across, turn (21 sc)
– Row 4: Repeat Row 2 for textured beard edge, turn (21 sc)
– Fasten off Cream.
Section 3: Santa Face (Peach)
With Peach yarn, make a small circle for the nose.
– Rnd 1: Magic ring, 6 sc in ring, sl st to first sc to join (6 sc)
– Rnd 2: Ch 1, inc in each st around, sl st to join (12 sc)
– Fasten off, leaving a tail for sewing. Lightly stuff with a tiny pinch of fiberfill before closing.
Section 4: Hat and Pom-Pom (Red and Cream)
With Red yarn, attach to the top right corner of the pouch flap.
– Row 1: Ch 6, working in 2nd ch from hook, sl st in next 2 ch, sc in next 2 ch, hdc in last ch, attach to pouch edge with a sl st.
– Fasten off Red.
– Pom-Pom: With Cream yarn, make a tiny magic ring, 5 sc in ring, sl st to join, fasten off and sew to the tip of the hat.
✅ Checkpoint: At this stage, your pouch should be fully seamed, the beard flap textured with puff stitches, the peach nose centered above the beard, and the mini red hat attached to the corner.
Assembly
- Position the Peach nose directly above the center of the Cream beard flap and sew securely.
- Embroider two French knots or small straight stitches with Black yarn for the eyes just above the beard and on either side of the nose.
- Insert a standard pocket tissue pack inside the pouch, pulling the first tissue through the center slit.
Finishing
Weave in all remaining yarn ends securely using your yarn needle. Trim any excess yarn close to the fabric. No blocking is required for this small acrylic project.
Size Customization Tips
- To fit a wider tissue pack, add stitches in multiples of 2 to your initial foundation chain for the main pouch.
- Ensure your beard flap matches the final stitch count of your pouch top edge.
Care Instructions
Spot clean with a damp cloth and mild soap. If heavily soiled, hand wash gently in cool water and lay flat to dry. Do not tumble dry.
FAQ
Can I use cotton yarn instead of acrylic?
Yes! Cotton yarn works wonderfully and gives the pouch a stiffer, more structured shape, which is great for durability.
How do I adjust this pattern for larger facial tissues?
This pattern is specifically designed for pocket-sized travel tissue packs. To scale it up for standard cube boxes, you would need to recalculate your foundation chain and panel height based on box measurements.
Are safety eyes safe for children’s gifts?
For gifts intended for children under 3 years old, it is always recommended to embroider the eyes with yarn or embroidery floss rather than using plastic safety eyes to prevent choking hazards.
Happy Crocheting!
I hope you enjoyed making this charming holiday tissue holder! Save this pin to your Christmas crochet board on Pinterest, and drop a comment below to let me know what colors you used for your Santa. Happy holidays and happy hooking!
📄 Your free PDF pattern