
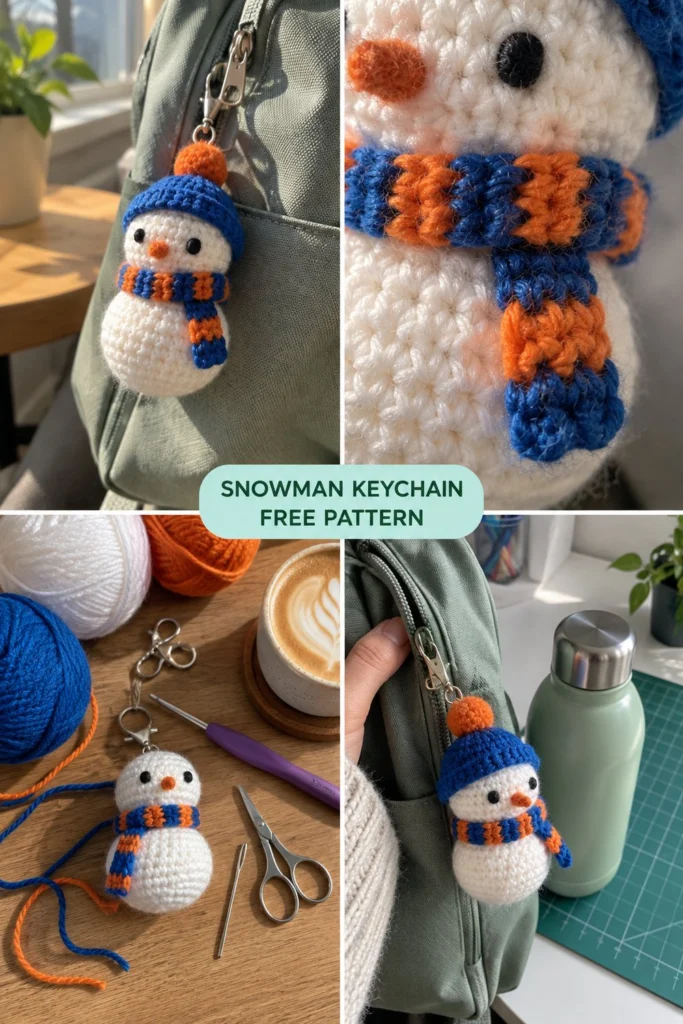
Bring cozy winter charm everywhere you go with this adorable handmade snowman keychain! Worked in simple continuous rounds of soft worsted-weight yarn, this little character features a plump white body, a vibrant cobalt and orange striped scarf, and a matching beanie topped with a cute pom-pom. It’s a quick, beginner-friendly project that makes a wonderful holiday gift or backpack accessory.
Mini Crochet Snowman Keychain – Free Christmas Pattern
Quick Facts
- Skill level: Easy Beginner
- Finished size: Approximately 2 inches (5 cm) tall and 1.5 inches (4 cm) wide
- Yarn: Worsted weight (Aran / 4-ply) in White, Cobalt Blue, and Bright Orange
- Hook: 3.5 mm (E/4) crochet hook
- Stitches used: US terminology (ch, sc, sl st, inc, dec)
- Time to make: 1 to 2 hours
Size customization tips are included further down in the article.
What Makes This Crochet Snowman Keychain Special
This pocket-sized amigurumi is designed for durability and speed. The head and body are worked in one continuous piece from top to bottom, minimizing sewing. The snug continuous round technique creates a dense fabric that keeps the polyester stuffing securely inside, while surface embroidery gives the snowman a sweet, baby-safe face without hard plastic pieces.
Skill Level
- Basic understanding of magic rings
- Working in continuous spiral rounds (without joining)
- Basic single crochet increases and decreases
- Simple surface embroidery (French knots)
Don’t worry if you are new to amigurumi—this pattern uses basic stitches only and is broken down step by step!
Finished Measurements
- Height: 2 inches (5 cm)
- Width: 1.5 inches (4 cm) at the widest part of the body
Materials You Will Need
| Material | Color / Detail | Amount |
|---|---|---|
| Worsted Weight Yarn | White | Approx. 15 yards (14 meters) |
| Worsted Weight Yarn | Cobalt Blue | Approx. 8 yards (7 meters) |
| Worsted Weight Yarn | Bright Orange | Approx. 5 yards (4 meters) |
| Crochet Hook | 3.5 mm (US E/4) | 1 hook |
| Notions | Polyester fiberfill stuffing | Small handful |
| Notions | Tapestry needle | 1 needle |
| Notions | Stitch markers | 1 to 2 markers |
| Notions | Keychain ring with chain clip | 1 set |
| Notions | Black embroidery floss or yarn | Small amount for facial features |
Yarn Suggestions
| Yarn Line | Weight | Notes |
|---|---|---|
| Caron Simply Soft | Worsted / Aran | Excellent stitch definition and vibrant sheen |
| Lion Brand Vanna’s Choice | Worsted / Aran | Sturdy and holds amigurumi shape exceptionally well |
| Red Heart Super Saver | Worsted / Aran | Budget-friendly with a wide range of colors |
⚠️ Note: Avoid novelty or eyelash yarns for this project, as they make it difficult to see your stitches and count your rounds correctly.
Gauge
- Amigurumi Gauge: Rnds 1 to 6 of the flat circle base = 1.25 inches (3.2 cm) across using a 3.5 mm hook. Gauge is not critical for amigurumi, but keep your stitches tight so stuffing doesn’t show through.
Abbreviations (US Terminology)
- beg: beginning
- ch: chain
- dec: decrease (invisible single crochet decrease: insert hook into front loops of next 2 stitches, yarn over, pull through both loops, yarn over, pull through remaining 2 loops)
- inc: increase (work 2 sc in the same stitch)
- rep: repeat
- rnd(s): round(s)
- sc: single crochet
- sl st: slip stitch
- st(s): stitch(es)
- [ ] / ( ): work instructions inside parentheses as directed
UK Conversion Note: UK: sc = dc, hdc = htr, dc = tr.
Special Stitches Explained
- Magic Ring: Form a loop with your yarn tail, insert hook into the center of the loop, yarn over, and pull up a working loop. Work your starting stitches directly into the ring, then pull the tail tightly to close the center hole.
- Invisible Decrease (dec): Insert your hook into the front loop only of the first stitch, then immediately insert your hook into the front loop only of the second stitch. Yarn over and pull through both front loops (2 loops on hook), yarn over and pull through both loops on hook.
Pattern Instructions
Pattern Notes
- The snowman body and head are worked in continuous spiral rounds without joining. Use a stitch marker to keep track of the first stitch of each round.
- Stuff firmly as you go before closing the final rounds.
Section 1: Snowman Head and Body (White, make 1)
Starting at the top of the head:
– Rnd 1: In White, work 6 sc in a magic ring (6 sc)
– Rnd 2: Inc in each st around (12 sc)
– Rnd 3: [1 sc, inc] x 6 (18 sc)
– Rnds 4 to 6: Sc in each st around (18 sc)
– Rnd 7: [1 sc, dec] x 6 (12 sc)
– Rnd 8: Dec x 6 (6 sc) — This forms the neck indentation.
– Rnd 9: Inc in each st around (12 sc)
– Rnd 10: [1 sc, inc] x 6 (18 sc)
– Rnds 11 to 14: Sc in each st around (18 sc)
– Rnd 15: [1 sc, dec] x 6 (12 sc)
– Begin stuffing the head and body firmly with fiberfill.
– Rnd 16: Dec x 6 (6 sc)
– Fasten off, leaving a long tail of about 6 inches (15 cm). Thread the tail through the front loops of the remaining 6 stitches with a tapestry needle, pull tight to close the hole, and weave in the end securely.
✅ Checkpoint: You should now have a stuffed figure with a distinct smaller head and larger body separated by a narrow neck.
Section 2: Beanie Hat (Cobalt Blue and Bright Orange, make 1)
Starting from the bottom brim of the hat:
– Rnd 1: With Cobalt Blue, ch 18, join with a sl st to form a ring (being careful not to twist the chain), ch 1, sc in same ch and in each ch around, join with sl st to first sc (18 sc)
– Rnd 2: Ch 1, [sc in next 4 sts, dec] x 3, join with sl st (15 sc)
– Rnd 3: Ch 1, [sc in next 3 sts, dec] x 3, join with sl st (12 sc)
– Rnd 4: Ch 1, [sc in next 2 sts, dec] x 3, join with sl st (9 sc)
– Fasten off Cobalt Blue, leaving a 6-inch (15 cm) tail for sewing.
– Pom-Pom: Using Bright Orange, make a tiny pom-pom by wrapping yarn around two fingers 15 times, tying tightly in the center, and trimming to a small fluffy ball about 0.5 inches (1.2 cm) in diameter. Alternatively, work 5 sc in a magic ring with Orange, pull closed, and fasten off.
Section 3: Scarf (Cobalt Blue and Bright Orange, make 1)
- Row 1: With Bright Orange, ch 36, sc in 2nd ch from hook and in each ch across (35 sc).
- Change to Cobalt Blue on the last pull-through of the final stitch.
- Row 2: Ch 1, turn, sc in each st across (35 sc).
- Fasten off, leaving a 6-inch (15 cm) tail.
Assembly
- Attaching the Hat: Place the Cobalt Blue beanie onto the top of the snowman’s head, angled slightly. Secure it by whip-stitching the bottom edge of the hat to Rnds 1 through 3 of the head.
- Attaching the Pom-Pom: Sew or glue the Bright Orange pom-pom firmly to the top center of the beanie.
- Attaching the Scarf: Wrap the striped scarf around the snowman’s neck (covering Rnd 8 / the neck indentation). Cross the ends in front so one hangs down over the chest. Secure with a few anchoring stitches at the back and side so it stays in place.
- Attaching the Keychain: Securely stitch the metal keychain loop through the top of the beanie (incorporating several stitches around the crown) so the snowman hangs upright.
Finishing
- Facial Embroidery:
- Using black embroidery floss or split yarn strands, embroider two French knot eyes on the head between Rnds 4 and 5, about 3 stitches apart.
- Using Bright Orange yarn, embroider a small vertical or diagonal satin-stitch carrot nose centered between and just below the eyes.
- Weaving Ends: Double-check that all loose yarn tails are securely woven into the interior of the amigurumi and trimmed cleanly.
Size Customization Tips
- To make a slightly larger snowman, use a 4.0 mm crochet hook with DK-weight or light worsted yarn, adding an extra increase round to the head and body.
- To make a mini version for delicate zipper pulls, use size 10 crochet cotton with a 1.5 mm steel hook.
Care Instructions
- Spot clean gently with a damp cloth and mild soap.
- Do not submerge completely in water or machine wash to protect the fiberfill stuffing and metal keychain hardware.
FAQ
Can I use safety eyes instead of embroidery?
For older children and adults, 4mm or 6mm safety eyes can be used. For babies and toddlers under 3 years old, always embroider the facial features to avoid choking hazards.
How do I keep my stitches from showing the stuffing?
Make sure you are using a hook size slightly smaller than recommended on your yarn label (a 3.5 mm hook for worsted weight is ideal). This keeps the tension tight and prevents the fiberfill from poking through.
Can I change the scarf colors to match my favorite team?
Yes! You can easily swap the cobalt and orange for any two team colors or holiday palettes (like red and green for Christmas).
Happy Crocheting!
I hope you love making your new mini snowman keychain! Save this pattern on Pinterest so you have it ready whenever you need a quick, joyful project. Leave a comment below to share what colors you used for your snowman’s scarf and hat!
📄 Your free PDF pattern