
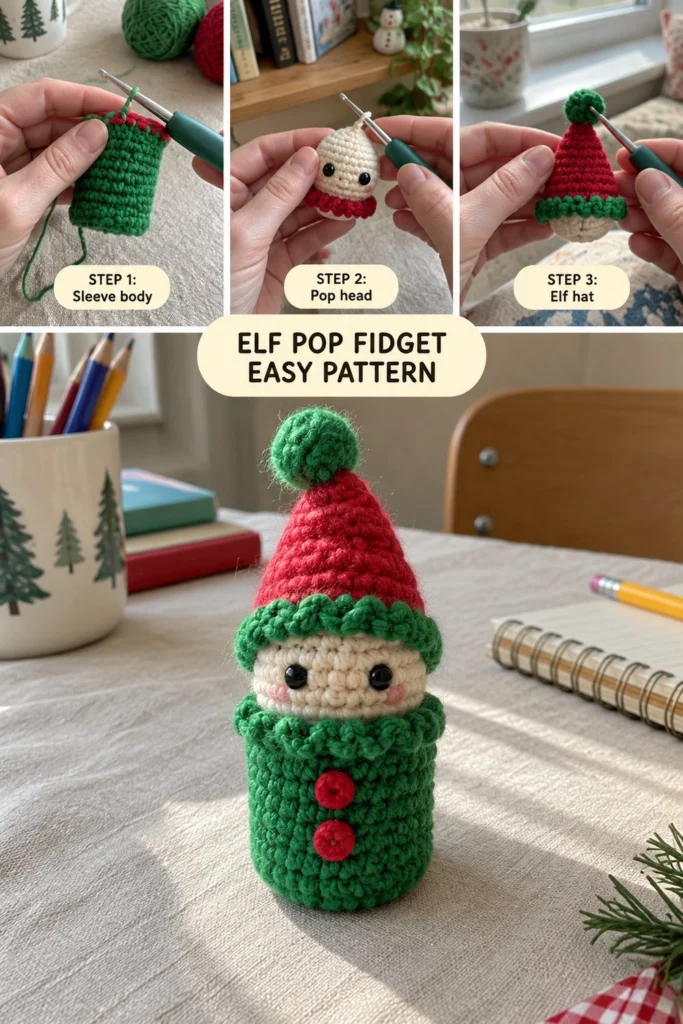
Press it, pop it, do it again: this quiet elf is weirdly hard to put down. This free crochet pattern makes a kelly green and red fidget about 3 inches tall: an elf with a soft body and a head that pops in and out of its collar quietly when pressed. Makes a thoughtful handmade gift, and this easy crochet project is simple to repeat. Happy hooking!
Quick Crochet Elf Pop Fidget – Free No-Sew Christmas Pattern
Quick Facts
| Feature | Detail |
|---|---|
| Skill level | Easy / Beginner-Friendly Amigurumi |
| Finished size | Approx. 3 inches (7.6 cm) tall |
| Yarn | Worsted weight (Category 4) yarn in Kelly Green, Red, and Cream |
| Hook | 3.5 mm (US E/4) crochet hook |
| Stitches used | US terminology (sc, inc, dec, sl st, FLO, BLO) |
| Time to make | 1 to 2 hours |
Size customization tips are included further down the page so you can easily adapt your fidget.
What Makes This Elf Pop Fidget Special
This fidget relies on smart shaping rather than complicated mechanisms. The green sleeve body works in continuous spiral rounds of single crochet, with a ribbed collar worked in both loops to create a snug pocket. The cream pop head is stuffed lightly so it pushes smoothly up and down inside the sleeve collar without getting stuck. The red elf hat is built directly onto the head with a cute green pom-pom on top, keeping all pieces securely attached for a clean finish.
Skill Level
- Basic understanding of crochet terminology and working in the round
- Comfort with a magic ring, single crochet increases, and invisible decreases
- Ability to identify front and back loops for textured turns
Don’t worry if you are new to pop fidget toys—every step is explained clearly below.
Finished Measurements
| Dimension | Inches | Centimeters |
|---|---|---|
| Height | 3.0 in | 7.6 cm |
| Diameter (Body) | 1.5 in | 3.8 cm |
Materials You Will Need
| Material / Notion | Color / Type | Details |
|---|---|---|
| Yarn A | Kelly Green | Worsted weight (approx. 25 yds / 23 m) |
| Yarn B | Red | Worsted weight (approx. 15 yds / 14 m) |
| Yarn C | Cream | Worsted weight (approx. 10 yds / 9 m) |
| Crochet Hook | 3.5 mm (US E/4) | Amigurumi hook |
| Safety Eyes | Black (6 mm) | 2 pairs or use embroidery floss |
| Embroidery Floss | Pink | For cheek blush |
| Buttons | Small Red (x2) | For front sleeve decoration |
| Notions | Stitch marker, tapestry needle, polyester fiberfill stuffing |
Yarn Suggestions
| Yarn Line | Weight | Notes |
|---|---|---|
| Lion Brand Vanna’s Choice | Worsted (4) | Firm stitch definition, holds shape well for fidget toys |
| Red Heart Super Saver | Worsted (4) | Durable, widely available, holds up to repeated popping |
| Caron Simply Soft | Worsted (4) | Soft feel, lovely sheen for holiday projects |
⚠️ Note: Avoid bulky or fluffy yarns for this pattern, as they add too much friction and prevent the head from popping smoothly inside the sleeve.
Gauge
- 10 sts x 11 rounds = 2 inches (5 cm) in single crochet
- Rnds 1 to 6 of the flat circle = 1.5 inches (3.8 cm) across
Abbreviations (US Terms)
| Abbreviation | Meaning |
|---|---|
| ch | chain |
| sc | single crochet |
| inc | single crochet increase (2 sc in one stitch) |
| dec | invisible single crochet decrease |
| FLO | front loop only |
| BLO | back loop only |
| sl st | slip stitch |
| st(s) | stitch(es) |
| Rnd(s) | round(s) |
UK terms: sc = dc, hdc = htr, dc = tr.
Special Stitches Explained
- Magic Ring: Wrap yarn around your index finger twice, insert hook under loops, pull up a loop, ch 1, and work starting stitches into the ring.
- Invisible Decrease (dec): Insert hook into the front loop of the next stitch, then insert hook into the front loop of the following stitch (3 loops on hook). Yarn over and pull through the first 2 loops, yarn over and pull through remaining 2 loops.
Pattern Instructions
Pattern Notes:
– Work in continuous spiral rounds without joining unless stated otherwise. Use a stitch marker to track the first stitch of each round.
– Stuff the head lightly so it remains squishy and flexible for popping. Leave the sleeve body mostly unstuffed so the head can slide inside.
Section 1: Sleeve Body (Kelly Green, make 1)
Rnd 1: In a magic ring, work 6 sc (6 sc)
Rnd 2: Inc in each st around (12 sc)
Rnd 3: (1 sc, inc) x 6 (18 sc)
Rnd 4: (2 sc, inc) x 6 (24 sc)
Rnd 5: Working in BLO, sc in each st around (24 sc)
Rnds 6 to 13: Sc in each st around (24 sc)
Rnd 14: Working in FLO, (3 sc, inc) x 6 (30 sc)
Rnd 15: Sl st in each st around, fasten off securely and weave in ends. Sew two small red buttons to the front of the sleeve body. (30 sl st)
✅ Checkpoint: Your sleeve body should stand upright with a textured base and a ruffled collar at the top edge.
Section 2: Pop Head (Cream, make 1)
Rnd 1: In a magic ring, work 6 sc (6 sc)
Rnd 2: Inc in each st around (12 sc)
Rnd 3: (1 sc, inc) x 6 (18 sc)
Rnd 4: (2 sc, inc) x 6 (24 sc)
Rnds 5 to 8: Sc in each st around (24 sc)
Note: If using safety eyes, insert them between Rnds 6 and 7, about 4 stitches apart. Embroider pink cheek blush just below and slightly to the outside of each eye.
Rnd 9: (2 sc, dec) x 6 (18 sc)
Rnd 10: (1 sc, dec) x 6 (12 sc)
Stuff the head lightly with fiberfill.
Rnd 11: Dec x 6 (6 sc)
Fasten off, leaving a short tail to close the top.
Section 3: Elf Hat (Red and Kelly Green, make 1)
Rnd 1 (Kelly Green): In a magic ring, work 5 sc (5 sc)
Rnd 2: Sc in each st around (5 sc)
Rnd 3 (Change to Red): (1 sc, inc) x 2, 1 sc (7 sc)
Rnd 4: Sc in each st around (7 sc)
Rnd 5: (2 sc, inc) x 2, 1 sc (9 sc)
Rnd 6: Sc in each st around (9 sc)
Rnd 7: (2 sc, inc) x 3 (12 sc)
Rnd 8: Sc in each st around (12 sc)
Rnd 9: (3 sc, inc) x 3 (15 sc)
Rnd 10: Sc in each st around (15 sc)
Rnd 11: (4 sc, inc) x 3 (18 sc)
Rnd 12: Working in FLO, sc in each st around (18 sc)
Fasten off, leaving a long tail for assembly.
Assembly
- Place the finished red hat over the top of the cream pop head, aligning the base of the hat with Rnd 8 of the head. Securely whipstitch the hat in place around the brim.
- Insert the bottom of the pop head assembly down into the top opening of the green sleeve body.
- Push the head down so it rests inside the sleeve collar; test the pop action by pushing it up and down.
Finishing
Weave in all remaining loose yarn ends securely inside the pieces. Trim excess yarn. Ensure all embroidered details or safety eye backs are secure before gifting.
Size Customization Tips
- To make a taller sleeve body, simply work extra straight single crochet rounds between Rnd 6 and Rnd 13 of the sleeve body.
- Adjusting your hook size up or down by 0.5 mm will change the overall tension, making the pop mechanism tighter or looser depending on your preference.
Care Instructions
Hand wash gently in cool water with mild soap. Lay flat to dry in the shade. Do not tumble dry or bleach.
FAQ
Can I use safety eyes for young children?
For children under 3 years old, we strongly recommend embroidering the eyes with black embroidery floss instead of using plastic safety eyes to prevent any choking hazards.
How do I make the pop action smoother?
Ensure you do not overstuff the head. A lightly stuffed head has more give, allowing it to invert and pop smoothly in and out of the sleeve collar.
Can I substitute cotton yarn for acrylic?
Yes! 100% cotton yarn works wonderfully and provides crisp stitch definition, though it has slightly less stretch than acrylic.
Happy Crocheting!
Thank you for making this holiday project with me! Save this pattern to your Pinterest boards to find it easily later, and leave a comment below sharing what colors you used for your elf fidget.
📄 Your free PDF pattern