











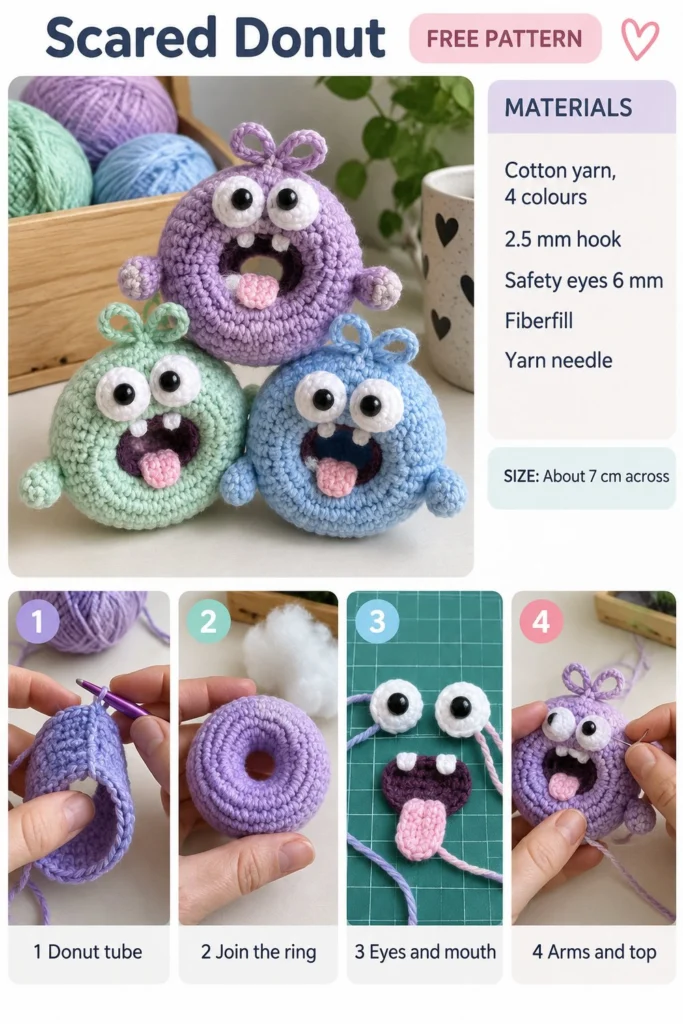
If you are looking for a quick and satisfying amigurumi project that packs a ton of personality into a tiny package, you are going to love this mini crochet donut monster. With its big wide eyes, open surprised mouth, two little teeth, and tiny plush tongue, it looks delightfully scared! It measures about seven centimeters across and works up fast using small yarn scraps.
Mini Crochet Donut Monster Amigurumi – Free Pattern (Scared Face)
Quick Facts
- Skill level: Confident Beginner
- Finished size: About 7 cm (2.8 in) across
- Yarn: Sport weight cotton yarn in 4 colors (e.g., lavender for the body, white for the eyes, dark purple for the mouth interior, pink for the tongue)
- Hook: 2.5 mm (US C/2)
- Stitches used: ch, sc, sl st, inc, dec
- Time to make: 2 to 3 hours
Size customization tips are included further down.
What Makes This Donut Monster Special
This plushie starts as a long crochet tube that is stuffed progressively as you work, then joined into a ring to create the classic donut shape. The expressive scared face comes together with simple flat-worked mouth pieces and safety eyes mounted on crocheted white circles, followed by two small side arms and a cute little loop on top.
Skill Level
- Working in continuous spiral rounds
- Basic increases and invisible decreases
- Joining flat pieces and amigurumi parts with sewing
- Simple embroidery and assembly
If you can crochet a basic amigurumi sphere, you can easily master this fun little monster!
Finished Measurements
| Dimension | Metric | Imperial |
|---|---|---|
| Diameter | 7 cm | 2.8 in |
| Thickness | 2.5 cm | 1.0 in |
Materials You Will Need
| Material | Detail / Color | Quantity |
|---|---|---|
| Cotton Yarn (Sport weight) | Lavender (Body) | 20 g / 50 m (55 yds) |
| Cotton Yarn (Sport weight) | White (Eyes) | 5 g / 12 m (13 yds) |
| Cotton Yarn (Sport weight) | Dark Purple (Mouth) | 5 g / 10 m (11 yds) |
| Cotton Yarn (Sport weight) | Pink (Tongue) | 5 g / 5 m (5 yds) |
| Crochet Hook | 2.5 mm (US C/2) | 1 hook |
| Safety Eyes | 6 mm black plastic | 2 pieces |
| Fiberfill | Polyester stuffing | 15 g |
| Notions | Yarn needle, stitch marker, scissors | 1 set |
Yarn Suggestions
| Yarn Line | Weight | Skein Yardage | Notes |
|---|---|---|---|
| Schachenmayr Catania | Sport (Fine 2) | 125 m per 50 g | 100% mercerized cotton with a neat stitch definition. |
| Hobbii Rainbow Cotton 8/4 | Sport (Fine 2) | 170 m per 50 g | Wide palette of bright amigurumi colors. |
| Drops Safran | Sport (Fine 2) | 160 m per 50 g | Soft combed cotton, great for toys. |
⚠️ Note: Avoid novelty, fuzzy, or dark-hued mohair yarns when starting out, as they obscure your stitches and make working in the round difficult. Stick to smooth cotton yarns for clean amigurumi texture.
Gauge
- 24 sts x 26 rnds = 10 cm (4 in) in single crochet using a 2.5 mm hook.
- Rnds 1 to 3 of the donut tube measure about 2.5 cm (1 in) across.
Abbreviations (US Terms)
- ch: chain
- sc: single crochet
- sl st: slip stitch
- inc: single crochet increase (2 sc in the same stitch)
- dec: single crochet decrease (sc2tog, work 2 sts together)
- st(s): stitch(es)
- Rnd(s): round(s)
- Row(s): row(s)
- sk: skip
- FO: fasten off
UK terminology note: sc = dc, hdc = htr, dc = tr.
Special Stitches Explained
- Magic Ring: Wrap yarn around your fingers to form a loop, insert hook, pull up a loop, ch 1, and work the first round of stitches into the center of the ring. Pull the tail to close.
- Invisible Decrease (dec): Insert the hook into the front loop only of the next two stitches, yarn over, pull through both front loops, yarn over, and pull through the remaining two loops on the hook.
Pattern Instructions
Pattern Notes
- Work in continuous spiral rounds without joining at the end of each round unless specified. Use a stitch marker to track the first stitch of every round.
- Stuff the donut tube firmly as you progress, making sure not to overstuff so you can still easily join the ends.
Section 1: Donut Body (Lavender, make 1)
Rnd 1: Start 18 ch with lavender, join with a sl st to form a ring (taking care not to twist the chain), ch 1 (does not count as st), work 18 sc into the ring (18 sc).
Rnds 2 to 45: sc in each st around (18 sc per rnd).
FO, leaving a long tail of about 30 cm (12 in) for sewing the two ends of the tube together.
✅ Checkpoint: You should have a long lavender tube measuring about 20 cm (8 in) long. Stuff the tube lightly with fiberfill as you go, then bring the two open ends together to form a ring. Whipstitch the two ends closed securely, weaving in the remaining yarn tail inside the donut hole.
Section 2: Eyes (White, make 2)
Rnd 1: Make a magic ring with white, work 6 sc into the ring, sl st to first st to join (6 sc).
Rnd 2: Ch 1, inc in each st around, sl st to first st to join (12 sc).
FO, leaving a 20 cm (8 in) tail for sewing. Insert a 6 mm safety eye into the center magic ring of each white circle and secure the backing on the reverse side.
Section 3: Mouth (Dark Purple, make 1)
Row 1: Ch 7, turn, starting in 2nd ch from hook, work 6 sc across, turn (6 sc).
Row 2: Ch 1, dec, 2 sc, dec, turn (4 sc).
Row 3: Ch 1, 4 sc across (4 sc).
FO, leaving a 20 cm (8 in) tail for sewing.
Teeth (White, make 2): Attach white yarn to the top edge of the mouth piece, ch 2, sl st in the same space to form a tiny tooth peak, FO and weave in ends. Repeat for the second tooth along the top inner edge of the mouth.
Section 4: Tongue (Pink, make 1)
Row 1: Ch 4, turn, starting in 2nd ch from hook, work 3 sc across, turn (3 sc).
Row 2: Inc, 1 sc, inc, turn (5 sc).
Row 3: 5 sc across (5 sc).
Row 4: Dec, 1 sc, dec (3 sc).
FO, leaving a 15 cm (6 in) tail for sewing. Sew the tongue overlapping the lower edge of the dark purple mouth piece.
Section 5: Arms (Lavender, make 2)
Rnd 1: Make a magic ring with lavender, work 4 sc into the ring (4 sc).
Rnds 2 to 3: sc in each st around (4 sc per rnd).
Rnd 4: Work 3 ch-loops for fingers at the tip: (ch 3, sl st in same st) 3 times, sl st to secure base. FO, leaving a 15 cm (6 in) tail for sewing. Leave arms unstuffed.
Section 6: Top Loop / Hair (Lavender, make 1)
Row 1: Ch 15, join with sl st to form a small loop, ch 3, form a second small loop joined at the same base to create a double-petal bow shape. FO, leaving a 15 cm (6 in) tail.
Assembly
- Mouth Placement: Position the dark purple mouth with its attached white teeth and pink tongue onto the front center of the donut body. Whipstitch securely around the outer edges.
- Eye Placement: Place the two white eye circles just above the mouth, slightly angled outward for that classic scared look. Sew them down using the white yarn tails.
- Arms Placement: Sew one small arm onto each side of the donut body roughly midway down the outer curve.
- Top Loop Placement: Attach the double-loop bow securely to the very top center of the donut body.
💡 Designer Tip: Use pins to hold all facial features in place before you start sewing. This lets you adjust the spacing so your donut monster looks perfectly wide-eyed and startled!
Size Customization Tips
- Using different yarn weights: If you swap the sport weight cotton for DK weight yarn and a 3.0 mm hook, your donut monster will measure about 9 cm (3.5 in) across. For a chunky version, use plush chenille yarn with a 4.5 mm hook.
- Adjusting tube length: To make a thicker or thinner donut ring, adjust your starting chain and repeat length accordingly, keeping the stitch count consistent in the round.
Care Instructions
Hand wash gently in cool water with mild soap. Press out excess water in a clean towel and reshape while damp. Do not tumble dry.
FAQ
Can I use safety eyes for babies and toddlers?
For children under 3 years old, it is always safest to embroider the eyes using black embroidery floss instead of using plastic safety eyes to prevent any choking hazards.
How do I keep my join seamless when making the donut tube?
When joining the two ends of the long tube together at the end, use a whipstitch catching both front and back loops evenly so the seam blends into the surrounding lavender stitches.
Can I make the donut in multiple colors?
Yes! You can change yarn colors every few rounds along the tube to create a frosted donut look with sprinkles, or make each monster a completely unique pastel color combination.
Happy Crocheting!
I hope you have so much fun stitching up your very own scared donut monster! Be sure to save this pin on Pinterest to your favorite crochet boards, and leave a comment below letting me know what colors you chose for yours. Happy making!
📄 Your free PDF pattern