












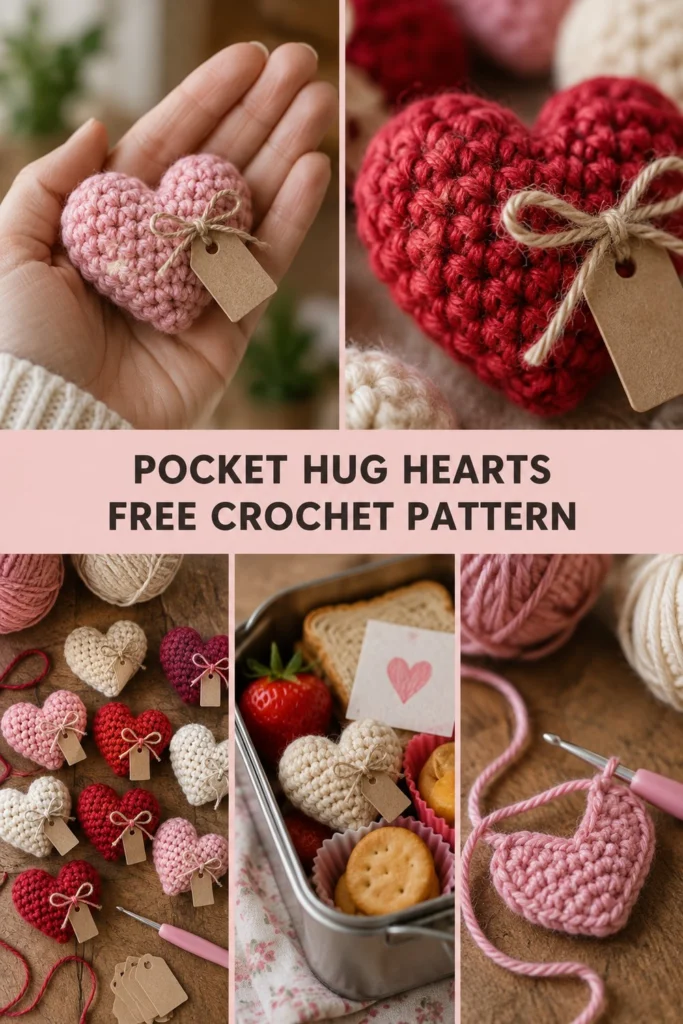
Sometimes a tiny handmade gift says the most. These pocket hug hearts are small stuffed amigurumi hearts worked in continuous rounds, made in minutes from yarn scraps and given with a little kraft paper tag to someone who needs a smile. Tuck one into a lunchbox, a greeting card, or a coat pocket to brighten someone’s day.
Quick Facts
- Skill level: Easy / Beginner-friendly
- Finished size: Approx. 2.5 inches (6.4 cm) wide by 2.25 inches (5.7 cm) tall
- Yarn: DK or Worsted weight yarn scraps (cotton or acrylic)
- Hook: US C/2 or D/3 (3.0 mm to 3.25 mm)
- Stitches used: ch, sc, inc, dec, sl st
- Time to make: 25 to 30 minutes each
Size customization tips are included further down in this guide.
What Makes This Crochet Heart Special
These pocket hugs are constructed as two separate little cups that are joined together in the round, then decreased into a neat little heart shape with a neat center dip. Working in continuous spiral rounds keeps the surface smooth with no visible seams, while the tight gauge with a smaller hook keeps the polyester fiberfill safely tucked inside. Finishing with a length of rustic twine and a small handwritten tag gives it that heartfelt, rustic gift appearance seen in the photos.
Skill Level
- Working in the round (spiral)
- Basic single crochet increases and decreases
- Joining two small components together
- Basic finishing, stuffing, and weaving in ends
Don’t worry if you are new to amigurumi shapes—this project moves quickly and teaches you the fundamentals of shaping in the round!
Finished Measurements
| Dimension | Inches | Centimeters |
|---|---|---|
| Width | 2.5 in | 6.4 cm |
| Height | 2.25 in | 5.7 cm |
| Depth | 1.0 in | 2.5 cm |
Materials You Will Need
| Material | Description / Color | Quantity / Details |
|---|---|---|
| Yarn A (Heart) | DK or Worsted weight (Pink, Red, or Cream) | Approx. 12–15 yds (11–14 m) |
| Crochet Hook | US C/2 or D/3 (3.0 mm – 3.25 mm) | For tight, neat amigurumi stitches |
| Fiberfill Stuffing | Polyester toy stuffing | Small handful |
| Notions | Tapestry needle, stitch marker, scissors | Standard tool kit |
| Gift Tag & Twine | Kraft paper gift tags and thin jute twine | For finishing |
Yarn Suggestions
| Yarn Line | Weight | Notes |
|---|---|---|
| Lion Brand Vanna’s Choice | Worsted | Gives a sturdy stitch definition |
| Caron Simply Soft | Aran / Worsted | Smooth texture with a slight sheen |
| Patons Classic Wool DK | DK | Wonderful for traditional felted or firm toys |
⚠️ Note: Avoid novelty, fuzzy, or eyelash yarns for these small hearts, as they obscure your stitches and make counting rounds difficult when working amigurumi shapes.
Gauge
- 22 sts and 24 rows = 4 in (10 cm) in single crochet
- Rnds 1 to 3 of the heart cups = 1.25 in (3.2 cm) across
Abbreviations (US Terms)
- ch: chain
- sc: single crochet
- inc: single crochet increase (work 2 sc in the same st)
- dec: single crochet invisible decrease (join next 2 sts into 1)
- sl st: slip stitch
- st(s): stitch(es)
- Rnd(s): round(s)
- FO: fasten off
UK terms equivalent: sc = dc, hdc = htr, dc = tr.
Special Stitches Explained
- Magic Ring (MR): Wrap yarn around your index finger twice, insert hook under loops, pull up a loop, ch 1, and work the first round of stitches into the ring. Pull the tail to close.
- Invisible Decrease (dec): Insert hook into the front loop only of the next stitch, then immediately insert hook into the front loop only of the following stitch. Yarn over and pull through both front loops, yarn over and pull through remaining 2 loops.
Pattern Instructions
Pattern Notes
- The heart body is worked in continuous spiral rounds without joining with a slip stitch at the end of each round. Use a stitch marker to keep track of the first stitch of each round.
- Make two identical small cups first, then join them together in Round 4.
First Cup (Make 1)
Rnd 1: In magic ring, work 6 sc. (6 sc)
Rnd 2: Inc in each st around. (12 sc)
Rnd 3: (1 sc, inc) x 6. (18 sc)
Rnd 4: Sc in each st around. (18 sc)
FO this first cup, cutting the yarn tail to about 3 inches.
Second Cup and Joining (Make 1)
Rnds 1 to 4: Repeat Rnds 1 to 4 of the First Cup. Do not fasten off the second cup. Now you will join them together.
✅ Checkpoint: You should now have two identical cups in front of you. The second cup still has the working yarn attached.
Joining the Cups and Shaping the Heart
Rnd 5: Holding both cups side by side, work 1 sc into the next available stitch on the First Cup (where you fastened off) to join them. Sc in the remaining 17 sts of the First Cup, then sc in all 18 sts of the Second Cup. (36 sc)
Rnd 6: (4 sc, dec) x 6. (30 sc)
Rnd 7: (3 sc, dec) x 6. (24 sc)
Rnd 8: (2 sc, dec) x 6. (18 sc)
Begin stuffing the heart firmly with polyester fiberfill, pushing some extra stuffing up into the two top humps.
Rnd 9: (1 sc, dec) x 6. (12 sc)
Add a little more stuffing to top off the heart shape.
Rnd 10: Dec x 6. (6 sc)
FO, leaving a 6-inch tail. Thread the tail through the front loops of the remaining 6 stitches using a tapestry needle and pull tightly to close the opening. Weave the end securely into the center dip of the heart to pull the top center down slightly, enhancing the heart cleft shape.
Assembly and Finishing
- Cut a 10-inch length of thin jute twine or baker’s twine.
- Wrap the twine around the center cleft and body of the heart in a crisscross pattern so it sits snugly.
- Slide a small kraft paper gift tag onto one end of the twine.
- Tie a neat bow on the front of the heart and trim the twine ends to about 0.75 inches.
Size Customization Tips
- Smaller hearts: Use a smaller hook (2.0 mm to 2.5 mm) with lace or fingering weight yarn. Stop increases after Rnd 2 for a miniature 12-stitch join.
- Larger hearts: Continue the flat circle increases for one more round before joining ((2 sc, inc) x 6 = 24 sts per cup), adjusting subsequent decrease rounds accordingly.
Care Instructions
Hand wash gently in lukewarm water with mild soap. Press out excess water in a clean towel and lay flat to dry. Do not tumble dry.
FAQ
Can I use acrylic yarn instead of cotton?
Yes! Acrylic yarn works wonderfully and gives the pocket hug a soft, squishy texture. Cotton yarn gives a firmer, more defined stitch structure.
Are these safe to give to toddlers and babies?
If giving to children under 3 years old, embroider the gift tag details or omit the twine and tag entirely to prevent choking hazards, and ensure all yarn ends are securely woven in.
How can I make these even faster?
Once you make your first couple of hearts, you can batch-make them by completing all the First Cups first, then joining them in batches during your assembly time.
Happy Crocheting!
I hope you enjoy making these sweet little tokens of kindness. Be sure to save this pin on Pinterest so you can find it later, and leave a comment below letting me know what colors you chose for your pocket hugs!
📄 Your free PDF pattern