
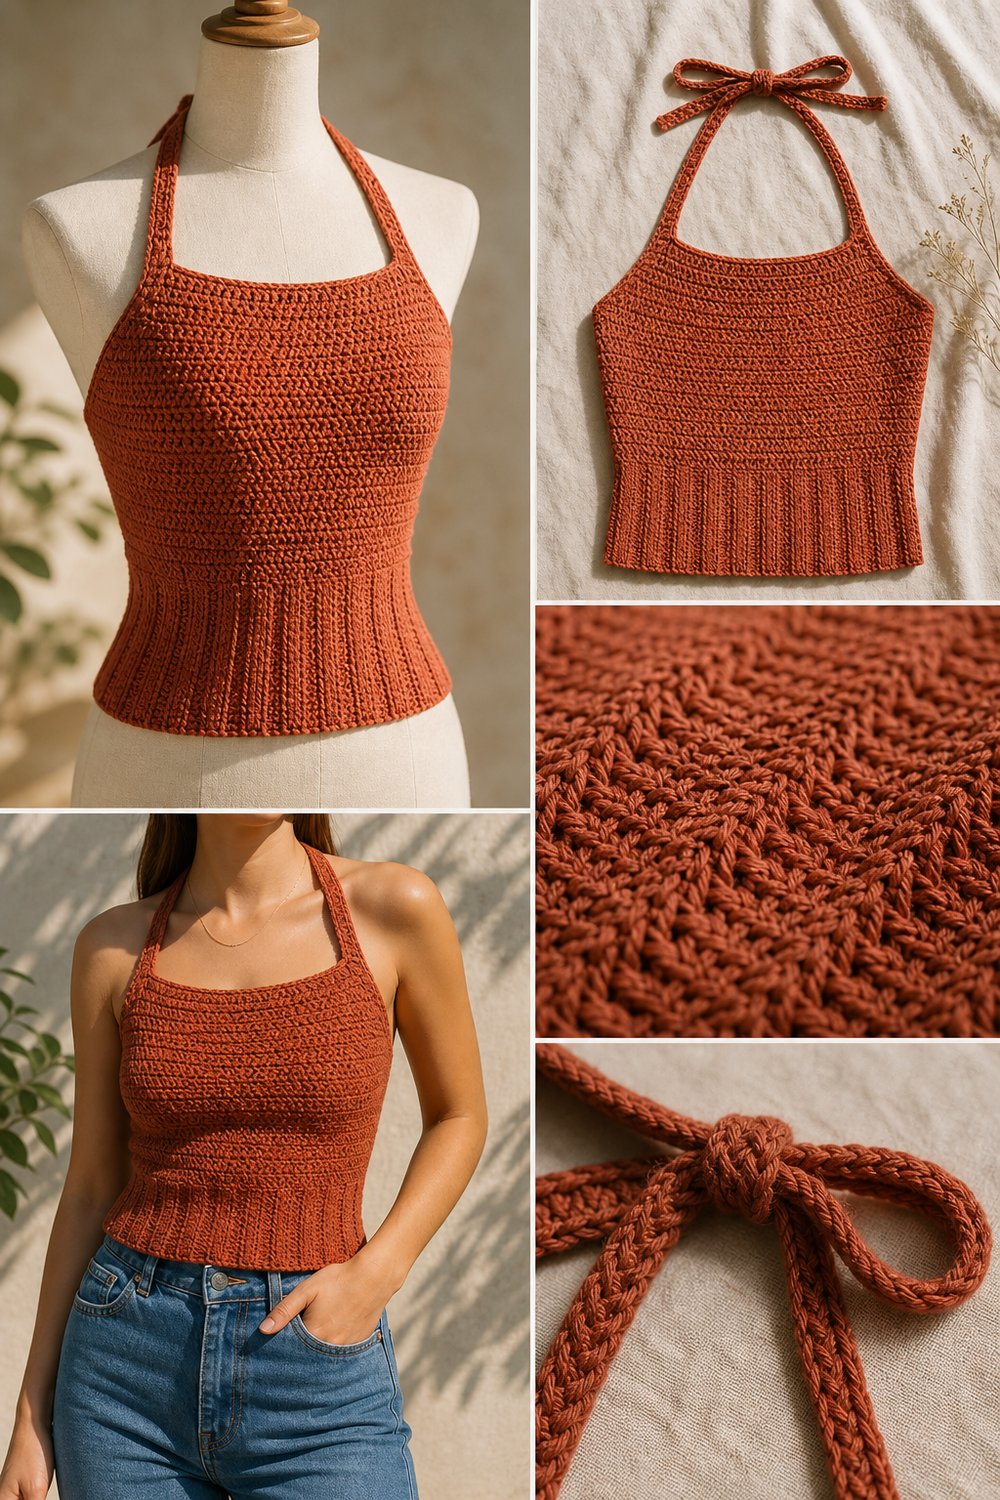
Step into the golden hour glow of a sun-drenched afternoon, where retro silhouettes meet modern textural appeal. This fitted retro halter tank top brings effortless 1970s charm to your handmade wardrobe with its structured square neckline and backless tie closure.
Vintage Square Neck Halter Tank Top Free Tank Top Pattern
Quick Facts
- Stitches Used: Chain (ch), Single Crochet (sc), Half Double Crochet (hdc), Herringbone Double Crochet (hbdc), Slip Stitch (sl st)
- Size Fit: Designed with 1-2 inches of negative ease for a snug, fitted silhouette across sizes XS through 2XL.
- Estimated Hours to Complete: 10–14 hours
- Gift-Appeal: A stunning, boutique-quality summer staple that makes an unforgettable handmade gift for fashion-forward friends.
Detailed sizing customization tips are included later in this post to help you achieve your ideal bespoke fit.
What Makes This Vintage Square Neck Halter Tank Top Special
This design achieves its crisp, modern-retro aesthetic through a clever combination of architectural shaping and dense textile choices. We use the herringbone double crochet stitch to create a rich, tight fabric with minimal stretch and zero see-through issues, eliminating the need for a lining. The structured square neckline is built using precise decreases that frame the collarbone beautifully, while sturdy woven ties anchor securely behind the neck and back for a fully adjustable, backless fit. Finished with neat, ribbed borders along the waist, this garment bridges the gap between everyday casual wear and elevated resort style.
Skill Level
- Intermediate
- Required Skills:
- Working in rows and working flat
- Executing post stitches and ribbed borders
- Basic garment shaping (increases and decreases)
- Seaming and attaching straps
- Reassurance Line: If you are comfortable reading a pattern and have conquered your first simple sweater or fitted top, you have all the skills needed to complete this gorgeous halter.
Finished Measurements
| Size | Bust Circumference | Waist Circumference | Total Length (Body) |
|---|---|---|---|
| XS | 30″ (76 cm) | 26″ (66 cm) | 15″ (38 cm) |
| S | 34″ (86 cm) | 30″ (76 cm) | 15.5″ (39.5 cm) |
| M | 38″ (96.5 cm) | 34″ (86 cm) | 16″ (40.5 cm) |
| L | 42″ (106.5 cm) | 38″ (96.5 cm) | 17″ (43 cm) |
| XL | 46″ (117 cm) | 42″ (106.5 cm) | 18″ (45.5 cm) |
| 2XL | 50″ (127 cm) | 46″ (117 cm) | 19″ (48 cm) |
Materials You Will Need
- Yarn: 100% Mercerized Cotton, Sport/Fine weight (approx. 125 yds / 115 m per 50g skein)
- Hook: US E/4 (3.5 mm) crochet hook (or size needed to obtain gauge)
- Notions: Tapestry needle for weaving ends, measuring tape, removable stitch markers
| Color Name | Colorway Order | Weight / Type | XS Yardage | S Yardage | M Yardage | L Yardage | XL Yardage | 2XL Yardage |
|---|---|---|---|---|---|---|---|---|
| Terracotta | Main Color (Hero) | Sport / 100% Cotton | 450 yds | 520 yds | 600 yds | 680 yds | 760 yds | 850 yds |
💡 Designer Tip: Mercerized cotton gives this top its signature crisp stitch definition and subtle sheen while preventing sagging over time.
Yarn Suggestions
| Yarn Brand & Line | Weight | Yardage per Skein | Notes |
|---|---|---|---|
| Lion Brand Coboo | DK (Blend) | 232 yds / 212 m | Beautiful drape, though slightly more relaxed than 100% cotton. |
| Schachenmayr Catania | Sport (100% Cotton) | 137 yds / 125 m | The gold standard for crisp stitch definition and rich terracotta colorways. |
| Hobbii Rainbow Cotton 8/8 | DK (100% Cotton) | 82 yds / 75 m | Budget-friendly with a massive range of vibrant matte shades. |
⚠️ Note: Avoid heavy wool or loosely spun acrylic yarns, as they lack the structural integrity required to hold the square neckline shape and will stretch out in warm weather.
Gauge
| Measurement Type | Stitches & Rows | Dimensions |
|---|---|---|
| Herringbone Double Crochet | 20 hbdc x 11 rows | 4″ x 4″ (10 cm x 10 cm) |
| Ribbing (Waistband) | 22 sc in BLO x 14 rows | 4″ x 4″ (10 cm x 10 cm) |
⚠️ Note: Always work a swatch using your chosen hook and block it before beginning your project. Getting the correct gauge is critical for a proper fitted bodice.
Abbreviations
| Abbreviation | Full Meaning |
|---|---|
| ch | Chain |
| sc | Single crochet |
| hdc | Half double crochet |
| hbdc | Herringbone double crochet |
| sl st | Slip stitch |
| BLO | Back loop only |
| st(s) | Stitch(es) |
| sc2tog | Single crochet 2 stitches together (decrease) |
| hbdc2tog | Herringbone double crochet 2 stitches together (decrease) |
| RS | Right side |
| WS | Wrong side |
| rep | Repeat |
Special Stitches Explained
- Herringbone Double Crochet (hbdc): Yarn over, insert hook into next st, yarn over and pull through st and the first loop on hook. (2 loops remain on hook). Yarn over, pull through first loop on hook. Yarn over, pull through remaining 2 loops on hook.
- Back Loop Only (BLO): Working exclusively into the rear loop of the target stitch V, leaving the front loop exposed to create ribbed texture.
Pattern Instructions
### Section 1: Waistband
Working flat in rows for the ribbed foundation band. Make 1 piece.
– Row 1: Ch 9, working into the 2nd ch from hook, sc in each ch across, turn. (8 sc)
– Rows 2 through 44 (48, 54, 60, 66, 72): Ch 1, working in BLO, sc in each st across, turn. (8 sc per row)
– Do not fasten off. Rotate your work 90 degrees to work along the long edge of the waistband.
### Section 2: Main Bodice Body
Transitioning from the waistband into the dense herringbone double crochet body.
– Row 1 (RS): Ch 2 (does not count as st here and throughout), evenly work 74 (82, 90, 100, 110, 120) hbdc evenly across the long edge of the waistband, turn. (74, 82, 90, 100, 110, 120 hbdc)
– Rows 2 through 20 (21, 22, 23, 24, 25): Ch 2, hbdc in each st across, turn. (74, 82, 90, 100, 110, 120 hbdc)
✅ Checkpoint: At the end of Row 20 (or your size’s final body row), lay your piece flat and count your stitches to ensure your side seams will align symmetrically.
### Section 3: Square Neckline and Armhole Shaping
We will now split the work to shape the iconic retro square neckline and armhole armscyes.
– Right Front Panel:
– Row 1: Ch 2, hbdc across the first 18 (20, 22, 25, 27, 30) sts, turn, leave remaining sts unworked. (18, 20, 22, 25, 27, 30 hbdc)
– Row 2: Ch 2, hbdc2tog, hbdc across to end, turn. (17, 19, 21, 24, 26, 29 hbdc)
– Rows 3 through 6: Rep Row 2. (13, 15, 17, 20, 22, 25 hbdc)
– Fasten off, leaving a 12-inch tail.
– Center Neckline Gap: Skip the middle 38 (42, 46, 50, 56, 60) sts of the main bodice for the flat square chest expanse.
– Left Front Panel:
– Join yarn to the corresponding stitch on the opposite side.
– Row 1: Ch 2, hbdc across the final 18 (20, 22, 25, 27, 30) sts, turn. (18, 20, 22, 25, 27, 30 hbdc)
– Row 2: Ch 2, hbdc to last 2 sts, hbdc2tog, turn. (17, 19, 21, 24, 26, 29 hbdc)
– Rows 3 through 6: Rep Row 2. (13, 15, 17, 20, 22, 25 hbdc)
– Fasten off.
### Section 4: Back Panel and Straps
- Back Panel: Work identical to the main bodice body through Row 20 (21, 22, 23, 24, 25), but do not shape the neckline—keep the top edge straight across. Fasten off.
- Woven Neck Ties: Join yarn at the top outer corner of the front left neckline. Ch 90 securely, sl st back down the chain, and sl st firmly into the corner base. Fasten off and weave ends. Repeat for the front right neckline corner.
- Back Closure Ties: Attach yarn at the upper left back corner, ch 90, sl st back down, and secure. Repeat for the upper right back corner.
### Section 5: Assembly and Finishing
- Lay the front and back panels with Right Sides facing together.
- Seam the left and right side seams securely using your preferred mattress stitch or whipstitch method, running from the base of the ribbed waistband up to the underarm opening.
- Weave in all remaining loose ends securely with your tapestry needle. Block the finished garment lightly with steam to set the drape and square neckline edges.
Size Customization Tips
- To adjust length: Add or subtract rows in Section 2 (Main Bodice Body) before splitting for the neckline. Each 2 rows adds or removes approximately 0.75 inches (2 cm) of total length.
- To adjust width/bust sizing: The stitch count for the waistband must be a multiple of the base pattern requirements. Adjust your starting chain in multiples of 2 to scale up or down between sizes cleanly.
Care Instructions
- Hand wash gently in cool water using a mild wool-safe detergent.
- Do not bleach or wring out aggressively to protect the mercerized cotton fibers.
- Lay flat in shade on a clean towel to dry, reshaping the square neckline and ribbed waistband while damp.
- Iron on low heat if crisp pressing is desired.
Vintage Square Neck Halter Tank Top Free Tank Top Pattern
Thank you so much for crafting along with me today! I hope you adore wearing your new retro halter top all through the warm weather season. If you share your creations online, please tag me and use the hashtag #VintageSquareHalterTop so I can admire your stunning color choices and stitches. Don’t forget to save this project to your Pinterest boards for easy access later, and leave a comment below to let me know how your project turned out!