
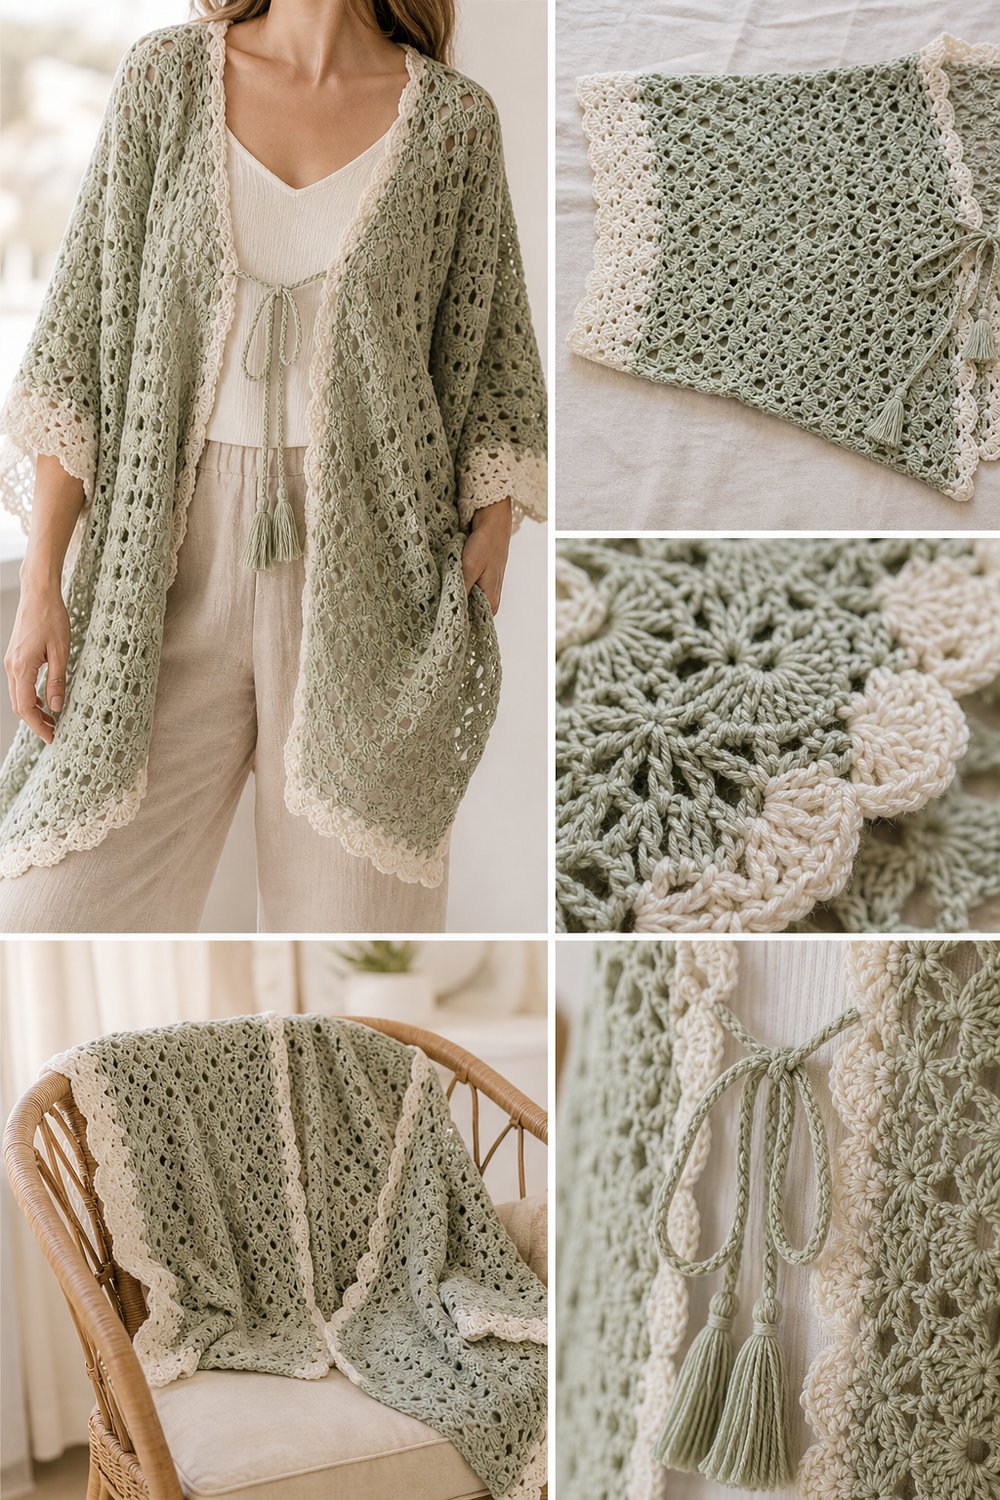
Wrap yourself in the luxurious drape of handcrafted bohemian elegance with a garment designed to elevate any outfit from simple to stunning. Whether you are layering it over a linen slip dress for a sun-drenched afternoon or pairing it with your favorite denim for a casual weekend stroll, this breezy layering piece offers effortless style.
Effortless Tie-Front Kimono Top Free Kimono Pattern
Quick Facts
This design utilizes foundational stitches combined with delicate shell motifs, resulting in a lightweight, breathable cardigan. Designed with an inclusive S/M (L/XL, 2XL/3XL) fit, it takes approximately 12–15 hours to complete. It makes a thoughtful, handmade gift for fashion-forward friends or a luxurious treat for your own handmade wardrobe.
💡 Designer Tip: Detailed instructions for customizing the body length and sleeve width to fit your exact frame are included further down in this guide.
What Makes This Effortless Tie-Front Kimono Top Special
The secret to the ethereal, flowing movement of this kimono lies in the interplay between an open-work shell stitch and a drapey bamboo-cotton fiber blend. The garment is worked in a seamless, rectangular-based construction that minimizes sewing, allowing the fabric to drape naturally over the shoulders. The lower body features an airy fan shell lace edging that catches the light and adds subtle texture, while delicate double-crochet ribbon ties at the front closure provide an adjustable, romantic finish. The asymmetric mosaic layout of the piece ensures clean lines, wide square kimono sleeves, and a flattering silhouette that moves gracefully with your body.
Skill Level
Intermediate
- Required Skills:
- Basic crochet stitches (chain, single crochet, double crochet)
- Working into chain spaces and skipping stitches
- Following a repeating lace stitch pattern
- Simple surface joining and strap attachment
⚠️ Note: While this pattern uses basic stitches, the shell lace sequence requires attention to stitch placement. If you are comfortable counting your rows and identifying stitch spaces, you will find this project deeply rewarding.
Finished Measurements
| Size | Bust Circumference | Total Length | Sleeve Width | Armhole Depth |
|---|---|---|---|---|
| S/M | 40 in / 101.5 cm | 26 in / 66 cm | 16 in / 40.5 cm | 8 in / 20.5 cm |
| L/XL | 48 in / 122 cm | 28 in / 71 cm | 18 in / 45.5 cm | 9 in / 23 cm |
| 2XL/3XL | 56 in / 142 cm | 30 in / 76 cm | 20 in / 51 cm | 10 in / 25.5 cm |
Materials You Will Need
- Yarn: Fine weight (Sport / #2) or light DK bamboo-cotton blend yarn with excellent drape.
- Hook: US G/6 (4.0 mm) crochet hook (or size needed to obtain gauge).
- Notions: Tapestry needle for weaving in ends, locking stitch markers (4).
| Color Name | Exact Order | Yarn Type | Yardage Needed (S/M) | Yardage Needed (L/XL) | Yardage Needed (2XL/3XL) |
|---|---|---|---|---|---|
| Sage | Color A | Bamboo-Cotton Blend | 950 yds / 870 m | 1150 yds / 1050 m | 1350 yds / 1235 m |
| Ivory | Color B | Bamboo-Cotton Blend | 300 yds / 275 m | 350 yds / 320 m | 400 yds / 365 m |
Yarn Suggestions
| Brand & Line Name | Yarn Weight | Skein Yardage | Notes |
|---|---|---|---|
| Lion Brand Coboo | Sport (#2) | 232 yds / 212 m per 100g | Exceptional drape, smooth stitch definition, breathable bamboo fiber. |
| Hobbii Friends Cotton Silk | Sport (#2) | 180 yds / 165 m per 50g | Luxurious sheen with a soft, lightweight hand-feel. |
| Scheepjes Whirl | Fingering / Sport (#1-#2) | 1093 yds / 1000 m per 215g | Great for a single-cake gradient effect across the body. |
⚠️ Note: Avoid heavy 100% wool or stiff acrylic yarns for this project. They lack the necessary fluid drape and will make the kimono stiff rather than flowing.
Gauge
| Stitch / Pattern | Over 4 inches (10 cm) |
|---|---|
| Shell Lace Pattern | 18 sts (approx. 3 shells) x 8 rows = 4 inches (10 cm) using a 4.0 mm hook. |
💡 Designer Tip: Always make and block your swatch before starting. Bamboo blends can relax significantly after washing, so checking your gauge ensures your finished kimono matches the measurements above.
Abbreviations
| Abbreviation | Meaning |
|---|---|
| ch | chain |
| dc | double crochet |
| sc | single crochet |
| sk | skip |
| sl st | slip stitch |
| sp | space |
| st(s) | stitch(es) |
| rep | repeat |
| RS | right side |
| WS | wrong side |
Special Stitches Explained
- Shell (sh): Work 5 dc in the designated st or ch-sp.
- Half-Shell (h-sh): Work 3 dc in the designated st or ch-sp.
- V-Stitch (v-st): Work (1 dc, ch 1, 1 dc) in the designated st.
Pattern Instructions
Section 1: Back Panel
Using Color A and a 4.0 mm hook, ch 93 (111, 129).
Row 1 (RS): 1 sc in 2nd ch from hook, ch 3, sk 3 ch, 1 sc in next ch; rep from * across, turn. (23, 28, 32 ch-3 sps)*
Row 2: Ch 4 (counts as 1 dc + ch 1 here and throughout), sk first sc and ch-3 sp, work [1 sc, ch 3, 1 sc] in next ch-3 sp, ch 3, sk next ch-3 sp, [1 sc, ch 3, 1 sc] in next ch-3 sp; rep from * across, end ch 1, 1 dc in last sc, turn. (11, 14, 16 full shell-bases)*
Row 3: Ch 1, 1 sc in first dc, work a Shell (sh) in next ch-3 sp, 1 sc in next ch-3 sp; rep from * across, ending with 1 sc in 3rd ch of turning ch-4, turn. (11, 14, 16 shells)*
Row 4: Ch 4, sk first sc and 2 dc, work [1 sc, ch 3, 1 sc] in top of next dc (3rd dc of shell), ch 3, sk next (2 dc, 1 sc, 2 dc), work [1 sc, ch 3, 1 sc] in top of next dc; rep from * across, end ch 1, 1 dc in last sc, turn. (11, 14, 16 ch-3 sps)*
Rows 5–48 (52, 56): Rep Rows 3 and 4 alternately 22 (24, 26) more times. Fasten off Color A, weave in ends.
✅ Checkpoint: Measure your back panel vertically. For size S/M it should measure roughly 26 inches (66 cm) long. Verify that your shell count matches your starting count across the top edge.
Section 2: Left Front Panel
Using Color A, ch 48 (57, 66).
Row 1 (RS): 1 sc in 2nd ch from hook, ch 3, sk 3 ch, 1 sc in next ch; rep from * across, turn. (12, 14, 16 ch-3 sps)*
Rows 2–48 (52, 56): Work identical pattern sequence as Back Panel (Rows 2–4 of the shell lace pattern). Fasten off, leaving a long tail for shoulder seams.
Section 3: Right Front Panel
Work exactly as Left Front Panel. Fasten off, leaving a long tail for seaming.
Section 4: Sleeve Construction & Edging
With RS facing, line up the top shoulder edges of the Front Panels with the Back Panel, leaving a center neck opening of 14 (16, 18) inches. Seam the shoulders using mattress stitch or your preferred seaming method.
Sleeve Base Setup:
Join Color A at the armhole opening marker. Working evenly along the armhole edge, work 1 row of sc stitches across the span, ensuring you end up with a stitch count divisible by 6 + 3.
Sleeve Lace Rows:
Work Rows 1–4 of the shell lace pattern for 8 (10, 12) rows outward from the armhole edge. Fasten off Color A.
Section 5: Trim and Tie-Front Closure
Switch to Color B for the decorative contrast edging.
Bottom and Front Placket Edging:
Join Color B at the bottom right front corner.
Round 1: Work 1 row of sc evenly up the right front opening, across the back neck, and down the left front opening, working 3 sc in each corner to maintain a flat edge. Fasten off.
Fan Shell Lace Trim:
Join Color B with a sl st along the bottom hem of the kimono.
Row 1: Work 1 Half-Shell* in first st, sk 2 sts, 1 sc in next st, sk 2 sts; rep from * across bottom hem. Fasten off and weave in all remaining ends.
Tie-Front Ribbons:
Make two long chains using Color B measuring approximately 18 inches (45.5 cm) each. Thread one tie securely to the inner edge of the right front panel at bust level, and the matching tie to the left front panel inner edge to allow for an adjustable, elegant bow closure.
Size Customization Tips
- To Adjust Length: Add or subtract pattern repeats in increments of 2 rows during the body panel sections. Each 2-row repeat adds approximately 0.6 inches (1.5 cm) to the total garment length.
- To Adjust Width: Modify your initial chain count by multiples of 6 stitches plus 3 to ensure the shell lace pattern aligns correctly across the front and back panels.
Care Instructions
- Hand wash gently in cool water using a mild wool and delicate detergent.
- Do not wring or twist the fabric; gently press out excess water using a clean towel.
- Lay flat to dry on a blocking mat, smoothing out the shell lace edges to your desired dimensions.
- Do not iron directly; use a cool steam setting if light blocking is needed.
Effortless Tie-Front Kimono Top Free Kimono Pattern
Thank you so much for joining me in making this breezy, bohemian layering piece! I hope creating this garment brings a sense of calm and creativity to your hook sessions. If you share your finished project on Instagram or Facebook, please tag me and use #EffortlessKimonoTop so I can admire your gorgeous color choices and stitch work. Don’t forget to save this tutorial to your favorite crochet boards on Pinterest, and leave a comment below to let me know which yarn colors you chose! Happy crocheting!