
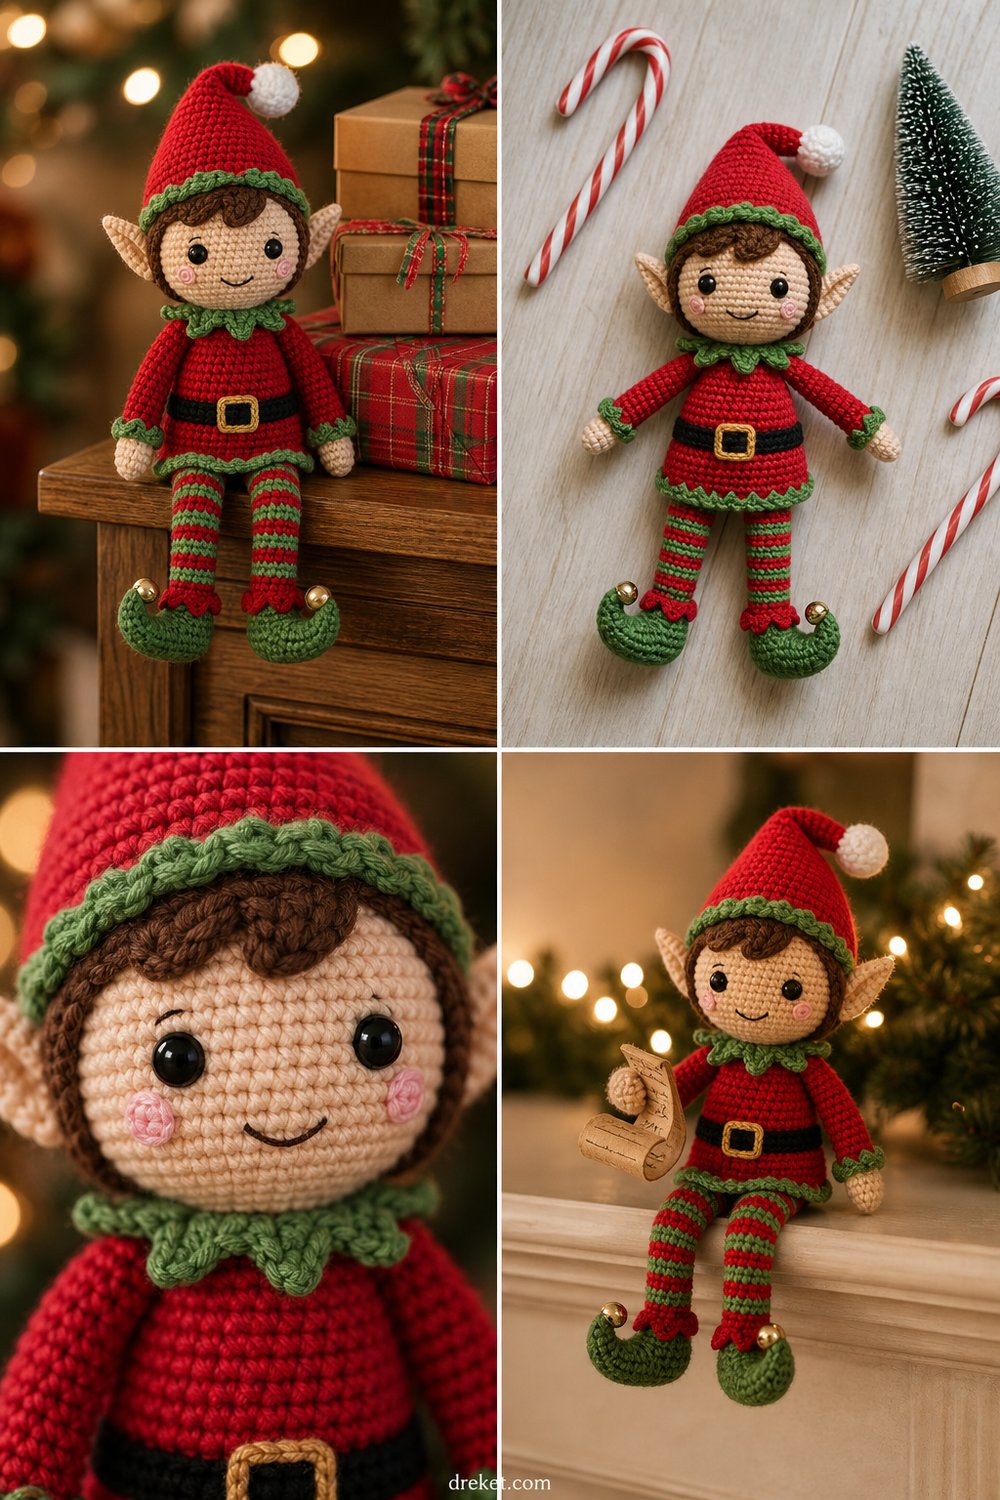
Bring the whimsical magic of the North Pole right into your living room this holiday season with a handcrafted companion that loves to dangle its legs from your mantel or bookshelf. Working up this charming amigurumi project fills your home with the cozy scent of pine and the comforting rhythm of plush yarn sliding over your hook.
Cheerful Christmas Elf Shelf Sitter Free Crochet Pattern
Quick Facts
- Stitches Used: Single crochet, increase, invisible decrease, half double crochet, slip stitch, back loop only.
- Size Fit: One size amigurumi (approx. 12 inches / 30.5 cm tall in a sitting position).
- Estimated Hours to Complete: 6 to 8 hours.
- Gift-Appeal: An heirloom-quality holiday decor piece that makes a wonderful handmade holiday gift or a cheerful addition to your own family traditions.
Sizing customization tips are included later in this post to help you adjust your elf’s scale.
What Makes This Cheerful Christmas Elf Shelf Sitter Special
This design relies on a clever blend of structural amigurumi techniques and playful detailing to achieve its classic holiday look. Working in continuous rounds creates a seamless, durable body that easily holds its sitting posture when weighted with poly pellets. The colorwork transition from the striped legs into the black belt and red tunic gives it a crisp, tailored appearance, while the curled-toe shoes and floppy pointed hat add unmistakable storybook charm. Embroidered facial features with soft pink blush give the elf its heartwarming, expressive character.
Skill Level
- Intermediate: Requires comfort with continuous amigurumi rounds, color changes, basic embroidery, and sewing multiple limbs securely in place.
- Reassurance Line: If you have mastered basic shaping and assembling amigurumi parts, you will find this project a joyful and rewarding weekend make.
Finished Measurements
| Measurement Type | Inches | Centimeters |
|---|---|---|
| Total Height (Sitting) | 12.0 in | 30.5 cm |
| Total Height (Standing) | 16.5 in | 41.9 cm |
| Head Circumference | 10.0 in | 25.4 cm |
| Arm Length | 4.5 in | 11.4 cm |
| Leg Length (to heel) | 6.5 in | 16.5 cm |
Materials You Will Need
- Yarn: Worsted weight (#4) medium acrylic or cotton yarn (details below).
- Crochet Hook: US Size E/4 (3.5 mm).
- Notions: Stitch markers, tapestry needle, polyester fiberfill stuffing, small handful of poly pellets (optional, for weight in the bottom), two 10mm black safety eyes, pink craft felt or blush for cheeks, sewing thread and needle for facial embroidery.
| Color Order | Color Name | Yarn Weight | Yardage Needed |
|---|---|---|---|
| Color 1 | Bright Red | Worsted (#4) | 120 yds (110 m) |
| Color 2 | Christmas Green | Worsted (#4) | 100 yds (91 m) |
| Color 3 | Black | Worsted (#4) | 25 yds (23 m) |
| Color 4 | Gold / Yellow | Worsted (#4) | 15 yds (14 m) |
| Color 5 | White | Worsted (#4) | 40 yds (37 m) |
| Color 6 | Peach / Skin Tone | Worsted (#4) | 60 yds (55 m) |
Yarn Suggestions
| Brand & Line Name | Yarn Weight | Skein Yardage | Notes |
|---|---|---|---|
| Caron Simply Soft | Worsted (#4) | 315 yds / 288 m | Beautiful sheen and wonderful stitch definition for amigurumi. |
| Lion Brand Vanna’s Choice | Worsted (#4) | 170 yds / 156 m | Sturdy texture that holds a seated shape exceptionally well. |
| Paintbox Yarns Simply Aran | Worsted (#4) | 201 yds / 184 m | Massive color range matching traditional holiday palettes. |
⚠️ Note: Avoid novelty eyelash yarns or super-stretch fuzzy yarns for the main body components, as they obscure stitch definition and make counting rounds difficult.
Gauge
| Measurement | Stitches | Rows |
|---|---|---|
| 4 x 4 inches (10 x 10 cm) | 16 single crochets | 18 rows |
💡 Designer Tip: Always make a small gauge swatch using your 3.5 mm hook. Amigurumi requires a tight, dense fabric so the fiberfill stuffing does not poke through the stitches. Go down a hook size if your stitches feel loose.
Abbreviations
| Abbreviation | Full Meaning |
|---|---|
| ch | Chain |
| sc | Single crochet |
| hdc | Half double crochet |
| inc | Increase (work 2 sc in the same stitch) |
| inv-dec | Invisible decrease (insert hook into front loops of next 2 sts, yarn over, pull through both, yarn over, pull through remaining 2 loops) |
| sl st | Slip stitch |
| blo | Back loop only |
| flo | Front loop only |
| st(s) | Stitch(es) |
| rnd(s) | Round(s) |
| FO | Fasten off |
Special Stitches Explained
- Invisible Decrease (inv-dec): Insert your hook under the front loop only of the first stitch, then immediately insert your hook under the front loop only of the second stitch. Yarn over and pull through both front loops (2 loops on hook). Yarn over and pull through remaining 2 loops to complete the stitch.
- Back Loop Only (blo): Working only into the rear loop of the designated stitch, leaving the front loop unworked to create a distinct horizontal ridge or edge.
- Curled Toe Shaping: Achieved by working a sequence of short rows combined with skipped stitches and decreases at the tip of the boot, anchoring the curl with a few secure anchoring stitches using the tail end.
Pattern Instructions
Section 1: Legs and Striped Tights (Make 2)
Starting with Green Color 2.
– Rnd 1: Magic ring, 6 sc in ring. (6 sc)
– Rnd 2: [Inc] around. (12 sc)
– Rnd 3: [1 sc, inc] around. (18 sc)
– Rnd 4: Working in blo, 18 sc around. (18 sc)
– Rnds 5–6: 18 sc around. (18 sc)
– Switch to Red Color 1.
– Rnds 7–8: With Red, 18 sc around. (18 sc)
– Switch to Green Color 2.
– Rnds 9–10: With Green, 18 sc around. (18 sc)
– Repeat the 2-row color stripes (Red then Green) until you have completed Rnd 22. Stuff the lower foot firmly and lightly stuff the leg as you go.
– Rnd 23: [1 sc, inv-dec] around. (12 sc)
– Rnd 24: 12 sc around. (12 sc)
– Sl st to first st, FO leaving a long tail for sewing. Repeat for the second leg.
Section 2: Body and Tunic
Starting with Black Color 3 for shoes/belt base, transitioning into Red Color 1 for the tunic.
– Join Red Color 1 to the top opening of Leg 1, ch 1, work 12 sc around Leg 1, then work 12 sc around Leg 2 to join both legs together in a continuous round. (24 sc)
– Rnd 2: [3 sc, inc] around. (30 sc)
– Rnds 3–4: 30 sc around. (30 sc)
– Switch to Black Color 3.
– Rnds 5–6: With Black, 30 sc around. (30 sc)
– Switch to Gold Color 4 for one round, then back to Black Color 3 for belt band contrast. Embroidery will be added later for the buckle.
– Switch to Red Color 1.
– Rnd 9: Working in blo, [3 sc, inv-dec] around. (24 sc)
– Rnd 10: 24 sc around. (24 sc)
– Rnd 11: [2 sc, inv-dec] around. (18 sc)
– Rnds 12–13: 18 sc around. (18 sc)
– FO, leaving a long tail for sewing to the head. Stuff the body firmly.
✅ Checkpoint: At this stage, your joined legs and tunic body should stand securely on their own and measure approximately 6 inches in height before attaching the head.
Section 3: Head
Starting with Peach / Skin Tone Color 6.
– Rnd 1: Magic ring, 6 sc in ring. (6 sc)
– Rnd 2: [Inc] around. (12 sc)
– Rnd 3: [1 sc, inc] around. (18 sc)
– Rnd 4: [2 sc, inc] around. (24 sc)
– Rnd 5: [3 sc, inc] around. (30 sc)
– Rnd 6: [4 sc, inc] around. (36 sc)
– Rnds 7–14: 36 sc around. (36 sc)
– Insert safety eyes between Rnds 10 and 11, leaving about 6 stitches between them. Embroider a small backstitch smile centered beneath the eyes using black thread. Apply pink blush or felt circles for cheeks.
– Rnd 15: [4 sc, inv-dec] around. (30 sc)
– Rnd 16: [3 sc, inv-dec] around. (24 sc)
– Rnd 17: [2 sc, inv-dec] around. (18 sc)
– Stuff head firmly with fiberfill.
– Rnd 18: [1 sc, inv-dec] around. (12 sc)
– Rnd 19: [Inv-dec] around. (6 sc)
– FO, closing the remaining hole and weaving in the yarn end. Sew head securely to the top of the body.
Section 4: Arms (Make 2)
Starting with Peach / Skin Tone Color 6.
– Rnd 1: Magic ring, 6 sc in ring. (6 sc)
– Rnd 2: [1 sc, inc] around. (9 sc)
– Rnds 3–4: 9 sc around. (9 sc)
– Switch to Green Color 2.
– Rnds 5–14: 9 sc around, stuffing lightly as you work up the arm. (9 sc)
– Flatten the top opening of the arm and sc across both open sides to close. FO, leaving a long tail for sewing. Sew arms to the upper sides of the tunic body just below the neck seam.
Section 5: Elf Hat
Starting with Red Color 1.
– Rnd 1: Magic ring, 4 sc in ring. (4 sc)
– Rnd 2: [1 sc, inc] around. (6 sc)
– Rnd 3: 6 sc around. (6 sc)
– Rnd 4: [2 sc, inc] around. (8 sc)
– Rnd 5: 8 sc around. (8 sc)
– Rnd 6: [3 sc, inc] around. (10 sc)
– Rnds 7–8: 10 sc around. (10 sc)
– Rnd 9: [4 sc, inc] around. (12 sc)
– Rnds 10–11: 12 sc around. (12 sc)
– Rnd 12: [3 sc, inc] around. (15 sc)
– Rnd 13: 15 sc around. (15 sc)
– Rnd 14: [4 sc, inc] around. (18 sc)
– Rnd 15: [2 sc, inc] around. (24 sc)
– Rnd 16: [3 sc, inc] around. (30 sc)
– Rnd 17: [4 sc, inc] around. (36 sc)
– Switch to White Color 5 for the brim trim.
– Rnds 18–19: With White, 36 sc around. (36 sc)
– FO, leaving a long tail. Make a small white pom-pom and attach it securely to the tip of the hat. Sew the hat onto the head at a jaunty angle.
Size Customization Tips
- Scaling Up: To make a larger shelf sitter (approx. 16 inches tall), switch to a bulky weight (#5) yarn and a US H/8 (5.0 mm) crochet hook. Increase initial magic ring counts to 8 stitches and adjust subsequent rounds accordingly.
- Scaling Down: To create a miniature ornament-sized elf, use sport weight (#2) yarn with a US C/2 (2.75 mm) hook. The finished height will decrease to roughly 7 inches.
Care Instructions
- Spot clean gently with a damp cloth and mild detergent.
- Do not submerge in water or machine wash, as the interior fiberfill and safety eyes may shift or warp.
- Air dry flat away from direct heat sources.
Closing
Thank you for creating the Cheerful Christmas Elf Shelf Sitter Free Crochet Pattern! I hope crafting this festive little character brings an abundance of holiday cheer to your home. Be sure to pin this pattern to your holiday crochet boards on Pinterest, share your finished shelf sitters on social media tagging #CheerfulElfSitter, and leave a comment below letting me know where your elf decides to sit!