
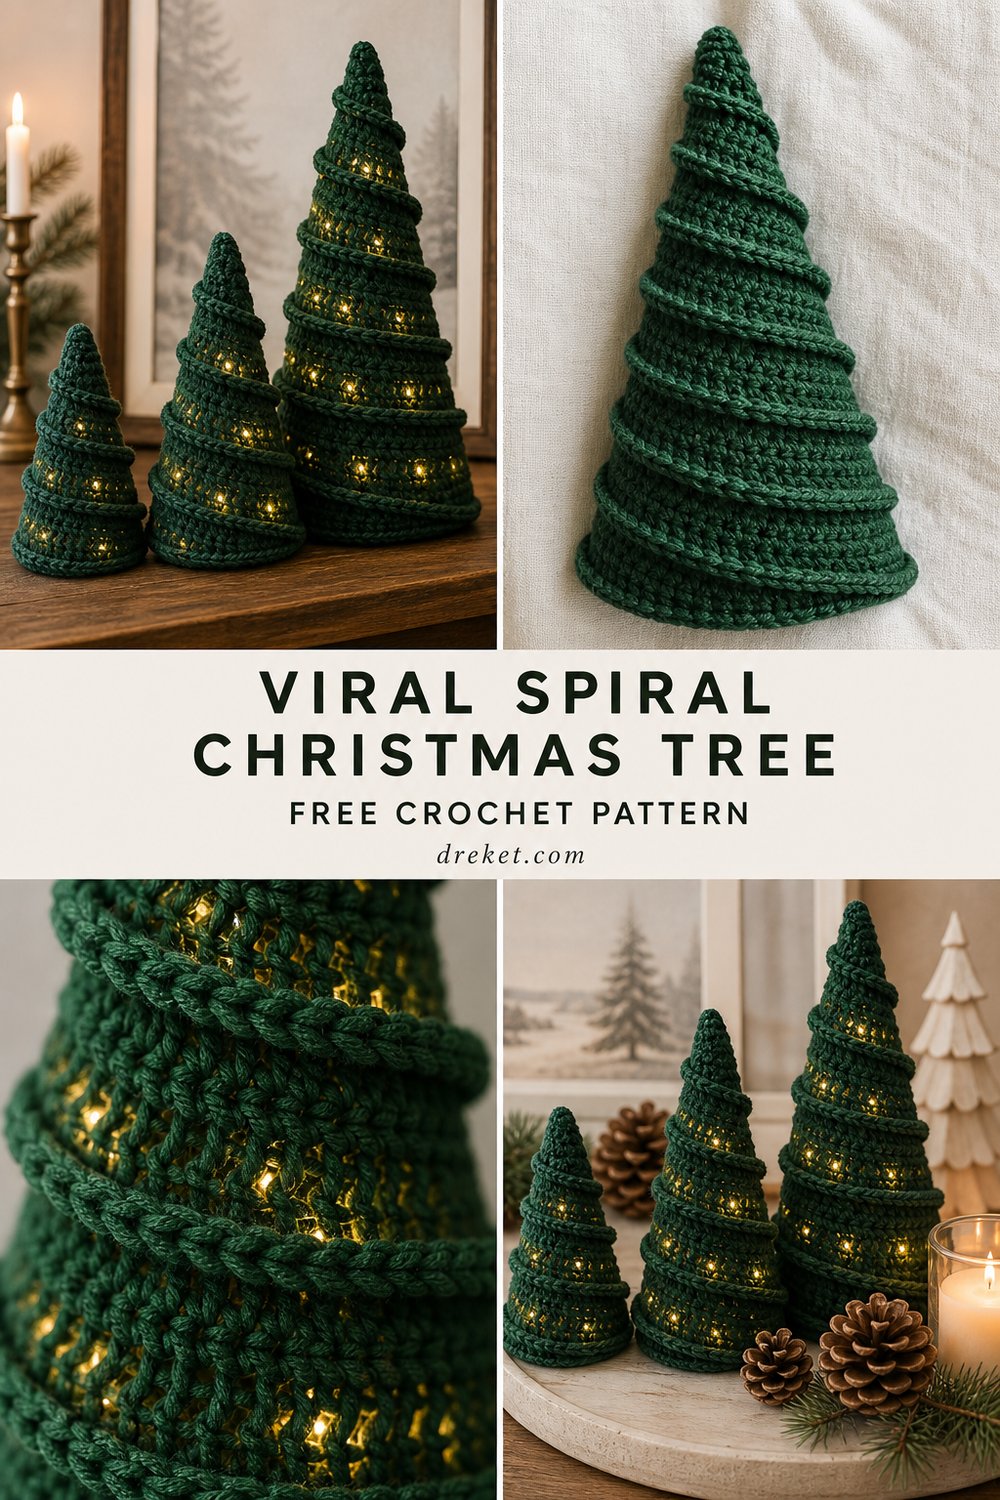
Bring the magic of a Scandinavian winter right to your mantelpiece with handcrafted 3D holiday decor that casts a warm, ambient glow. The Modern Forest Spiral Christmas Tree Free Crochet Pattern creates freestanding, sculptural home decor pieces featuring an architectural spiral ridge design that allows fairy lights to peek through the texture.
Modern Forest Spiral Christmas Tree Free Crochet Pattern
Quick Facts
- Stitches Used: Slip stitch, single crochet, half double crochet, front post stitches, continuous spiral working.
- Size Fit: Three distinct freestanding tree heights (4-inch, 6-inch, and 10-inch).
- Estimated Hours to Complete: 2 to 4 hours per tree depending on height.
- Gift Appeal: An exquisite, quick-to-stitch handmade holiday gift or stunning mantelpiece centerpiece.
Sizing customization tips are included later in the article so you can easily adapt these trees to any display space.
What Makes This Modern Forest Spiral Christmas Tree Special
This design relies on an innovative continuous spiral construction method combined with post-stitch ridges. Rather than working in flat rows or traditional vertical panels, you build the tree from the base up while sculpting a diagonal ridge that winds seamlessly from the bottom edge all the way to the pointed tip. These raised ridges give the trees a rigid, self-supporting structure without requiring heavy internal wiring, while leaving intentional gaps in the stitch texture. When paired with a string of warm fairy lights tucked underneath, the light spills through the spiral crevices to create a stunning glowing effect reminiscent of cozy winter forest evenings.
Skill Level
- Level: Intermediate
- Required Skills:
- Working in the round (continuous spiral vs. joined rounds)
- Basic increases and decreases (
sc2tog,2 sc in next st) - Textured post stitches (Front Post Double Crochet)
- Reading a specialized sculptural crochet pattern
- Stiffening or blocking techniques for freestanding decor
💡 Designer Tip: If you are comfortable working amigurumi spirals and basic post stitches, you will breeze through this pattern in no time!
Finished Measurements
| Tree Size | Height (Inches) | Height (CM) | Base Diameter (Inches) | Base Diameter (CM) |
|---|---|---|---|---|
| Small (4-inch) | 4.0 in | 10.0 cm | 2.5 in | 6.5 cm |
| Medium (6-inch) | 6.0 in | 15.0 cm | 3.5 in | 9.0 cm |
| Large (10-inch) | 10.0 in | 25.0 cm | 5.0 in | 12.5 cm |
Materials You Will Need
- Yarn: Worsted weight (Category 4) smooth cotton or wool blend yarn.
- Colors Used (Exact Order):
- Dark Emerald Green (Primary body)
- Cream / Warm Linen (Accent / optional base edging)
- Natural Wood (Optional display mantel/base element)
- Hook: US G/6 (4.0 mm) crochet hook
- Notions: Tapestry needle, stitch markers, polyester fiberfill stuffing, battery-operated fairy lights (optional), stiffening spray (optional).
| Colorway / Material | Yarn Weight | Yardage Needed (Small) | Yardage Needed (Medium) | Yardage Needed (Large) |
|---|---|---|---|---|
| Dark Emerald Green | Worsted (4) | 45 yds | 85 yds | 160 yds |
| Cream / Warm Linen | Worsted (4) | 5 yds | 10 yds | 15 yds |
Yarn Suggestions
| Brand & Line Name | Yarn Weight | Skein Yardage | Notes |
|---|---|---|---|
| Lion Brand Wool-Ease | Worsted (4) | 197 yds / 180 m | Excellent stitch definition and holds structural shape well. |
| Knit Picks Dishie | Worsted (4) | 190 yds / 174 m | 100% cotton for crisp, matte texture and rigid freestanding drape. |
| Caron Simply Soft | Worsted (4) | 315 yds / 288 m | Beautiful sheen, though may require extra stiffening. |
⚠️ Note: Avoid novelty yarns with heavy fuzz, fur, or eyelash textures. They obscure the architectural spiral ridges and block the warm glow of the fairy lights.
Gauge
- Stitch Gauge: 16 sts and 18 rows = 4 inches (10 cm) in single crochet.
- Motif Note: Gauge is not overly critical for these decorative items, but working with a slightly tighter tension than normal helps the trees stand upright independently without collapsing.
| Measure Type | Stitches | Rows / Length |
|---|---|---|
| Standard Gauge | 16 sc | 18 rows over 4 in (10 cm) |
Abbreviations
| Abbreviation | Full Term |
|---|---|
| ch | chain |
| sc | single crochet |
| hdc | half double crochet |
| sl st | slip stitch |
| inc | increase (work 2 sc in same stitch) |
| dec | decrease (single crochet two stitches together) |
| fpdc | front post double crochet |
| st(s) | stitch(es) |
| rnd(s) | round(s) |
| rep | repeat |
| FO | fasten off |
Special Stitches Explained
- Front Post Double Crochet (
fpdc): Yarn over, insert hook from front to back to front around the post of the specified stitch two rows below, yarn over, pull up a loop, (yarn over, draw through 2 loops) twice. - Spiral Shift Increase (
ss-inc): Work two single crochets into the designated stitch while shifting the diagonal alignment one stitch forward as directed in the round instructions.
Pattern Instructions
Section 1: Small Tree (4-Inch)
Worked from the base up in continuous spirals without joining rounds. Place a stitch marker in the first stitch of each round and move it up as you go.
- Rnd 1: Leaving a 6-inch tail, ch 2, work 6 sc in 2nd ch from hook. (6 sc)
- Rnd 2:
[Inc]in each st around. (12 sc) - Rnd 3:
[Sc in next st, inc in next st]rep around. (18 sc) - Rnd 4:
[Sc in next 2 sts, inc in next st]rep around. (24 sc) - Rnd 5:
[Sc in next 3 sts, inc in next st]rep around. (30 sc) - Rnd 6: Working in back loops only, sc in each st around. (30 sc)
- Rnd 7: Begin spiral ridge pattern:
[Fpdc around stitch 2 rows below, sc in next 4 sts]rep around. (36 sts including fpdc) - Rnds 8–15: Continue spiral pattern, shifting the
fpdcone stitch to the left on each subsequent round to create the diagonal ridge effect, decreasing 3 evenly spaced stitches every 2 rounds. (12 sts remaining by Rnd 15)
✅ Checkpoint: At Rnd 15, verify your stitch count is down to (12 sts) and the spiral ridge wraps cleanly around the cone shape at least twice.
- Rnd 16:
[Dec]around. (6 sc) - Rnd 17:
[Dec]3 times, FO leaving a long tail. Thread tail through remaining 3 loops and pull tight to close apex. Weave in ends.
Section 2: Medium Tree (6-Inch)
- Rnds 1–5: Work identically to Small Tree Base until you reach (30 sc).
- Rnd 6:
[Sc in next 4 sts, inc in next st]rep around. (36 sc) - Rnds 7–22: Establish spiral ridge pattern using alternating
fpdcandscsequences, decreasing 2 evenly spaced stitches every 3 rounds to maintain a gradual conical slope. (14 sts remaining by Rnd 22) - Rnds 23–24:
[Dec]around, FO, stuff firmly, and close apex securely. (7 sts)
Section 3: Large Tree (10-Inch)
- Rnds 1–7: Work base expansions up to (42 sc).
- Rnds 8–35: Work continuous spiral ridges, decreasing 1 stitch every 2 rounds to achieve a tall, elegant silhouette. Stuff lightly with fiberfill and insert fairy light battery pack base if desired before closing. (10 sts remaining by Rnd 35)
- Rnds 36–38: Final tapering and closing apex. FO and weave in ends. (5 sts)
💡 Designer Tip: Stuff the trees firmly with polyester fiberfill as you work the upper third of the rounds. If using fairy lights, weave the wire strand through the center before packing the stuffing around it.
Size Customization Tips
- Scaling Up: To make an even taller tree (e.g., 12-inch or higher), simply continue the base expansion rounds by adding 6 stitches per round until your desired base diameter is reached, then lengthen the transition spiral rounds by working extra repetitions before beginning your gradual decreases.
- Scaling Down: Omit the final increase rounds in the foundation phase to create miniature 2-inch accent trees perfect for holiday gift toppers.
Care Instructions
Spot clean gently with a damp cloth and mild detergent. Do not submerge fully in water if internal fairy lights or wired frames are inserted. Reshape while damp and allow to air dry completely on a flat surface.
Modern Forest Spiral Christmas Tree
I hope you thoroughly enjoyed stitching up this modern holiday forest set! These little trees bring such a warm, handcrafted charm to seasonal tabletops and mantels.
I would love to see your handmade forest! Be sure to snap a photo of your finished trees glowing on your mantel, share your project on social media, tag me so I can admire your work, save this pin to your holiday crochet boards on Pinterest, and drop a comment below to let me know which size is your favorite!