
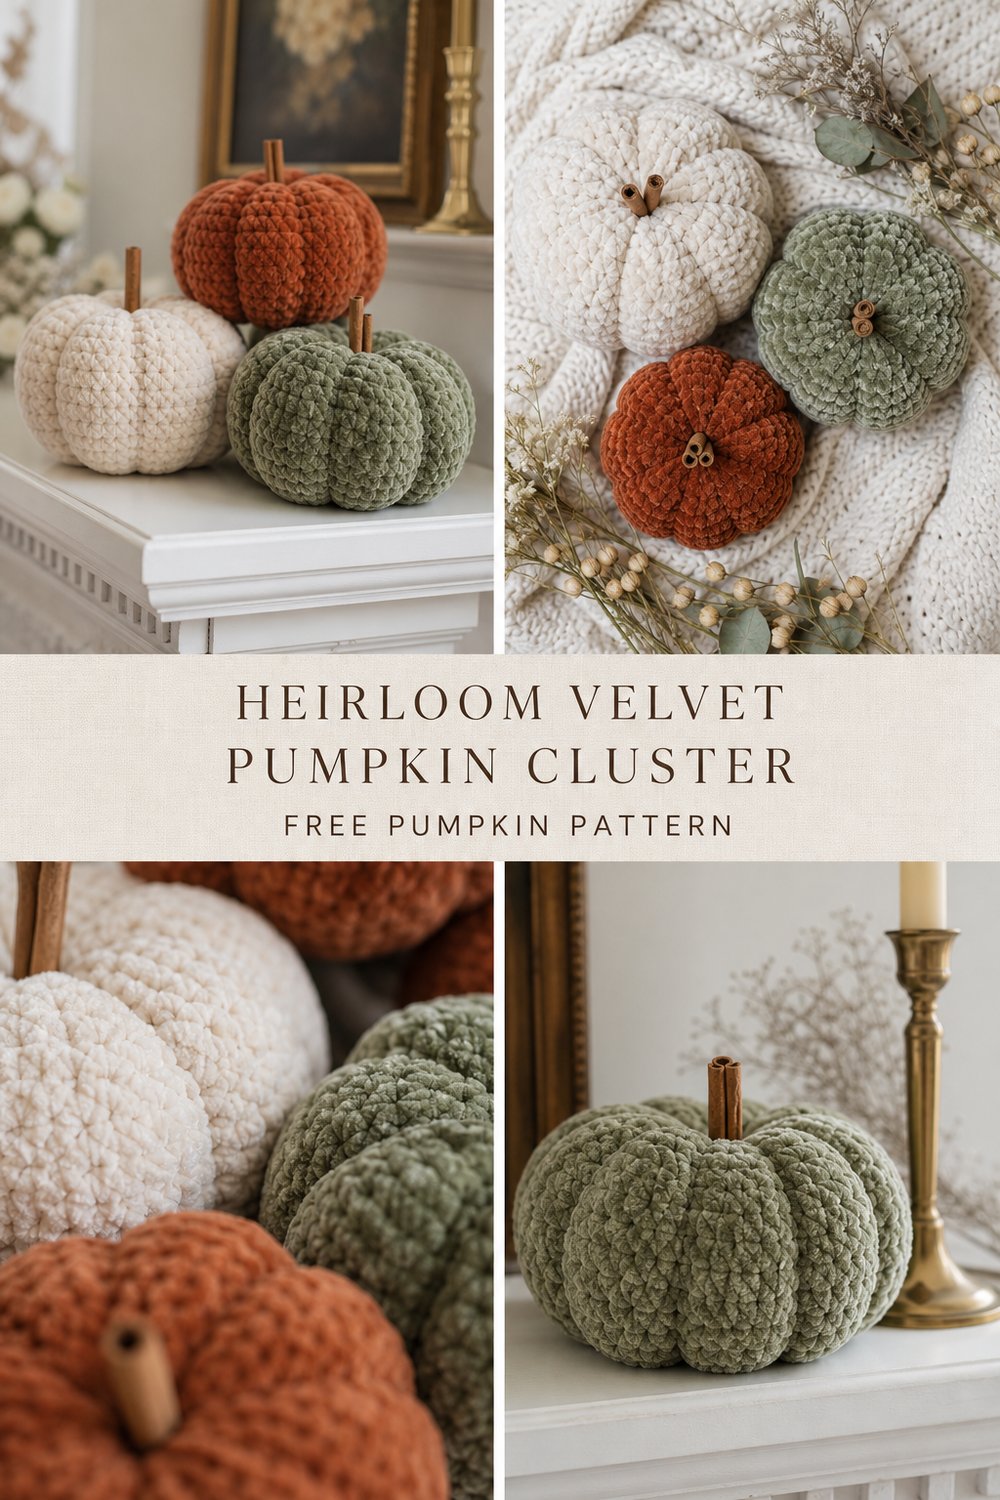
Bring the sophisticated, tactile warmth of autumn into your living space with a trio of handcrafted plushies that look straight out of a boutique window display. Nestled among dried florals on a rustic mantel or paired with a brass candlestick, these soft chenille gourds add effortless elegance to your seasonal decor.
Heirloom Velvet Pumpkin Cluster Decor Free Crochet Pattern
Worked entirely in plush chenille yarn using simple waistcoat stitches and post-stitch cinching, this home decor project features easy intermediate skills and takes just 2 to 3 hours to whip up from start to finish. It makes a stunning housewarming gift, a thoughtful host present, or a quick weekend craft to refresh your own autumn tablescape.
Sizing customization tips are included later in the pattern so you can effortlessly scale your pumpkins from small tabletop accents to large statement floor pieces.
What Makes This Heirloom Velvet Pumpkin Cluster Decor Special
The secret to achieving that high-end boutique look lies in a clever combination of textured stitches and clever structural shaping. Instead of working traditional flat panels that get seamed together, these pumpkins are crocheted entirely in the round as a seamless, continuous tube.
We use the waistcoat stitch (also known as the knit stitch) to create a dense, uniform fabric that mimics the tight weave of luxury velvet while completely preventing any polyfill stuffing from peeking through. To capture those signature deep pinched ridges, we incorporate post-stitch anchoring lines and weave a heavy-duty gathering cord vertically through the center, pulling it taut to create authentic, organic indentations before topping each piece with a real, fragrant cinnamon-stick stem.
Skill Level
- Advanced Beginner to Intermediate
- Familiarity working in the round in spiral rounds
- Comfortable with basic post stitches and cinching techniques
- Experience working with plush/chenille-style yarn (keeping track of hidden stitches)
💡 Designer Tip: Because chenille yarn can make individual stitches slightly difficult to distinguish visually, rely on your fingers to feel the “V” of each top loop rather than trusting your eyes alone.
Finished Measurements
The pattern is written in three distinct sizes to create a natural, organic-looking cluster when styled together.
| Size | Circumference | Height (excluding stem) | Diameter |
|---|---|---|---|
| Small | 12 inches / 30.5 cm | 3.5 inches / 9 cm | 4 inches / 10 cm |
| Medium | 16 inches / 40.5 cm | 5 inches / 12.5 cm | 5.5 inches / 14 cm |
| Large | 22 inches / 56 cm | 6.5 inches / 16.5 cm | 7.5 inches / 19 cm |
Materials You Will Need
- Yarn: Bulky weight (#5) or Super Bulky (#6) Chenille/Velvet yarn. Exact color order based on our design sample:
- Rust
- Cream
- Sage
- Hook: US M/13 (9.0 mm) crochet hook
- Notions: Tapestry needle for weaving ends, locking stitch markers, polyester fiberfill stuffing, strong upholstery thread or nylon cord for cinching, and real cinnamon sticks (cut to 2-3 inch lengths) for stems. Hot glue gun (optional, for securing stems).
| Colorway | Yarn Weight / Type | Yardage Needed (Small) | Yardage Needed (Medium) | Yardage Needed (Large) |
|---|---|---|---|---|
| 1. Rust | Super Bulky Chenille (#6) | 35 yds / 32 m | 55 yds / 50 m | 85 yds / 78 m |
| 2. Cream | Super Bulky Chenille (#6) | 35 yds / 32 m | 55 yds / 50 m | 85 yds / 78 m |
| 3. Sage | Super Bulky Chenille (#6) | 35 yds / 32 m | 55 yds / 50 m | 85 yds / 78 m |
Yarn Suggestions
| Yarn Brand & Line Name | Weight Category | Yardage / Skein | Notes |
|---|---|---|---|
| Bernat Velvet | Bulky (#5) | 315 yds / 288 m per 300g | Incredible sheen, feels luxurious, requires a slightly smaller hook (US J/10). |
| Premier Yarns Parfait Chunky | Super Bulky (#6) | 120 yds / 109 m per 100g | Plush pile, fantastic range of rust, cream, and sage shades; works up very quickly. |
| Hobby Lobby Yarn Bee Velvetine | Super Bulky (#6) | 145 yds / 132 m per 150g | Super soft with zero shedding, creates deep, pillowy ridges. |
⚠️ Note: Avoid novelty eyelash yarns or novelty faux-fur yarns for this pattern, as they lack the structural integrity needed to hold the cinched pumpkin shape and will hide your stitch definition entirely.
Gauge
| Measurement Type | Stitches / Rows | Imperial / Metric Equivalent |
|---|---|---|
| Stitch Gauge | 8 sc x 9 rows | 4 x 4 inches / 10 x 10 cm using US M/13 hook in standard sc |
| Ridge Gauge | 3 set post-ridges | 2 inches / 5 cm horizontal span |
💡 Designer Tip: Always swatch with your specific chenille yarn before beginning. If your stitches are too loose, your polyfill will show; if they are too tight, cinching the center will be difficult.
Abbreviations
| Abbreviation | Full Meaning |
|---|---|
| ch | chain |
| sc | single crochet |
| hdc | half double crochet |
| inc | increase (work 2 sc in the same stitch) |
| invdec | invisible decrease (sc next 2 sts together through front loops only) |
| sl st | slip stitch |
| st(s) | stitch(es) |
| rnd(s) | round(s) |
| Fpdc | front post double crochet |
| RS | right side |
| FO | fasten off |
Special Stitches Explained
- Waistcoat Stitch (knit stitch – wsc): Worked identically to a standard single crochet, but your hook is inserted directly through the center “V” of the stitch from front to back, underneath the horizontal bar. This creates a tight, knitted-look fabric.
- Invisible Decrease (invdec): Insert hook into the front loop only of the first stitch, then immediately insert hook into the front loop only of the second stitch. Yarn over, pull through both front loops on hook, yarn over and pull through remaining two loops.
- Front Post Double Crochet (Fpdc): Yarn over, insert hook from front to back to front around the post of the specified stitch from the row below, yarn over, pull up a loop, [yarn over, pull through 2 loops] twice.
Pattern Instructions
Note: Instructions are written for the Small size, with Medium and Large modifications noted in parentheses where applicable.
Section 1: Body Cylinder Base
Rnd 1: Leaving a 12-inch starting tail for later cinching, ch 24 (32, 44), taking care not to twist your chain. Join with a sl st to the first ch to form a ring. Ch 1 (does not count as a st here and throughout).
Rnd 2: Sc in each ch around. Join with a sl st to the first sc. (24, 32, 44 sc)
Rnd 3: Working in the round without joining (use a stitch marker to track the start of each rnd), work 1 wsc in each st around. (24, 32, 44 wsc)
✅ Checkpoint: At the end of Rnd 3, verify your stitch count matches your starting chain count. Your tube should look uniform with clear “V” formations.
Section 2: Adding Structural Ridge Lines
Rnd 4: [Work 3 wsc, work 1 Fpdc around the vertical post 2 rows down] repeat from * to * around. (24, 32, 44 sts total including Fpdc ribs)
Rnds 5–14 (Small) / Rnds 5–18 (Medium) / Rnds 5–22 (Large): Repeat Rnd 4, stacking your Fpdc stitches directly on top of the Fpdc stitches from the previous round to build continuous vertical ridges. (24, 32, 44 sts)
💡 Designer Tip: Keep your tension even while working the post stitches so the ridges pull inward slightly, beginning the shaping process naturally.
Section 3: Top Decreasing and Cinching
Rnd 15 (Small) / Rnd 19 (Medium) / Rnd 23 (Large): [Work 2 wsc, invdec] repeat from * to * around. (18, 24, 33 sts)
Rnd 16 (Small) / Rnd 20 (Medium) / Rnd 24 (Large): [Work 1 wsc, invdec] repeat from * to * around. (12, 16, 22 sts)
Rnd 17 (Small) / Rnd 21 (Medium) / Rnd 25 (Large): Work invdec around. (6, 8, 11 sts)
FO, leaving a long 18-inch tail.
Stuff the pumpkin firmly with polyfill fiberfill, ensuring it is plump and rounded on the sides. Thread your long ending tail onto your tapestry needle, weave in and out of the remaining top stitches, and pull tightly to close the top opening completely. Secure with a knot and hide the tail inside the body.
Section 4: Shaping the Pumpkin Ridges
Thread your tapestry needle with a long strand of strong nylon upholstery thread (matching your yarn color). Insert the needle straight down through the exact center top of the pumpkin, exiting out the exact center bottom. Bring the thread up along the outside of the pumpkin, following one of your Fpdc vertical ridges, and pull firmly to pinch the side inward. Repeat this process around all vertical ridges, pulling each strand tight to create your deep heirloom indentations. Knot securely at the base and trim excess.
Section 5: Stem Attachment
Insert a real cinnamon stick (or a cluster of three smaller sticks for the large size) into the top center opening of your pumpkin right where you pulled the cinching thread tight. Secure firmly with a dab of hot glue if desired. Repeat the entire process in Rust, Cream, and Sage to create a gorgeous multi-tonal pumpkin cluster.
Size Customization Tips
- Scaling Up (Extra-Large Floor Pumpkin): Start with a chain of 60 sts in Rnd 1, work additional height rounds in Section 2, and add an extra transition decrease round before final closure to ensure a smooth top profile. This increases the finished diameter by approximately 3 inches / 7.5 cm.
- Scaling Down (Mini Acorn-Style Pumpkin): Start with a chain of 16 sts, work 6 rows of height, and skip the Fpdc ridge rows entirely for a smooth, minimalist mini gourd.
Care Instructions
- Spot clean only using a damp cloth and mild liquid detergent.
- Do not submerge in water or place in a washing machine, as moisture can soften and damage the cinnamon stick stems.
- Fluff the polyester filling gently by hand after seasonal storage to maintain the pumpkin’s plump shape.
Heirloom Velvet Pumpkin Cluster Decor
Thank you so much for crafting along with me! I hope this project brings a cozy, handmade touch to your autumn home.
I would love to see your gorgeous finished velvet pumpkin clusters! Please snap a photo, share it on Instagram or TikTok, and tag me [@YourDesignHandle] along with the hashtags #HeirloomVelvetPumpkin and #FreeCrochetPattern. Be sure to save this tutorial to your favorite Fall Decor boards on Pinterest, and leave a comment below to let me know which color combination is your favorite!