
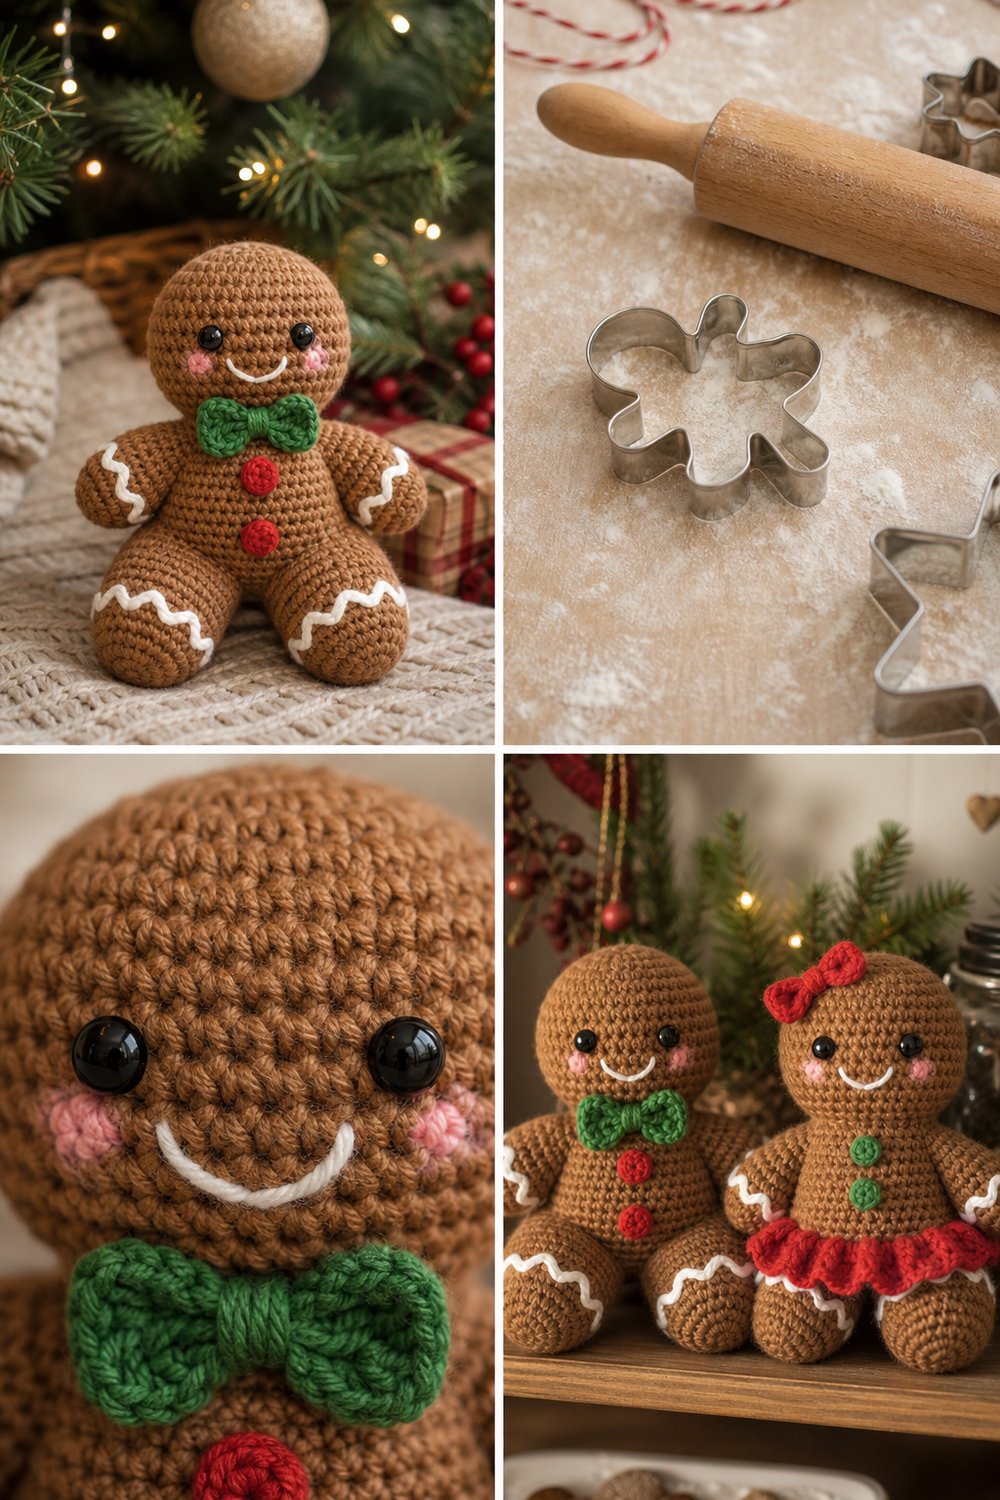
Bake up a little holiday magic with soft, plush yarn fibers, sweet embroidered details, and all the charm of a freshly baked Christmas treat sitting beneath a decorated tree. This cuddly companion brings the nostalgic warmth of holiday baking straight to your crochet hook, complete with snowy white icing cuffs and cheerful gumdrop buttons.
Adorable Gingerbread Boy Amigurumi Toy Free Toy Pattern
Quick Facts
- Stitches Used: Single crochet, increase, invisible decrease, surface slip stitch, bobble stitch
- Size Fit / Finished Dimensions: 8 inches (20 cm) tall and 5 inches (12.5 cm) wide
- Estimated Time to Complete: 4 to 6 hours
- Gift-Appeal Framing: An ideal handmade holiday stocking stuffer, mantel decoration, or sensory plush toy for children
Sizing customization tips are included later in this post to help you scale your gingerbread friend up or down.
What Makes This Adorable Gingerbread Boy Special
This amigurumi design relies on continuous spiral crocheting and strategic color changes to achieve its classic look without awkward assembly seams. The spiced gingerbread body provides a rich, textured canvas for the white ric-rac icing cuffs, which are worked directly onto the limbs using surface slip stitches. By using a smaller hook size than recommended for your yarn weight, you create a dense, tight fabric that prevents stuffing fiber from poking through. Finally, safety eyes paired with hand-embroidered pink cheeks and a sweet smile give this holiday toy its irresistible personality.
Skill Level
- Difficulty: Intermediate
- Required Skills:
- Working in the round (magic ring)
- Basic increases and invisible decreases (inv-dec)
- Changing yarn colors cleanly
- Surface slip stitching for textured details
- Basic embroidery (French knots, satin stitch)
💡 Designer Tip: If you are new to working with plush velvet or chenille yarns, don’t worry! This pattern uses simple stitches and clear shaping, making it a wonderful confidence-builder for intermediate makers ready to tackle textured yarn.
Finished Measurements
| Measurement | Inches | Centimeters |
|---|---|---|
| Total Height | 8.0 in | 20.0 cm |
| Body Width (Arms) | 5.0 in | 12.5 cm |
| Torso Width | 3.5 in | 8.9 cm |
| Depth | 2.5 in | 6.4 cm |
Materials You Will Need
- Yarn Weight: Bulky / Chunky (Cat. 5) plush chenille or velvet yarn
- Hook: US D/3 (3.25 mm) crochet hook
- Notions: Tapestry needle, stitch markers, polyester fiberfill stuffing, embroidery floss (black and pink), 12mm black safety eyes with washers
| Color Name in Exact Order | Yarn Type / Weight | Yardage Needed |
|---|---|---|
| Spiced Gingerbread (Primary Body) | Bulky / Chenille (Cat. 5) | 75 yds (68 m) |
| White (Icing Cuffs & Smile) | Bulky / Chenille (Cat. 5) | 15 yds (14 m) |
| Red (Buttons) | Bulky / Chenille (Cat. 5) | 5 yds (5 m) |
| Green (Bow Tie) | Bulky / Chenille (Cat. 5) | 10 yds (9 m) |
Yarn Suggestions
| Brand & Line Name | Yarn Weight | Skein Yardage | Notes |
|---|---|---|---|
| Hobby Lobby Yarn Bee Sweet Delight | Bulky (5) | 120 yds | Ultra-soft chenille texture, perfect stitch definition. |
| Bernat Velvet | Bulky (5) | 315 yds | Beautiful sheen, creates a soft vintage toy aesthetic. |
| Premier Yarns Parfait Chunky | Bulky (5) | 120 yds | Highly durable, does not shed easily during working. |
⚠️ Note: Avoid loosely spun novelty eyelash yarns or novelty faux-fur yarns for this project. They obscure your stitches, making it difficult to maintain the required stitch counts and secure safety eyes properly.
Gauge
| Gauge Type | Stitches / Rows | Measurement |
|---|---|---|
| Single Crochet (Body) | 14 sts x 16 rows | 4 x 4 inches (10 x 10 cm) |
⚠️ Note: Gauge is important in amigurumi to ensure your toy does not have gaps that allow stuffing to peek through. Always make a small test swatch using your hook and yarn before beginning.
Abbreviations
| Abbreviation | Full Term |
|---|---|
| ch | Chain |
| sc | Single crochet |
| inc | Increase (work 2 sc in same stitch) |
| inv-dec | Invisible decrease (sc two stitches together front loops only) |
| sl st | Slip stitch |
| st(s) | Stitch(es) |
| Rnd(s) | Round(s) |
| FO | Fasten off |
Special Stitches Explained
- Invisible Decrease (inv-dec): Insert hook under the front loop only of the next stitch, then insert hook under the front loop only of the following stitch (3 loops on hook). Yarn over and pull through the first 2 loops, yarn over and pull through remaining 2 loops.
- Surface Slip Stitch: Hold working yarn behind the fabric. Insert hook from front to back through the toy’s body, yarn over, pull loop through to the front, and pull directly through the loop on your hook. Repeat along the desired path to create raised icing lines.
Pattern Instructions
Section 1: Legs and Body (Worked as One Piece)
Left Leg:
– Rnd 1: With Spiced Gingerbread, start with a magic ring and work 6 sc. (6 sc)
– Rnd 2: [Inc] 6 times. (12 sc)
– Rnd 3-6: Sc in each st around. (12 sc)
– FO leaving a short tail. Make a duplicate Right Leg following Rnds 1–6, but do not fasten off.
Joining Legs and Body:
– Rnd 7: Continuing from Right Leg, ch 2, join to Left Leg with an sc, sc in next 11 sts around Left Leg, work 2 sc in ch-2 space, sc in next 12 sts around Right Leg, work 2 sc in opposite side of ch-2 space. (28 sc)
– Rnd 8-13: Sc in each st around. (28 sc)
– Rnd 14: [Inv-dec, sc in next 5 sts] 4 times. (24 sc)
– Rnd 15: Sc in each st around. (24 sc)
– Rnd 16: [Inv-dec, sc in next 2 sts] 6 times. (18 sc)
– Rnd 17: Sc in each st around. (18 sc)
✅ Checkpoint: Stuff the legs and lower torso firmly with polyester fiberfill before continuing up to the neck and head. Your stitch count should be exactly 18 sts.
Section 2: Head
- Rnd 18: [Inc, sc in next 2 sts] 6 times. (24 sc)
- Rnd 19: [Inc, sc in next 3 sts] 6 times. (30 sc)
- Rnd 20: [Inc, sc in next 4 sts] 6 times. (36 sc)
- Rnd 21-26: Sc in each st around. (36 sc)
- Rnd 27: [Inv-dec, sc in next 4 sts] 6 times. (30 sc)
- Rnd 28: [Inv-dec, sc in next 3 sts] 6 times. (24 sc)
⚠️ Note: Insert safety eyes between Rnds 23 and 24, leaving approximately 6 stitches space between them. Embroider pink cheek details just below the outer edges of the eyes using pink embroidery floss.
- Rnd 29: [Inv-dec, sc in next 2 sts] 6 times. (18 sc)
- Rnd 30: [Inv-dec] 9 times. (9 sc)
- FO, leaving a long tail. Thread tail through remaining front loops of Rnd 30 and pull tight to close the top of the head. Weave in ends.
Section 3: Arms (Make 2)
- Rnd 1: With Spiced Gingerbread, magic ring, 6 sc. (6 sc)
- Rnd 2: [Inc, sc in next st] 3 times. (9 sc)
- Rnd 3-8: Sc in each st around. (9 sc)
- Rnd 9: Flatten opening and sew across with 4 sc to close. FO leaving a long tail for sewing to the upper torso at Rnd 16.
Section 4: Details, Icing, and Assembly
- Icing Cuffs: Using White yarn, work a row of surface slip stitches around the wrists (Rnd 7 of arms) and ankles (Rnd 4 of legs) to mimic ric-rac icing cuffs.
- Buttons: Using Red yarn, embroider two French knot buttons down the center of the torso at Rnds 10 and 13.
- Smile: Using White yarn, backstitch a cheerful smiling mouth across Rnds 20 and 21, centered between the safety eyes.
- Bow Tie: With Green yarn, ch 6, sc in 2nd ch from hook and across (5 sc), ch 1, turn. Work 3 rows of 5 sc. FO and wrap a strand of green yarn tightly around the center to create a bow shape, then sew securely beneath the gingerbread boy’s chin.
Size Customization Tips
- Scaling Up: To make a larger 12-inch gingerbread plush, switch to a Super Bulky (Cat. 6) blanket yarn and a US J/10 (6.0 mm) crochet hook. This will increase your finished height by roughly 50%.
- Scaling Down: To create a miniature 4-inch gingerbread ornament, use fingering weight yarn (Cat. 1) with a US B/1 (2.25 mm) crochet hook. Note that you will need to swap safety eyes for small black embroidery knots if scaling down to toy-safe miniature sizes.
Care Instructions
To keep your handmade gingerbread boy looking fresh and sweet for many holiday seasons to come:
– Spot clean gently with a damp cloth and mild liquid detergent as needed.
– Do not submerge completely in water or put through a washing machine, as this can distort the polyester fiberfill stuffing and damage safety eye attachments.
– Air dry flat away from direct heat sources.
Closing
Thank you for joining me to stitch this Adorable Gingerbread Boy Amigurumi Toy Free Toy Pattern! I hope he brings an extra dash of warmth and handmade joy to your holiday decor.
If you loved making this pattern, please be sure to save it to your Holiday Crochet boards on Pinterest, share photos of your finished gingerbread friend on Instagram, and tag me so I can admire your festive creations. Drop a comment below to let me know how your baking—er, crocheting—turned out! Happy holidays and happy hooking!