
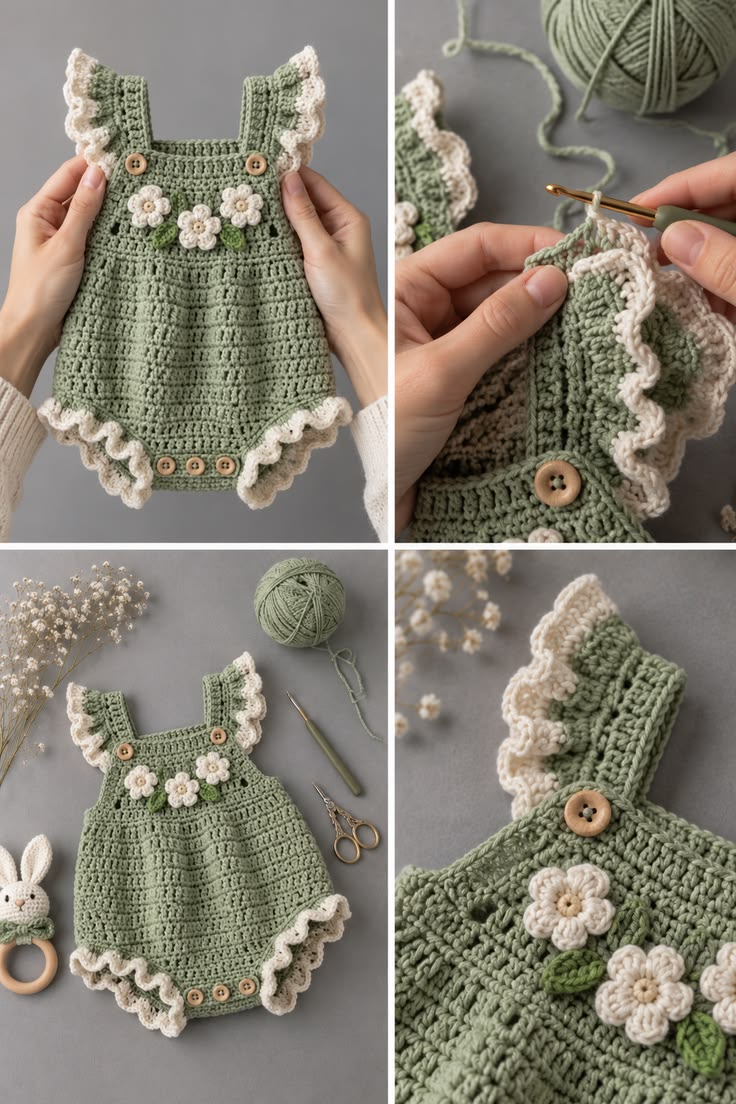
There’s a quiet kind of magic in a baby wrapped in soft sage green, and a few ruffles turn that calm color into something playful. This little romper pairs a stretchy, wide neckline with flutter-ruffle armholes and ruffled leg openings, so it looks as sweet on a hanger as it does on a wiggling baby. It’s the kind of handmade piece that ends up in every newborn photo shoot and every memory box.
Sage Green Ruffle Baby Romper Free Crochet Pattern
Quick Facts
This romper is crafted using single crochet and double crochet stitches, worked from the neckline down in one seamless piece with only a small crotch seam to finish. Sized to fit babies from 0 to 18 months, this project takes about 6 to 8 hours to complete from start to finish. It makes a charming baby-shower gift, a photo-shoot outfit, or a keepsake for your own little one.
Sizing customization tips, including how to make the romper longer or shorter, are included later in this post.
What Makes This Sage Green Ruffle Romper Special
The romper is worked top-down with a raglan yoke, so there are no bulky shoulder seams pressing against baby’s skin, and you can try it on as you go. The armholes and leg openings are edged with double-crochet ruffles: each stitch is doubled in the first ruffle round, which creates the soft, gathered flutter without any sewing or gathering thread. The bubble-style bottom is closed with a small center seam, leaving room for a diaper and for kicking legs. Because the whole piece is made in a single color, the ruffles and the smooth sc fabric do all the decorating.
Skill Level
- Working in the round and joining rounds with a slip stitch
- Following raglan increases at marked stitches
- Working double crochet stitches, including 2 dc in one stitch
- Simple whipstitch seaming
This is an Advanced Beginner to Intermediate pattern. If you’ve crocheted a hat or a small sweater in the round before, you’re ready. Every step is explained below, and each key round lists its stitch count so you can check your work as you go.
Finished Measurements
| Size | Chest | Length (Neck to Crotch) | Leg Opening (before ruffle) |
|---|---|---|---|
| 0–3 months | 18 in / 46 cm | 9 in / 23 cm | 7 in / 18 cm |
| 3–6 months | 19.5 in / 50 cm | 10.5 in / 27 cm | 8 in / 20 cm |
| 6–12 months | 20.5 in / 52 cm | 12 in / 30 cm | 8 in / 20 cm |
| 12–18 months | 22 in / 56 cm | 13 in / 33 cm | 9 in / 23 cm |
Materials You Will Need
- Yarn Weight: Worsted weight (Category 4) soft acrylic, cotton blend, or superwash wool yarn.
- Hook Size: U.S. G/6 (4.0 mm) crochet hook.
- Additional Tools: Tapestry needle for seaming and weaving ends, 4 stitch markers, scrap yarn or stitch holders for the sleeve stitches.
| Color Order | Color Name / Description | Yarn Weight | Yardage Needed |
|---|---|---|---|
| 1 | Sage Green (MC) | Worsted Weight (Cat. 4) | 200 [240, 290, 340] yds / 183 [219, 265, 311] m |
Yarn Suggestions
| Yarn Brand & Line Name | Weight | Yardage per Skein | Notes |
|---|---|---|---|
| Lion Brand Pound of Love | Worsted (Cat. 4) | 1020 yds / 932 m per 16 oz skein | Very soft, machine washable, and budget-friendly for baby garments. |
| Berroco Vintage | Worsted (Cat. 4) | 218 yds / 199 m per 100 g skein | Soft acrylic-wool blend with a lovely drape for ruffles. |
| Cascade 220 Superwash | Worsted (Cat. 4) | 220 yds / 200 m per 100 g skein | Crisp stitch definition and easy-care superwash finish. |
⚠️ Note: Avoid stiff, scratchy, or heavily textured yarns. Baby’s neck and underarm skin is sensitive, and a yarn without drape will make the ruffles stick out instead of flutter.
Gauge
| Stitches | Rows | Measurement |
|---|---|---|
| 18 sc | 20 rows | 4 in / 10 cm |
💡 Designer Tip: Work a small swatch in the round before you begin. If you have more than 18 stitches per 4 inches, go up a hook size; fewer than 18, go down. Gauge matters here because the neckline needs to stretch over baby’s head.
Abbreviations
| Abbreviation | Meaning |
|---|---|
| ch | chain |
| sc | single crochet |
| dc | double crochet |
| sl st | slip stitch |
| sk | skip |
| rep | repeat |
| st(s) | stitch(es) |
| MC | Main Color |
| * | repeat the instructions after the asterisk as directed |
| [ ] | numbers in brackets are for the larger sizes, in order: 3–6, 6–12, 12–18 months |
Special Stitches Explained
Raglan Increase (3 sc in marked stitch):
- Work 1 sc in each stitch until you reach a marked stitch.
- Work 3 sc into the marked stitch.
- Move the stitch marker to the middle of those 3 stitches so it is ready for the next increase round.
Ruffle Round (2 dc in each stitch):
- Ch 3 (counts as your first dc) and work 1 dc in the same stitch.
- Work 2 dc in each remaining stitch around.
- Join with a sl st to the top of the beginning ch-3. The number of stitches has now doubled.
Whipstitch Seam:
- Hold the two edges together with the wrong sides facing out.
- Thread the yarn needle and insert it through both edges, front to back.
- Repeat across the seam, pulling gently so the stitches lie flat.
Pattern Instructions
Section 1: Neckline
Ch 64 [68, 72, 76]. Join with a sl st to the first ch, taking care not to twist the chain.
Round 1: Ch 1, sc in each ch around. Join with a sl st to the first sc. (64 [68, 72, 76] sc)
Round 2 (mark corners): Ch 1, *sc in next 15 [16, 17, 18] sts, sc in next st and place a marker in it; rep from * 3 more times. Join. (64 [68, 72, 76] sc, 4 marked corner sts)
The first 15 [16, 17, 18] stitches are the back. The next section is the right sleeve, then the front, then the left sleeve.
Section 2: Raglan Yoke
Increase Round: Ch 1, *sc in each st to the marked st, 3 sc in the marked st (move the marker to the center st); rep from * 3 more times. Join. (+8 sts)
Plain Round: Ch 1, sc in each st around. Join. (no change)
Work 1 Increase Round followed by 1 Plain Round, 6 [8, 9, 10] times. Then work the Increase Round only, with no plain rounds between, 5 [4, 4, 4] more times. You will have worked 11 [12, 13, 14] Increase Rounds in total. (152 [164, 176, 188] sc)
✅ Checkpoint: Count the stitches between the markers. You should have exactly 37 [40, 43, 46] sc in each of the four sections (back, front, and both sleeves), not counting the marked stitches. If a section is off, check the round where you last worked an increase.
Section 3: Divide for Body and Armholes
Division Round: Ch 1, sc in each of the next 37 [40, 43, 46] sts (back). Skip the marked st, the next 37 [40, 43, 46] sleeve sts, and the next marked st, placing these 39 [42, 45, 48] sleeve sts on scrap yarn. Ch 3 [4, 3, 4]. Sc in each of the next 37 [40, 43, 46] sts (front). Skip the next marked st, the next 37 [40, 43, 46] sleeve sts, and the marked st, placing these 39 [42, 45, 48] sts on scrap yarn. Ch 3 [4, 3, 4]. Join with a sl st to the first sc.
💡 Designer Tip: Before moving on, gently try the yoke over a doll or baby’s head. If the neckline feels tight, you can always go up a hook size for the foundation chain and Round 1 next time.
Section 4: Body
Round 1: Ch 1, sc in each st and in each ch around. Join. (80 [88, 92, 100] sc)
Rounds 2 to 26 [2 to 30, 2 to 34, 2 to 38]: Ch 1, sc in each st around. Join. (80 [88, 92, 100] sc)
Fasten off, leaving the last round’s stitches intact for the leg openings.
✅ Checkpoint: Measure from the underarm chain to the bottom edge. It should be about 5 [6, 7, 7.5] in / 13 [15, 18, 19] cm. Every 5 extra rounds adds about 1 in / 2.5 cm of length.
Section 5: Crotch Seam and Leg Openings
Lay the body flat with the front and back each holding 40 [44, 46, 50] stitches, and the side folds falling at the center of each underarm chain.
Find the center 8 [8, 10, 10] stitches of the bottom edge on both the front and the back. Whipstitch these center stitches together to form the crotch. The remaining stitches on each side form the leg openings: 16 [18, 18, 20] stitches on the front plus 16 [18, 18, 20] on the back, for 32 [36, 36, 40] stitches per opening.
Section 6: Leg Ruffles (make 2)
Round 1: Join MC at the crotch seam edge of a leg opening. Ch 1, sc in each of the 32 [36, 36, 40] sts around the opening. Join. (32 [36, 36, 40] sc)
Round 2 (ruffle): Ch 3 (counts as first dc), dc in the same st, *2 dc in next st; rep from * around. Join to top of ch-3. (64 [72, 72, 80] dc)
Round 3: Ch 3, dc in each st around. Join. (64 [72, 72, 80] dc)
Round 4: Ch 1, sc in each st around. Join. Fasten off. (64 [72, 72, 80] sc)
✅ Checkpoint: After Round 2, your ruffle should have exactly double the stitches of Round 1. If you’re short, one or more stitches only got a single dc.
Section 7: Armhole Ruffles (make 2)
Round 1: Slip the 39 [42, 45, 48] held sleeve stitches back onto your hook area. Join MC at the center of the underarm. Ch 1, sc along the base of the underarm chain (3 [4, 3, 4] sc), then sc in each held sleeve stitch. Join. (42 [46, 48, 52] sc)
Round 2 (ruffle): Ch 3 (counts as first dc), dc in the same st, *2 dc in next st; rep from * around. Join to top of ch-3. (84 [92, 96, 104] dc)
Round 3: Ch 3, dc in each st around. Join. (84 [92, 96, 104] dc)
Round 4: Ch 1, sc in each st around. Join. Fasten off. (84 [92, 96, 104] sc)
Section 8: Neck Edging
Turn the romper so the foundation chain is at the top. Join MC in the free loop of any foundation chain stitch.
Rounds 1 and 2: Ch 1, sc in each st around. Join. (64 [68, 72, 76] sc) Fasten off.
Weave in all ends securely. Gently steam or lightly block the ruffles so they lie softly.
Size Customization Tips
- Longer or shorter body: add or remove rounds in Section 4. Every 5 rounds changes the length by about 1 in / 2.5 cm.
- Deeper yoke: add 1 extra Plain Round after each of the first Increase Rounds. Each extra Plain Round adds about 0.2 in / 0.5 cm of depth.
- Fuller ruffles: work Ruffle Round 3 as a second 2-dc round (the stitch count doubles again), and use a hook one size larger for the ruffle rounds.
- Wider chest: add 1 extra chain to each underarm chain. This adds 2 stitches to the body (about 0.45 in / 1.1 cm), so adjust the crotch and leg stitch counts to keep the openings even.
Care Instructions
Hand wash in cool water with a gentle detergent, or machine wash on a delicate cycle inside a mesh bag if you used a superwash yarn. Reshape and lay flat to dry, fluffing the ruffles with your fingers. Avoid the dryer, which can flatten the ruffles and shrink natural fibers.
Closing
And that’s your Sage Green Ruffle Baby Romper, ready for tiny kicking legs and plenty of photos! I’d love to see your version, so tag your finished romper on social media, save this pattern to Pinterest for your next baby gift, and leave a comment below if you have any questions along the way.
Happy stitching, the Happy Handmade design team 🌿