
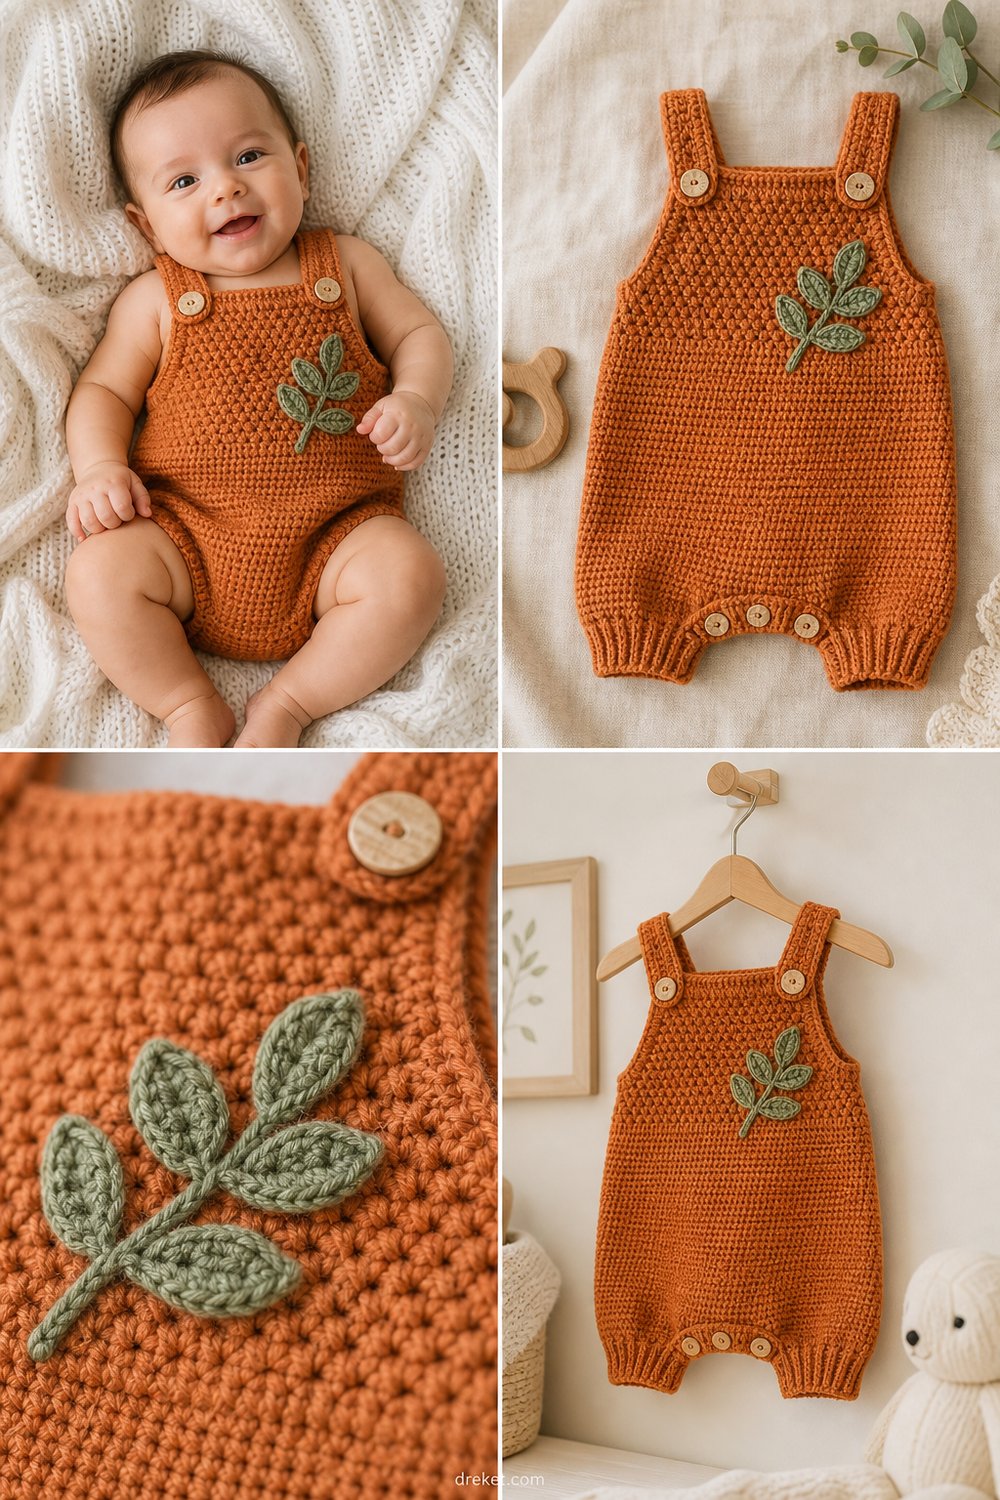
Wrap your little one in the comforting warmth of autumn with a handmade heirloom piece designed for crisp morning walks and cozy nursery snuggles. The gentle textures and earthy tones of this outfit capture the absolute best of seasonal crafting while keeping baby exceptionally comfortable all day long.
Cozy Pumpkin Spice Baby Romper Free Baby Pattern
Quick Facts
- Stitches Used: Chain (ch), Single Crochet (sc), Half Double Crochet (hdc), Seed Stitch (alternating sc and dc).
- Size Fit: 0-3 Months (with easy customization tips for up to 12 months).
- Estimated Hours to Complete: 6 to 8 hours.
- Gift-Appeal: An exquisite, premium baby shower gift that looks boutique-bought yet carries the priceless love of handmade craftsmanship.
💡 Designer Tip: Read through the entire pattern before casting on, and don’t skip the gauge swatch to ensure your finished romper matches the specified drape and sizing!
Sizing customization tips are included later in this post to help you adjust the garment for a longer torso or wider fit.
What Makes This Cozy Pumpkin Spice Baby Romper Special
This romper is engineered with both aesthetics and functionality in mind, utilizing intentional design elements that set it apart from standard baby patterns. The bodice features a delicate textured seed stitch panel that creates a moss-like, breathable fabric—preventing overheating while adding a sophisticated, boutique-quality look. Crotch closure openings secured by natural coconut buttons allow for effortless diaper changes without needing to pull the garment over the baby’s head. Finally, the ribbed cuffs and adjustable straps provide a snug, flexible fit that grows with your baby, paired with a charming sage leaf appliqué on the chest for an organic, nature-inspired finish.
Skill Level
- Required Skills:
- Working in rows and in the round
- Basic increases and decreases
- Working the seed stitch (alternating single and double crochet)
- Simple surface crochet and sewing on appliques
- Creating buttonholes and attaching buttons securely
⚠️ Note: This pattern is rated Intermediate due to the textured seed stitch combinations and construction shaping. Confident advanced beginners who are comfortable with basic garment assembly will also find this project deeply rewarding.
Finished Measurements
The following table provides the finished garment dimensions for the 0-3 month size, designed with positive ease for comfort and mobility.
| Measurement | Inches | Centimeters |
|---|---|---|
| Total Length (Shoulder to Crotch) | 14.5 in | 36.8 cm |
| Chest Width (Underarm to Underarm) | 8.5 in | 21.6 cm |
| Leg Opening Circumference | 7.0 in | 17.8 cm |
| Strap Length | 6.0 in | 15.2 cm |
Materials You Will Need
To achieve the exact look shown in the design, gather the following materials before beginning your project.
| Material / Item | Specification | Quantity / Details |
|---|---|---|
| Pumpkin Spice Yarn | DK weight (3), soft cotton-blend | 220 yds / 200 m |
| Cream Yarn | DK weight (3), soft cotton-blend | 100 yds / 90 m |
| Sage Green Yarn | DK weight (3), soft cotton-blend | 20 yds / 18 m |
| Crochet Hook | US E/4 (3.5 mm) | Ergonomic handle recommended |
| Buttons | Small natural coconut buttons (0.5 in / 1.3 cm) | 4 pieces |
| Notions | Tapestry needle, locking stitch markers, measuring tape | As needed |
Yarn Suggestions
Selecting the right yarn ensures your baby romper is breathable, machine-washable, and gentle against sensitive skin.
| Yarn Brand & Line | Weight | Yardage per Skein | Notes |
|---|---|---|---|
| Lion Brand Coboo | DK (3) | 232 yds / 212 m | Excellent stitch definition, wonderful bamboo-cotton breathability. |
| Schachenmayr Catania | Sport/DK (3) | 137 yds / 125 m | 100% mercerized cotton with a stunning matte finish. |
| Hobbii Rainbow Cotton 8/8 | DK (3) | 82 yds / 75 m | Budget-friendly option with a vast color palette. |
⚠️ Note: Avoid heavy wools or 100% acrylic yarns that lack breathability. Always choose a soft cotton or cotton-blend yarn to keep baby comfortable and prevent overheating.
Gauge
Checking your gauge ensures your finished romper will fit the intended size accurately.
| Gauge Type | Stitches / Rows | Measurement |
|---|---|---|
| Seed Stitch Gauge | 20 sts x 18 rows | 4 in x 4 in (10 cm x 10 cm) |
| Hdc Ribbing Gauge | 22 sts x 16 rows | 4 in x 4 in (10 cm x 10 cm) |
💡 Designer Tip: Make your swatch slightly larger than 4×4 inches, and measure from the center stitches to get the most accurate count. Adjust your hook size up if your gauge is too tight, or down if it is too loose.
Abbreviations
This pattern uses standard US crochet terminology.
| Abbreviation | Full Term |
|---|---|
| ch | Chain |
| sl st | Slip stitch |
| sc | Single crochet |
| hdc | Half double crochet |
| dc | Double crochet |
| st(s) | Stitch(es) |
| sk | Skip |
| rep | Repeat |
| RS | Right Side |
| WS | Wrong Side |
| inc | Increase (work 2 sts into the same st) |
| dec | Decrease (work 2 sts together) |
Special Stitches Explained
- Seed Stitch: Worked over an even number of stitches. Row 1: *1 sc in next st, 1 dc in next st; rep from * across. Row 2: Work a dc into each sc and an sc into each dc from the previous row so that the stitches offset.
- Back Loop Only (BLO): Insert hook only under the back loop of the designated stitch, leaving the front loop exposed to create a ridged texture.
- Modified Crab Stitch (Reverse Sc): Working from left to right, insert hook into the next stitch to the right, yarn over, pull up a loop, yarn over and pull through both loops on hook.
Pattern Instructions
Section 1: Crotch and Back Panel
Using Pumpkin Spice yarn and US E/4 (3.5 mm) hook, ch 18.
– Row 1 (RS): Working in the back bumps of the chain, 1 sc in 2nd ch from hook, 1 sc in each ch across, turn. (17 sc)
– Rows 2–6: Ch 1, 1 sc in each st across, turn. (17 sc)
– Row 7 (Leg Opening Increases): Ch 1, 2 sc in first st, sc in each st across to last st, 2 sc in last st, turn. (19 sc)
– Rows 8–12: Ch 1, 1 sc in each st across, turn. (19 sc)
– Row 13: Repeat Row 7 increase row. (21 sc)
– Rows 14–22: Ch 1, 1 sc in each st across, turn. (21 sc)
Fasten off and set aside. Make a matching front panel following the exact same instructions through Row 22.
Section 2: Bodice Joining and Lower Body
With RS facing, join front and back panels at the side seams by working 10 sc up each side, leaving leg openings unworked.
– Round 1: Join Pumpkin Spice yarn at side seam. Ch 1, work hdc evenly around the entire lower body opening, join with sl st to first hdc. (62 hdc)
– Round 2: Ch 2 (does not count as st here and throughout), working in BLO, hdc in each st around, join. (62 hdc)
– Rounds 3–8: Ch 2, hdc in both loops around, join. (62 hdc)
✅ Checkpoint: At the end of Round 8, count your stitches to ensure you have exactly 62 hdc. This forms the solid foundation of the lower romper.
Section 3: Seed Stitch Chest Panel
- Row 1 (RS): Switch to Cream yarn. Facing the front 31 stitches of the bodice, attach yarn at the left side marker. Ch 1, work Seed Stitch across the 31 front stitches, turn. (31 sts)
- Rows 2–14: Continue working in established Seed Stitch pattern, ensuring stitches offset properly on every row, turn. (31 sts)
- Row 15: Ch 1, sc in first 3 sts, ch 2 (buttonhole), sk 2 sts, sc in next 21 sts, ch 2 (buttonhole), sk 2 sts, sc in last 3 sts, turn. (27 sc and 2 ch-2 spaces)
- Row 16: Ch 1, seed stitch across, working 2 sc into each ch-2 space, turn. (31 sts)
Fasten off cream yarn.
Section 4: Straps
- Strap 1: Attach Pumpkin Spice yarn to the top right corner of the front chest panel. Ch 45.
- Row 1: 1 hdc in 3rd ch from hook, hdc in each ch down, sl st securely to the top back edge of the romper. Fasten off. (43 hdc)
- Strap 2: Repeat for the left side strap, mirroring the placement on the back panel. Fasten off and weave in all loose ends.
Section 5: Sage Leaf Appliqué and Finishing
Using Sage Green yarn:
– Round 1: Ch 8, working around the chain, 1 sc in 2nd ch from hook, hdc in next 2 sts, dc in next 2 sts, hdc in next st, 3 sc in last st. Working down opposite side of chain: hdc in next st, dc in next 2 sts, hdc in next 2 sts, 1 sc in last st, join with sl st. (16 sts)
– Finishing: Sew the sage leaf securely to the center of the Cream seed stitch chest panel. Attach two small coconut buttons to the lower back waistband corresponding to the front strap buttonholes. Securely weave in all remaining yarn tails.
Size Customization Tips
- To size up to 3-6 Months: Add 4 chains to the initial foundation chain, and work 4 additional rows in each section before shaping the leg openings. Add 6 rows to the chest panel length.
- To size down to Newborn: Decrease the initial foundation chain by 2 stitches, work 2 fewer rows on the lower body, and shorten the straps by 5 chains.
- Torso Length Adjustment: Simply add or subtract rows in Section 2 (Lower Body) before transitioning to the chest panel to customize the romper length for a taller or shorter baby.
Care Instructions
- Hand wash gently in cold water using a mild, baby-safe wool wash.
- Do not bleach or wring out the garment.
- Reshape carefully while damp and lay flat to dry on a clean towel away from direct sunlight.
- Cool iron if needed, avoiding direct pressure on the coconut buttons.
Cozy Pumpkin Spice Baby Romper Free Baby Pattern
Thank you so much for crafting along with me today! I hope you thoroughly enjoyed making this sweet romper as much as I loved designing it. If you share your creations on Instagram or Facebook, please tag me and use the hashtag #CozyPumpkinSpiceRomper so I can admire your gorgeous work! Be sure to save this tutorial to your Pinterest baby crochet boards for easy reference, and leave a comment below to let me know how your project turned out. Happy crocheting!