
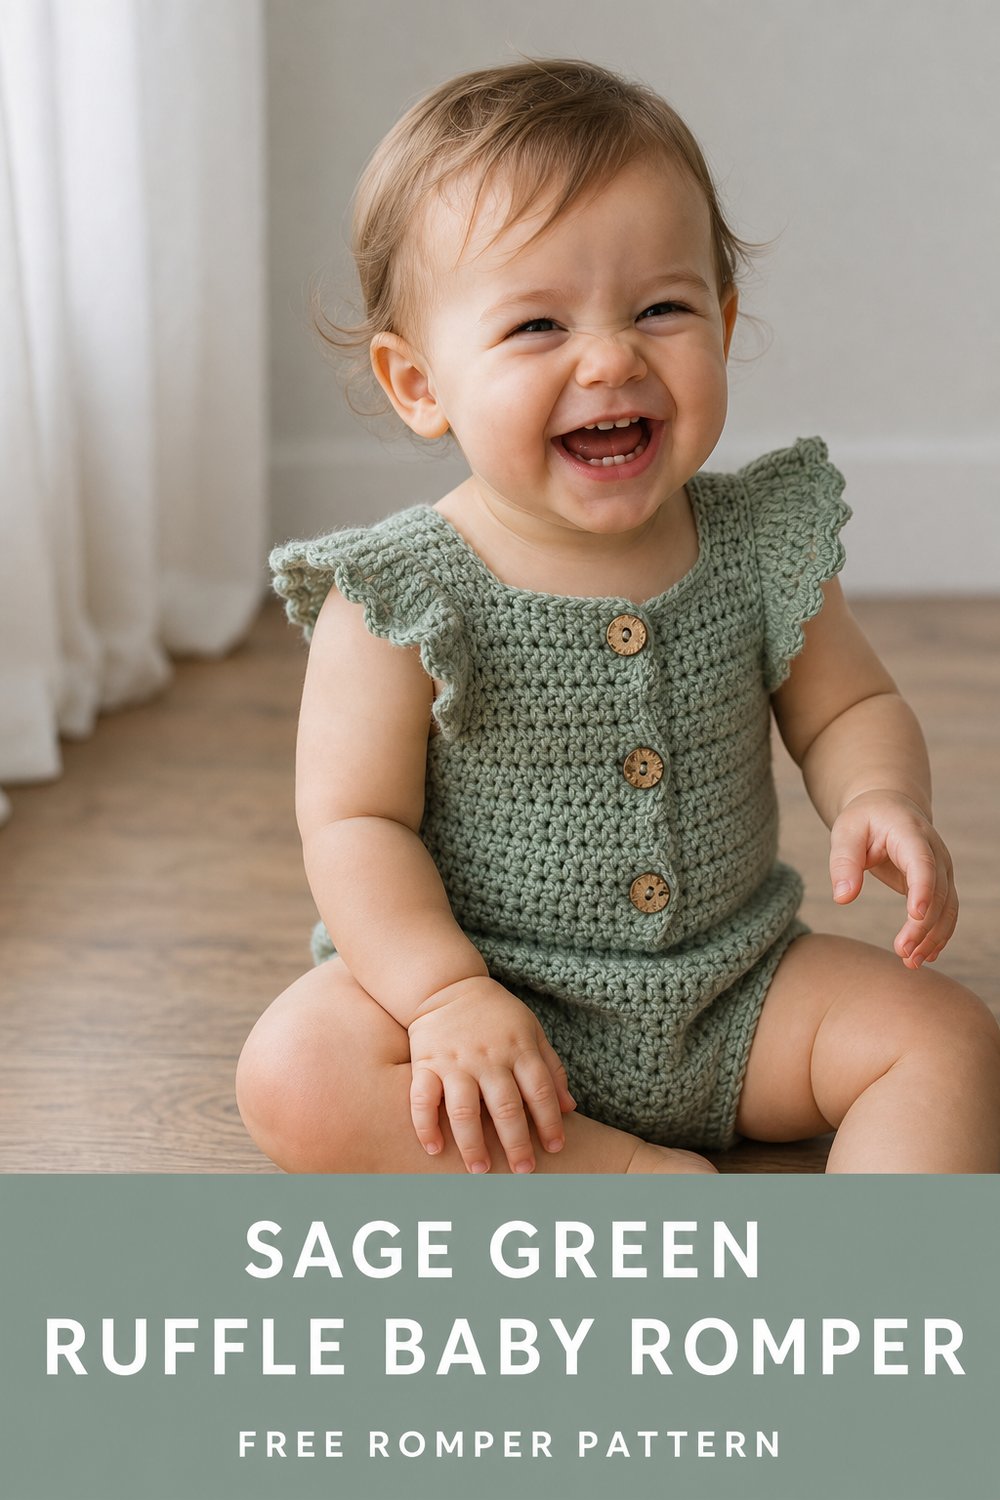
Imagine dressing your little one in a garment that feels as gentle as a morning breeze, handcrafted with love and designed for effortless everyday movement. This darling sage green ruffle baby romper brings together vintage charm and modern practicality, featuring fluttery shoulder wings and natural coconut buttons for a truly timeless heirloom piece.
Sage Green Ruffle Baby Romper Free Crochet Pattern
This adorable romper works up using foundational basic stitches paired with delicate front- and back-post detailing, comfortably fitting babies aged 6 to 12 months with an estimated completion time of 10 to 12 hours. It makes an unforgettable, heart-melting handmade baby shower gift or heirloom keepsake that will be treasured long after your little one outgrows it.
Sizing customization tips are included later in this article to help you adapt the fit for preemies or toddlers.
What Makes This Sage Green Ruffle Baby Romper Special
The visual magic of this romper lies in its thoughtful construction and structural detailing. The bodice is worked in a sturdy moss stitch (granite stitch) that creates a dense yet flexible fabric, preventing gaping while maintaining a clean, modern texture. The dramatic ruffled shoulder wings are built directly using layered increases along the straps, creating an organic, architectural flutter that holds its shape without feeling stiff. Finally, the organic touch of natural coconut buttons paired with the earthy sage palette gives the garment an elevated, artisan aesthetic reminiscent of high-end boutique childrenswear.
Skill Level
- Skill Level: Intermediate
- Required Skills: Working in rows and rounds, basic increases and decreases, working into post stitches, maintaining consistent gauge, and simple sewing/assembly.
Reassurance Line: If you are an adventurous beginner who feels comfortable tackling post stitches and simple shaping, you can absolutely complete this project by taking it one step at a time!
Finished Measurements
- Chest Width: 10 inches (25.4 cm) flat
- Total Length (Shoulder to Crotch): 16 inches (40.6 cm)
- Leg Opening Width: 4.5 inches (11.4 cm) flat
- Strap Length: 6.5 inches (16.5 cm) adjustable via buttonholes
Materials You Will Need
- Yarn Weight: Sport (#2 Fine) or Light DK weight yarn
- Hook: US E/4 (3.5 mm) crochet hook
- Notions: 3 natural coconut buttons (approx. 15mm), tapestry needle, locking stitch markers, measuring tape
| Color Name / Shade | Exact Order Match | Estimated Yardage Needed |
|---|---|---|
| Sage Green | Primary Garment Color | 380 yds (347 m) |
| Cream | Accent / Buttonhole Trim (Optional) | 20 yds (18 m) |
Yarn Suggestions
- Knit Picks Galileo: (Sport weight, 50% Merino Wool, 50% Bamboo, 131 yards / 50g per skein) — Requires 3 skeins of Sage Green. Provides incredible drape and a soft sheen.
- Scheepjes Stone Washed: (Sport weight, 78% Cotton, 22% Acrylic, 142 yards / 50g per skein) — Requires 3 skeins of Sage Green. Offers a rustic, heathered look that accentuates the sage tone.
- Hobbii Rainbow Cotton 8/8: (DK weight, 100% Cotton, 82 yards / 50g per skein) — Requires 5 skeins of Sage Green. A crisp, breathable pure cotton option that holds stitch definition brilliantly.
Avoid heavy 100% acrylic or wool-nylon sock yarns that lack breathability or drape; babies need lightweight, breathable fibers that prevent overheating.
Gauge
- Moss Stitch Gauge: 22 stitches and 20 rows = 4 inches (10 cm) using a 3.5 mm hook.
- Note: Always take time to work a gauge swatch before beginning your romper to ensure your finished dimensions match the sizing specs.
Abbreviations
- ch: chain
- sc: single crochet
- hdc: half double crochet
- dc: double crochet
- sl st: slip stitch
- st(s): stitch(es)
- sk: skip
- sp(s): space(s)
- blo: back loop only
- fpdc: front post double crochet
- bpdc: back post double crochet
- inc: increase (work 2 sts in same st)
- dec: decrease (work 2 sts together)
- PM: place marker
- RS: right side
- WS: wrong side
Special Stitches Explained
- Moss Stitch (Granite Stitch): (Sc, ch 1, sk next st) across as indicated in pattern instructions. On subsequent rows, work the sc into the ch-1 space of the previous row.
- Front Post Double Crochet (fpdc): Yarn over, insert hook from front to back to front around the post of the indicated stitch from the previous row, yarn over, pull up a loop, (yarn over, pull through 2 loops) twice.
- Back Post Double Crochet (bpdc): Yarn over, insert hook from back to front to back around the post of the indicated stitch from the previous row, yarn over, pull up a loop, (yarn over, pull through 2 loops) twice.
Pattern Instructions
Section 1: Front Bodice
Working from the top down. Using Sage Green and a 3.5 mm hook, ch 52.
- Row 1 (RS): Sc in 2nd ch from hook, [ch 1, sk 1, sc in next ch] across, turn. (51 sts including ch-1 spaces)
- Rows 2–16: Ch 1, sc in first sc, [sc in next ch-1 sp, ch 1, sk next sc] across, ending with sc in turning ch, turn. (51 sts)
- Row 17 (Armhole Shaping): Sl st across first 4 sts, ch 1, moss stitch across to last 4 sts, leave remaining sts unworked, turn. (43 sts)
- Rows 18–26: Continue moss stitch on these 43 sts. Fasten off.
Section 2: Back Bodice & Split Opening
Working from the top down. Ch 26 for Left Back Panel.
- Row 1 (RS): Sc in 2nd ch from hook, [ch 1, sk 1, sc in next ch] across, turn. (25 sts)
- Rows 2–16: Work moss stitch. (25 sts)
- Row 17 (Armhole Shaping): Sl st across first 4 sts on the inner edge, moss stitch across to end, turn. (21 sts)
- Rows 18–25: Continue moss stitch.
- Row 26 (Buttonhole Row): Moss stitch across 8 sts, ch 2, sk 2 ch-1/sc spaces, moss stitch to end, turn. Fasten off.
- Repeat for Right Back Panel, mirroring the buttonhole placement.
Checkpoint
At this stage, your front bodice and two back bodice panels are complete. Lay them flat with right sides facing up. Seam the shoulder edges together across the outer 5 stitches of each side, leaving the center unworked for the neck opening.
Section 3: Lower Body & Crotch
Join Sage Green yarn at the lower edge of the front bodice to begin working in joined rounds downward toward the leg openings.
- Round 1: Ch 1, work 52 sc evenly spaced across the bottom edge of the front bodice, join back panels and work 50 sc across the bottom edge of the back panels. Join with sl st to first sc. (102 sts)
- Rounds 2–10: Ch 2 (counts as hdc here and throughout), hdc in each st around, join. (102 sts)
- Round 11 (Leg Opening Division): Hdc 38, ch 8, sk 26 sts for right leg opening, hdc 25, ch 8, sk 26 sts for left leg opening, join. (76 hdc + 16 ch = 92 sts)
- Rounds 12–14: Hdc in each st and ch around. Fasten off.
Section 4: Leg Cuffs
- Round 1: Join Sage Green in any st around the right leg opening. Ch 2, work hdc evenly around the entire leg opening, join with sl st. (30 sts)
- Round 2: Ch 2, fpdc around next st, bpdc around next st; repeat from * around, join.
- Round 3: Repeat Round 2. Fasten off.
- Repeat Rounds 1–3 for the left leg opening.
Section 5: Ruffled Shoulder Wings
- Row 1: Join Sage Green along the outer armhole edge of the front bodice. Ch 3 (counts as dc), work 2 dc in each row edge along the armhole opening, turn. (36 dc)
- Row 2: Ch 3, work 2 dc in each st across. Fasten off. (72 dc)
- Repeat for the opposite armhole edge.
Section 6: Finishing & Assembly
Weave in all loose ends securely using your tapestry needle. Sew three natural coconut buttons securely onto the back waistband corresponding to the buttonholes created in Section 2. Block lightly with steam if desired to crisp up your moss stitch edges.
Size Customization Tips
To adjust this romper for a smaller preemie size, reduce your starting foundation chain by 8 stitches and work 2 fewer pattern repeats for the bodice length. For a larger toddler size (12–18 months), increase your starting chain by 8 stitches and add 2 extra rows to both the bodice and lower body sections before dividing for the legs.
Care Instructions
Hand wash gently in cool water using a mild, baby-safe wool wash. Do not wring or twist the fabric. Roll gently in a clean towel to remove excess moisture, then lay flat to dry in the shade on a blocking mat to preserve shape and stitch definition.
Sage Green Ruffle Baby Romper
Thank you so much for joining me in creating this sweet piece! I would love to see your finished rompers. Please share your makes on Instagram by tagging me and using the hashtag #SageGreenRomper, save this design to your favorite Pinterest boards for later, and leave a comment below to let me know how your project turned out!