
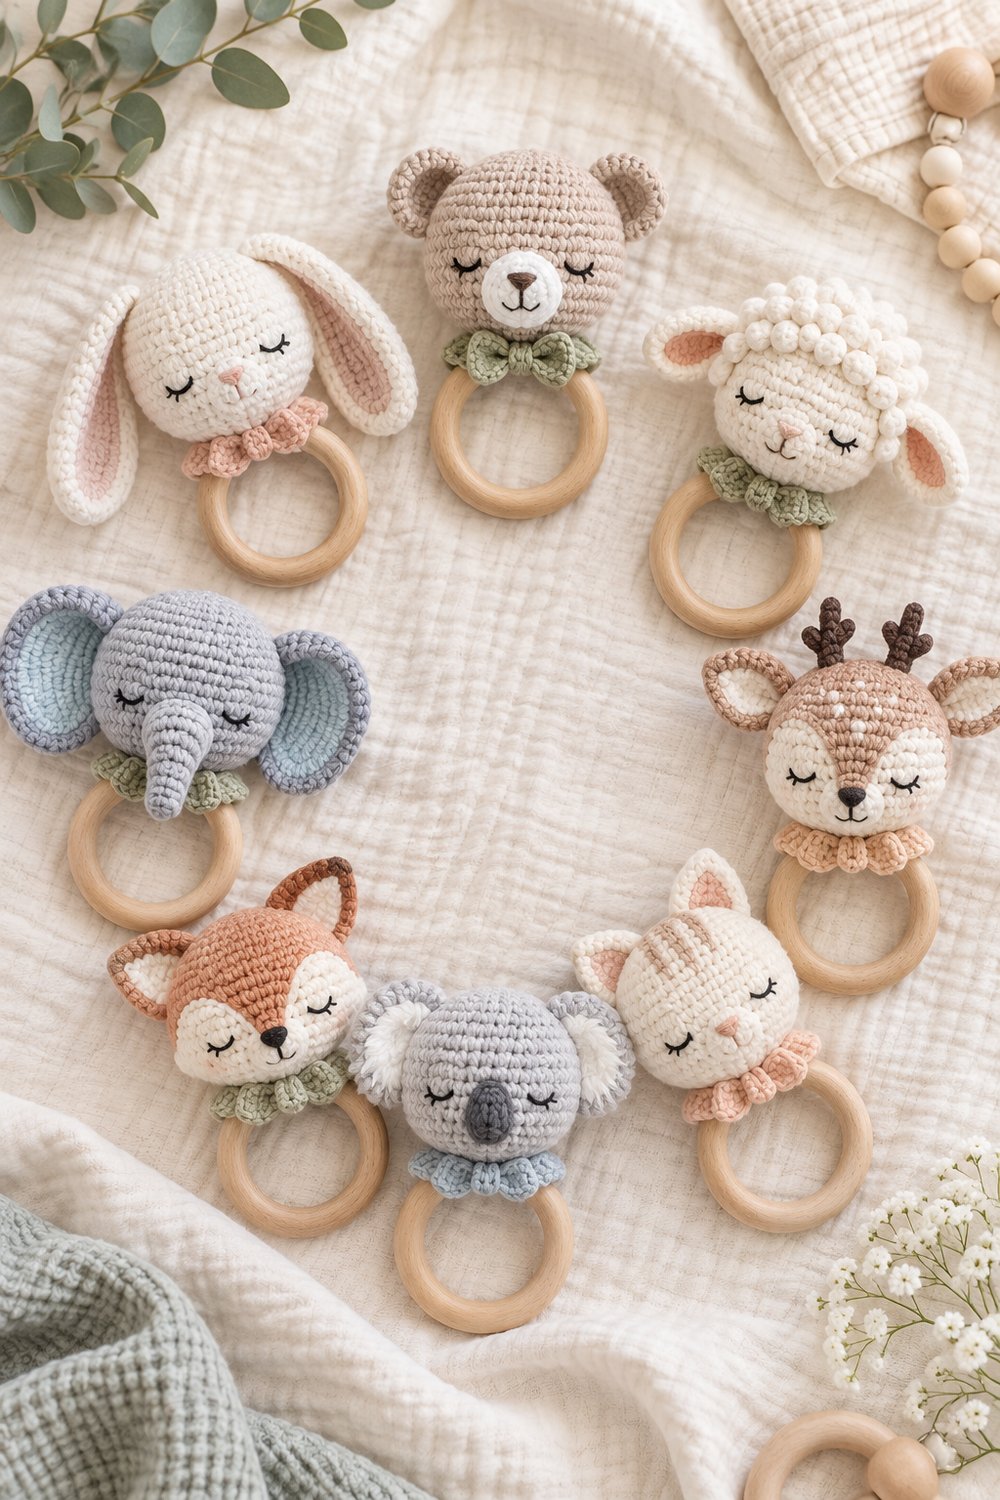
Imagine welcoming a new little one with a handmade treasure crafted in soft, organic cotton and mounted on a smooth, natural beechwood ring. These charming creations combine gentle textures and soothing sounds to delight a baby’s senses during playtime and quiet moments alike. Whether you are prepping for a nursery reveal or searching for a heartfelt baby shower crochet gift, these timeless keepsakes bring instant warmth and heirloom quality to any handmade collection.
Cute Kawaii Baby Animal Rattle Patterns Free DIY Tutorial
Quick Facts
- Stitches Used: Chain (ch), Single Crochet (sc), Slip Stitch (sl st), Increase (inc), Decrease (inv-dec), Bobble Stitch (bo).
- Size Fit: Designed to fit standard 2.75 in (7 cm) wooden teething rings with a finished animal head height of approximately 4.5 in (11.5 cm).
- Estimated Hours to Complete: 3 to 4 hours per rattle.
- Gift-Appeal Framing: Ideal as an artisanal baby shower gift, modern nursery decor piece, or a comforting sensory toy for newborns.
💡 Designer Tip: Easily customize your finished rattles by mixing and matching any animal head with any of the soft neutral pastel colorways to create a cohesive nursery collection.
What Makes This Cute Kawaii Baby Animal Rattle Patterns Free DIY Tutorial Special
These baby crochet patterns stand out because they combine modern minimalist aesthetics with traditional amigurumi techniques, creating cute baby toys that are both stylish and secure. By utilizing organic cotton yarn, the finished items offer a breathable, machine-washable fabric that is gentle against sensitive skin. Textured elements like subtle bobble stitches and secure embroidered sleepy eyes add tactile interest without posing any choking hazards, making this wooden teether rattle project completely baby-safe when constructed according to instructions.
Skill Level
- Beginner-Confident / Intermediate: Must be comfortable working in continuous rounds (spiral), basic amigurumi increases and decreases, and simple surface embroidery.
- Required Skills:
- Magic ring creation
- Single crochet in the round
- Invisible decreases
- Working around a wooden ring foundation
- Basic satin stitch for facial features
⚠️ Note: This pattern involves small parts (rattle inserts and embroidery). Always ensure all yarn tails are securely woven in and hidden inside the stuffed head before sealing the base to the wooden ring.
Finished Measurements
| Measurement Type | Inches | Centimeters |
|---|---|---|
| Total Height (Rattle + Ring) | 6.5 in | 16.5 cm |
| Animal Head Width | 3.5 in | 9.0 cm |
| Wooden Ring Diameter | 2.75 in | 7.0 cm |
Materials You Will Need
- Yarn Weight: Sport (#2) or DK (#3) 100% organic cotton yarn.
- Hook Size: US C/2 (2.75 mm) crochet hook.
- Notions: Toy safety stuffing (polyfill), 2.75 in (7 cm) natural untreated beechwood teething ring, plastic rattle insert box (optional), yarn needle, black embroidery floss, locking stitch markers, and sharp scissors.
| Color | Yarn Weight / Type | Yardage Needed |
|---|---|---|
| Warm Cream | DK (#3) 100% Organic Cotton | 35 yds (32 m) |
| Soft Taupe | DK (#3) 100% Organic Cotton | 15 yds (14 m) |
| Sage Green | DK (#3) 100% Organic Cotton | 10 yds (9 m) |
| Blush Peach | DK (#3) 100% Organic Cotton | 8 yds (7 m) |
| Dusty Blue | DK (#3) 100% Organic Cotton | 8 yds (7 m) |
Yarn Suggestions
| Yarn Brand & Line | Weight | Yardage per Skein | Notes |
|---|---|---|---|
| Schachenmayr Catania | Sport (#2) | 137 yds (125 m) per 50g | Exceptional stitch definition, broad range of muted pastels. |
| Knit Picks CotLin | DK (#3) | 123 yds (112 m) per 50g | Cotton-linen blend with wonderful organic drape and softness. |
| Drops Safran | Sport (#2) | 175 yds (160 m) per 50g | 100% combed mercerized cotton, very durable for toys. |
⚠️ Note: Avoid using fuzzy novelty yarns (like mohair or eyelash yarn) for baby items, as loose fibers can easily shed and irritate an infant’s airways. Stick to smooth, tightly spun plant fibers.
Gauge
- Stitch Gauge: 24 sc × 28 rows = 4 inches (10 cm) using a US C/2 (2.75 mm) hook.
- Motif Measurement: Base magic ring working round of 6 sc measures approximately 0.5 inches (1.2 cm) across.
💡 Designer Tip: Amigurumi requires a tight fabric to prevent stuffing from escaping. If your stitches show gaps where the stuffing peeks through, drop down one hook size.
Abbreviations
| Abbreviation | Full Meaning |
|---|---|
| ch | Chain |
| sc | Single Crochet |
| sl st | Slip Stitch |
| inc | Increase (work 2 sc in same stitch) |
| inv-dec | Invisible Decrease (insert hook in front loops of next 2 stitches, yarn over, pull through both, yarn over, pull through remaining 2 loops) |
| bo | Bobble Stitch (work 5 incomplete dc into the same st, YO and pull through all 6 loops on hook) |
| st(s) | Stitch(es) |
| Rnd(s) | Round(s) |
| FO | Fasten Off |
Special Stitches Explained
- Invisible Decrease (inv-dec): Insert your hook into the front loop only of the first stitch, then immediately insert it into the front loop only of the second stitch (3 loops on hook). Yarn over and pull through the first 2 loops on hook. Yarn over and pull through the remaining 2 loops.
- Bobble Stitch (bo): Yarn over, insert hook into designated stitch, yarn over, pull up a loop, yarn over, pull through 2 loops (2 loops on hook). Repeat this process 4 more times in the same stitch (6 loops on hook). Yarn over, pull through all 6 loops on hook. Secure with a chain if required, or proceed immediately to the next stitch.
Pattern Instructions
Section 1: The Animal Head (Base Component)
Working in continuous rounds with Warm Cream yarn. Do not join with a slip stitch at the end of rounds unless specified; use a stitch marker to track the beginning of each round.
- Rnd 1: Work 6 sc in a magic ring. (6 sc)
- Rnd 2: [inc] around. (12 sc)
- Rnd 3: [1 sc, inc] around. (18 sc)
- Rnd 4: [2 sc, inc] around. (24 sc)
- Rnd 5: [3 sc, inc] around. (30 sc)
- Rnd 6: [4 sc, inc] around. (36 sc)
- Rnd 7: [5 sc, inc] around. (42 sc)
- Rnds 8–14: [sc] around. (42 sc for 7 rounds)
- Rnd 15: [5 sc, inv-dec] around. (36 sc)
- Rnd 16: [4 sc, inv-dec] around. (30 sc)
- Rnd 17: [3 sc, inv-dec] around. (24 sc)
- Insert rattle box and stuff head firmly with polyfill.
- Rnd 18: [2 sc, inv-dec] around. (18 sc)
- Rnd 19: [1 sc, inv-dec] around. (12 sc)
- Rnd 20: [inv-dec] around. (6 sc)
- FO, leaving a long tail to sew the head securely onto the wooden ring handle wrap.
✅ Checkpoint: At the end of Rnd 10, verify your stitch count is exactly 42 sc before moving into the straight body rounds.
Section 2: Wooden Ring Handle Wrap
Using Soft Taupe yarn, attach yarn directly around the top portion of the natural beechwood ring.
- Row 1: Ch 1, work 12 sc evenly spaced directly over the wood ring, turn. (12 sc)
- Rows 2–22: Ch 1, 12 sc across, turn. (12 sc for 21 rows)
- FO, leaving a long tail. Wrap the crocheted strip tightly around the wooden ring, aligning the starting and ending edges, and whipstitch the long seam closed around the wood.
Section 3: Animal Features (Ears and Muzzle)
Bunny Ears (Make 2):
Using Warm Cream yarn.
– Rnd 1: Work 6 sc in a magic ring. (6 sc)
– Rnd 2: [1 sc, inc] around. (9 sc)
– Rnds 3–8: [sc] around. (9 sc for 6 rounds)
– FO, leaving a long tail. Flatten ears (do not stuff) and stitch them securely to the top of the head between Rnds 5 and 7.
Bear Muzzle (Make 1):
Using Soft Taupe yarn.
– Rnd 1: Ch 6, starting in 2nd ch from hook: 4 sc, 3 sc in last ch. Working along opposite side of foundation chain: 3 sc, inc in last ch. (12 sc)
– Rnd 2: Inc, 3 sc, [inc] 3 times, 3 sc, [inc] 2 times. (18 sc)
– FO, leaving a long tail. Lightly stuff and sew to the lower center of the head. Embroider a small triangle nose in black embroidery floss.
Section 4: Assembly & Finishing
- Position the stuffed animal head directly over the top center of the wrapped wooden handle piece.
- Use the remaining yarn tail from the head base to securely anchor the head to the handle wrap using double-knotting and deep anchoring stitches through both components.
- Using black embroidery floss, stitch closed sleepy crescent eyes onto the face, angled slightly upward for a peaceful expression.
- Weave in all remaining loose yarn ends inside the work.
✅ Checkpoint: Tug gently on the attached head and ears to ensure all structural attachment points are firm and secure before gifting.
Size Customization Tips
- To Scale Up: Use a heavier weight yarn (such as Worsted #4) paired with a US D/3 (3.25 mm) hook and a larger 3.5 in (9 cm) wooden teething ring, resulting in a rattle that is roughly 25% larger overall.
- To Scale Down: Use a fingering weight (#1) thread with a US B/1 (2.25 mm) hook and a 2.0 in (5 cm) ring for a petite, newborn-sized rattle keepsake.
Care Instructions
- Hand wash gently in cool water using a mild, baby-safe detergent.
- Do not submerge the wooden ring for extended periods; wipe the wooden portion clean with a damp cloth and condition occasionally with food-grade beeswax or mineral oil to preserve the natural grain.
- Lay flat in the shade to dry completely. Do not tumble dry.
Cute Kawaii Baby Animal Rattle Patterns Free DIY Tutorial
Thank you so much for stitching along with this free pattern! I hope crafting these sweet rattles brings as much joy to your hands as they will to the little ones receiving them. If you make your own set of baby crochet patterns, please share your creations, tag me on social media, save this post to your baby crochet Pinterest board, and leave a comment below to let me know which animal was your favorite to make!