
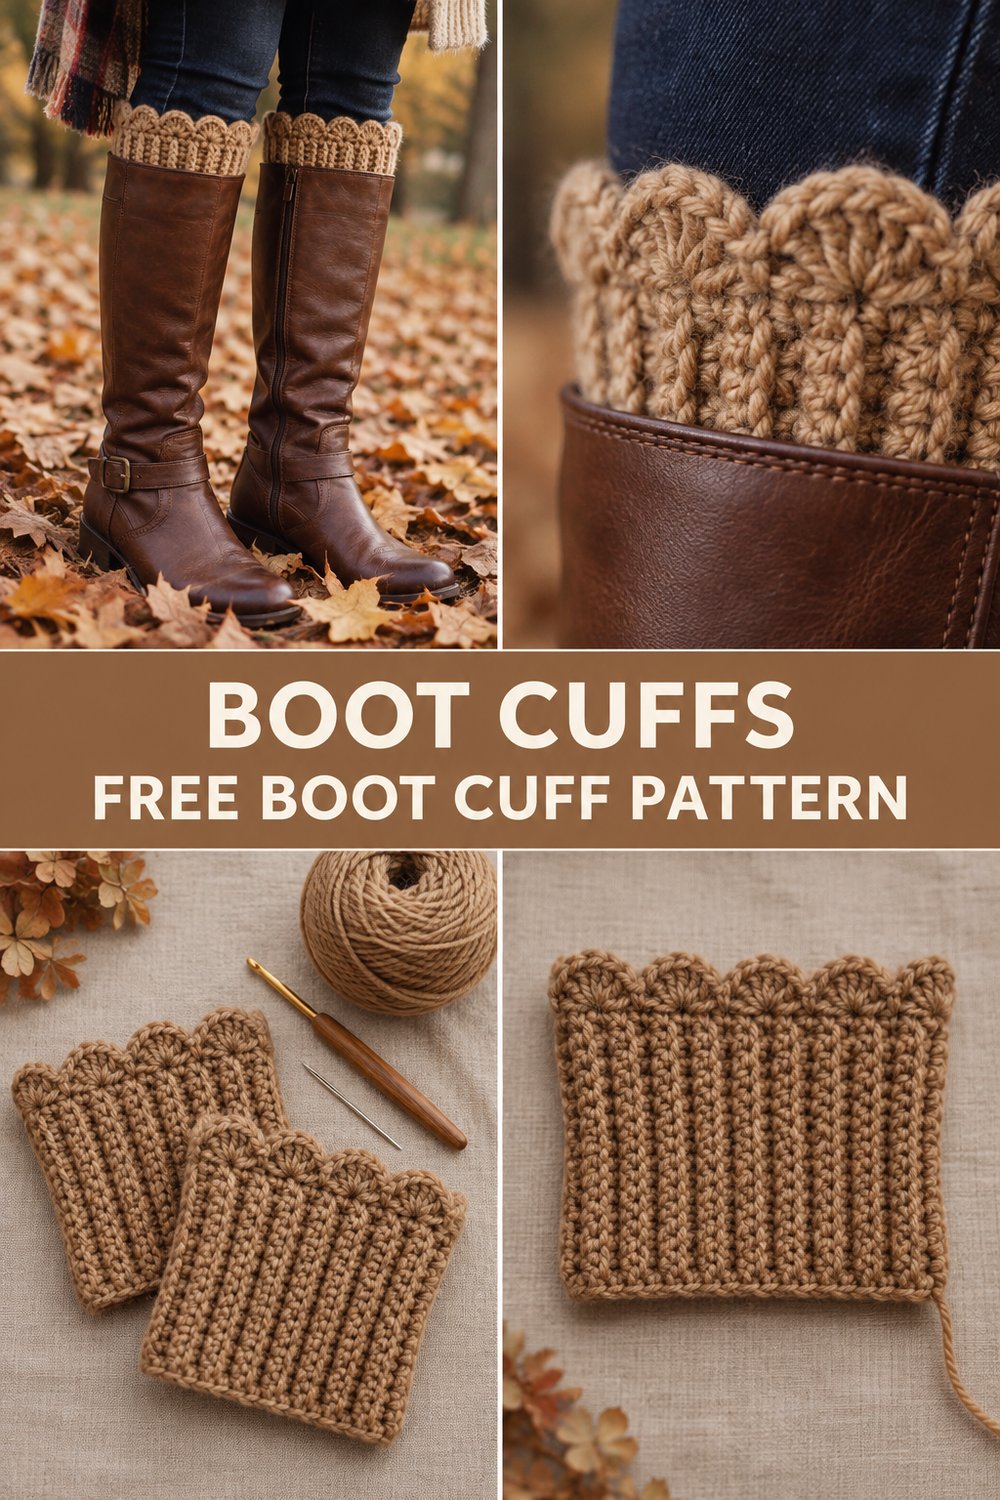
When the crisp autumn air whispers of changing seasons and cold days ahead, there’s nothing quite like the cozy embrace of handcrafted warmth. These Crochet Boot Cuffs for Cold Days are designed to add a touch of charming comfort to your favorite boots, peeking out with their soft scalloped edge and keeping those ankles toasty. They’re a quick and satisfying project perfect for adding a stylish layer without the bulk of full socks.
Crochet Boot Cuffs for Cold Days — Free Easy Pattern
These crochet boot cuffs are made using simple stitches, making them an easy crochet accessory perfect for almost any skill level. Each cuff works up quickly, often in under 2 hours, making them ideal for scrap yarn crochet projects or thoughtful, handmade gifts. You’ll love how these boot toppers crochet into a practical and pretty addition to your cold-weather wardrobe.
💡 Designer Tip: Detailed instructions for customizing the size are included later in the pattern, so you can make them perfect for any boot!
What Makes This Boot Cuff Special
This design focuses on creating a classic, cozy look with an elegant finish. The main body of the cuff uses half double crochet (hdc) worked into the back loop only (BLO), which creates a beautiful, stretchy ribbing that mimics the look of knitting. This ribbed crochet technique ensures a snug yet comfortable fit around the calf or ankle, preventing them from slouching down into your boots. The top edge is finished with a delicate scalloped shell stitch, adding a soft, decorative touch that perfectly frames the top of your boots, just as seen peeking out of tall leather boots. The seamless construction (after seaming the rectangle) ensures comfort and a polished look.
Skill Level
- Required Skills:
- Chain (ch)
- Slip Stitch (sl st)
- Single Crochet (sc)
- Half Double Crochet (hdc)
- Double Crochet (dc)
- Working in the Back Loop Only (BLO)
- Seaming
- Who Should Attempt It: This pattern is perfect for advanced beginners looking to practice basic stitches and learn new techniques like BLO ribbing and shell stitches, as well as seasoned crocheters seeking a quick and satisfying project.
Finished Measurements
The measurements below are for a standard women’s size medium, designed to fit snugly around the calf or ankle just above a boot shaft.
| Measurement | Inches | Centimeters |
|---|---|---|
| Height (excluding scallop) | 5 | 12.5 |
| Circumference (relaxed) | 12 | 30.5 |
| Circumference (stretched) | 14 | 35.5 |
Materials You Will Need
| Color | Yarn Weight/Type | Yardage Needed (per cuff) |
|---|---|---|
| Camel | Worsted Weight #4 | 50 yards |
- Hook: 4.5 mm (US G/7) crochet hook
- Additional Tools:
- Yarn needle (for weaving in ends and seaming)
- Scissors
- Stitch markers (optional, but helpful for counting rows)
Yarn Suggestions
When choosing your yarn, look for a wool or wool blend for natural warmth and excellent stitch definition, just like the warm camel wool in the inspiration image. Avoid overly slippery or stiff yarns, as they won’t provide the same cozy texture or hold the ribbed shape as well.
| Brand/Line | Weight | Yardage/Skein | Notes |
|---|---|---|---|
| Lion Brand Wool-Ease Worsted | Worsted (#4) | 197 yards | Wool/Acrylic blend, great stitch definition. |
| Caron Simply Soft | Worsted (#4) | 315 yards | Acrylic, good drape, but less warmth. |
| Patons Classic Wool Worsted | Worsted (#4) | 210 yards | 100% wool, excellent for warmth and texture. |
Gauge
It’s crucial to check your gauge to ensure your boot cuffs will fit correctly.
| Stitch/Row | Measurement (4 inches / 10 cm) |
|---|---|
| Hdc BLO (rows) | 16 rows |
| Hdc BLO (stitches) | 14 hdc |
⚠️ Note: Your swatch should be at least 6×6 inches to get an accurate gauge reading. If your swatch is too small, your gauge may not be accurate. If your swatch is too large, it will not fit properly around your boots. Adjust your hook size accordingly to meet gauge (smaller hook if too large, larger hook if too small).
Abbreviations
| Abbreviation | Full Meaning |
|---|---|
| ch | Chain |
| sl st | Slip Stitch |
| sc | Single Crochet |
| hdc | Half Double Crochet |
| dc | Double Crochet |
| BLO | Back Loop Only |
| st(s) | Stitch(es) |
| rep | Repeat |
Special Stitches Explained
Shell Stitch: (2 dc, ch 1, 2 dc) all worked into the same stitch or space.
Pattern Instructions
We will be making two identical boot cuffs. Each cuff is constructed as a flat ribbed rectangle, then seamed into a loop, and finally, the scalloped edge is added.
Section 1: Ribbed Cuff Body (Make 2)
We begin by creating the foundation chain for the height of the cuff.
- Ch 21. This chain determines the height of your cuff (approx. 5 inches / 12.5 cm).
- Row 1: Hdc in the 2nd ch from the hook and in each ch across. Ch 1, turn. (20 hdc)
- Row 2: Hdc in the BLO of each st across. Ch 1, turn. (20 hdc)
> ✅ Checkpoint: You should have 20 hdc stitches at the end of Row 2. - Rows 3-48: Rep Row 2.
> ⚠️ Note: The number of rows determines the circumference of your boot cuff. 48 rows will result in a relaxed circumference of about 12 inches (30.5 cm). You can adjust this in the “Size Customization Tips” section.
> ✅ Checkpoint: After Row 48, your piece should be a rectangle approximately 5 inches (12.5 cm) high and 12 inches (30.5 cm) long (when slightly stretched).
Section 2: Seaming the Cuff
Now we will join the short edges of the rectangle to form a loop.
- Fold the rectangle in half, bringing the first row and the last row together.
- Working through both loops of the last row and the corresponding starting chain loop of the first row, sl st across to seam the edges together. (20 sl sts)
- Fasten off, leaving a long tail (approx. 12 inches / 30 cm) for weaving in.
> 💡 Designer Tip: For a nearly invisible seam, use a whip stitch or mattress stitch with your yarn needle instead of sl st.
Section 3: Scalloped Top Edge
Now we add the pretty decorative scallop around one edge of the cuff.
- Join yarn with a sl st to the top edge of the cuff (the edge opposite your seamed row). The “top edge” is the one you were working into when making the hdc rows (i.e., the chains from Row 1).
- Round 1: Ch 1 (does not count as a st), sc evenly around the top edge, placing one sc into the end of each hdc row. Sl st to the first sc to join. (48 sc)
> ⚠️ Note: Ensure your sc stitches are evenly spaced around the edge. You should have 1 sc for every ribbed row. If you made more or fewer rows in Section 1, adjust this count accordingly.
> ✅ Checkpoint: You should have 48 sc stitches in Round 1 if you completed 48 ribbed rows. - Round 2: Ch 1 (does not count as a st), skip 2 sc, (2 dc, ch 1, 2 dc) in next sc (this forms one shell), skip 2 sc, sc in next sc. Rep from * around. You will end with a sc. Sl st to the first sc to join. (8 shells and 8 sc)
> 💡 Designer Tip: If your last repeat doesn’t perfectly end with skipping 2 sc and a sc, you can subtly adjust the skips on the final shell to make it work. For example, skip 1 or 3 stitches if needed. The goal is to distribute the scallops evenly. - Fasten off and weave in all remaining ends securely.
Size Customization Tips
- To adjust height: Increase or decrease the number of beginning chains in Section 1, Step 1. Each chain adds approximately 0.25 inches (0.6 cm) to the height.
- To adjust circumference: Increase or decrease the number of rows in Section 1, Step 4. Each row adds approximately 0.25 inches (0.6 cm) to the circumference (when relaxed). For example, to make a cuff that is 2 inches larger in circumference, add 8 rows (8 rows x 0.25 inches/row = 2 inches). Ensure that the total number of rows is a multiple of 6 for the shell stitch pattern to work out evenly in the final round (or be prepared to adjust your skips slightly as noted in the pattern).
Care Instructions
To keep your crochet boot cuffs looking their best and feeling soft:
* Hand wash in cool water with a mild detergent.
* Gently squeeze out excess water (do not wring).
* Lay flat to dry on a clean towel, reshaping as needed.
* Do not iron or bleach.
Crochet Boot Cuffs for Cold Days — Free Easy Pattern
I hope you enjoyed creating these cozy and stylish crochet boot cuffs! They’re such a simple way to add warmth and flair to any outfit, and I just love how quickly they work up. Don’t forget to share your finished cuffs on social media – tag me and use #CrochetBootCuffs and #ColdDaysWarmToes so I can see your beautiful creations! Save this free crochet pattern to your Pinterest boards so you can always find it when you need a quick gift idea or a little something for yourself. Let me know in the comments if you have any questions or how your cuffs turned out!