
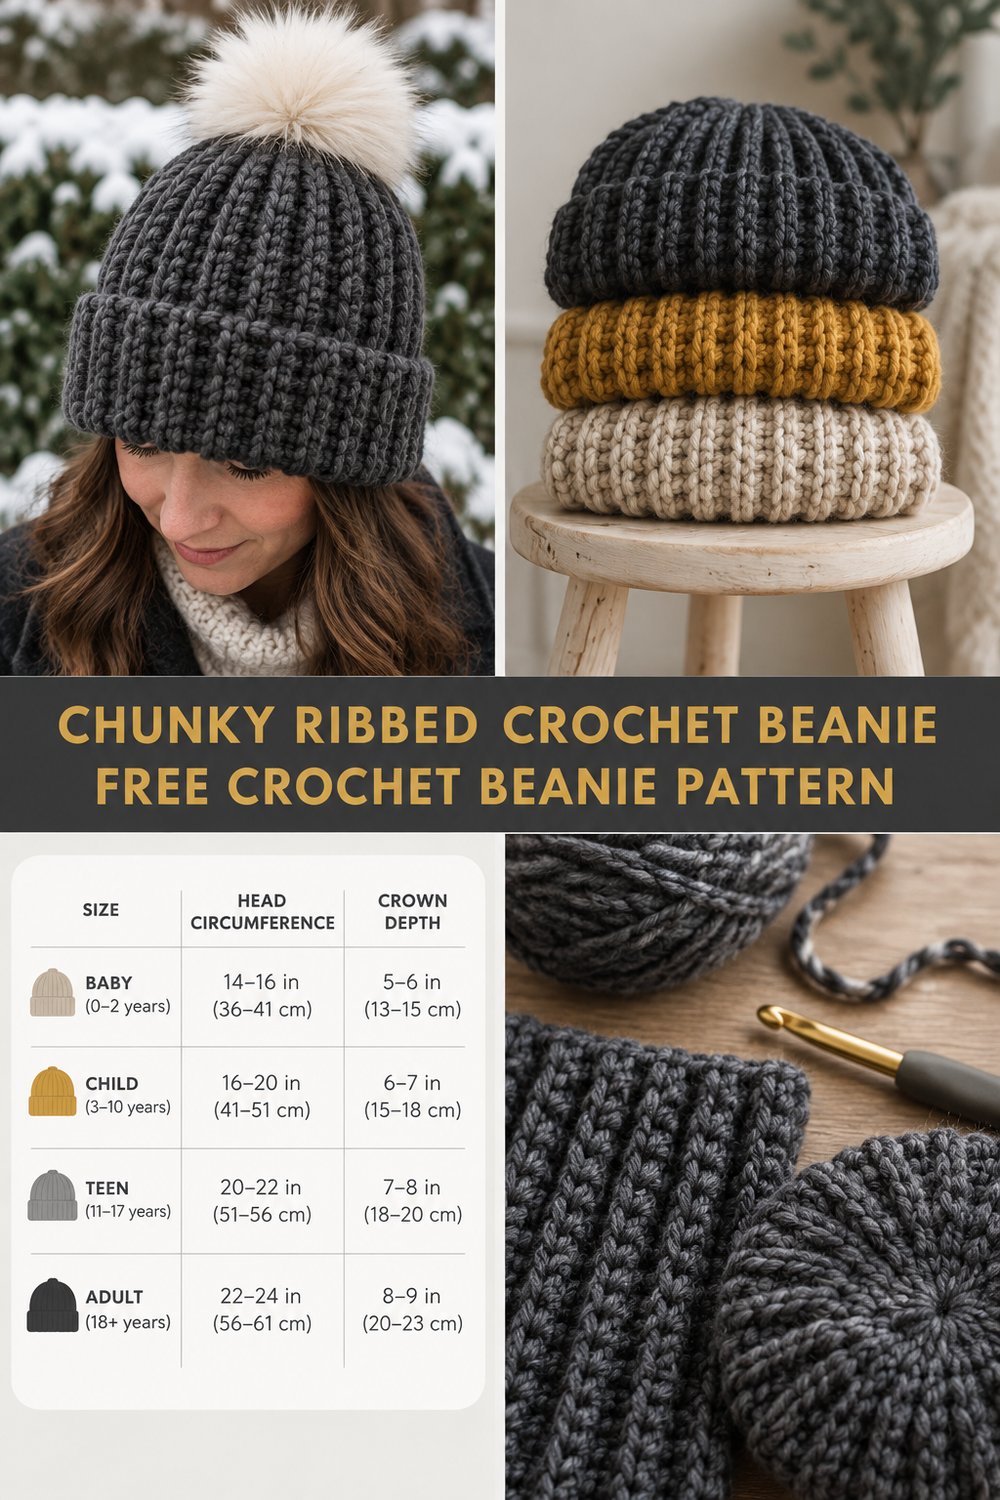
Wrap yourself in cozy comfort with a chunky ribbed crochet beanie that feels as good to make as it does to wear. This pattern delivers that sought-after hand-knitted look with the ease of crochet, creating a stylish and warm accessory perfect for frosty days.
Chunky Ribbed Crochet Beanie Free Size Guide
This chunky ribbed crochet beanie is perfect for a quick, satisfying project. Using simple stitches, it creates a cozy, stretchy fit for everyone from baby to adult. You can easily complete one in an evening or two, making it an ideal gift or a quick addition to your winter wardrobe.
💡 Designer Tip: This pattern is designed for versatility! While written for a standard adult size, you’ll find comprehensive customization tips later to help you achieve the perfect fit for any head circumference.
What Makes This Chunky Ribbed Crochet Beanie Special
The unique beauty of this chunky crochet beanie comes from working the entire hat sideways in rows using the third-loop half double crochet (TLHDC) stitch. This creates a beautifully vertical ribbing that mimics a knitted fabric, offering exceptional stretch and a polished, professional finish. The construction method ensures a seamless crown decrease spiral, avoiding any bulky seams and creating a smooth, comfortable top. Combined with a deep, foldable brim, this beanie is both stylish and incredibly warm.
Skill Level
This pattern is suitable for confident beginners and intermediate crocheters.
- Required Skills:
- Magic Ring (or alternative starting method)
- Chain (ch)
- Slip Stitch (sl st)
- Half Double Crochet (hdc)
- Third-Loop Half Double Crochet (TLHDC)
- Working in rows and rounds
- Basic seaming (optional, for joining brim)
- Working knowledge of increasing and decreasing
- This pattern is approachable for anyone ready to learn a new stitch and create a beautiful, functional accessory.
Finished Measurements
| Size | Head Circumference (inches) | Head Circumference (cm) | Crown Depth (inches) | Crown Depth (cm) |
|---|---|---|---|---|
| Baby | 14 – 16 | 35.5 – 40.5 | 6.5 – 7 | 16.5 – 18 |
| Child | 17 – 19 | 43 – 48 | 7.5 – 8 | 19 – 20.5 |
| Teen | 20 – 21 | 51 – 53.5 | 8.5 – 9 | 21.5 – 23 |
| Adult | 22 – 23 | 56 – 58.5 | 9.5 – 10 | 24 – 25.5 |
Materials You Will Need
| Color | Yarn Weight & Type | Yardage (approx.) |
|---|---|---|
| Heathered Charcoal | Bulky (5) Weight Acrylic Blend | 150 – 180 yds |
| Mustard | Bulky (5) Weight Acrylic Blend | 150 – 180 yds |
| Oatmeal | Bulky (5) Weight Acrylic Blend | 150 – 180 yds |
| Cream | (for pompom, optional) | 20 – 30 yds |
- Hook: 7mm crochet hook (or size needed to meet gauge)
- Additional Tools:
- Yarn needle for weaving in ends
- Scissors
- Stitch marker
- Faux fur pompom (cream, optional)
- Pom-pom maker (if making your own yarn pom-pom)
Yarn Suggestions
When choosing your yarn, look for a soft, bulky weight (category 5) yarn that has good elasticity.
| Brand/Line | Weight | Yardage/Skein | Notes |
|---|---|---|---|
| Lion Brand Wool-Ease Thick & Quick | Bulky (5) | 106 yds | Soft, warm, and comes in a great range of heathered colors. |
| Bernat Softee Chunky | Bulky (5) | 164 yds | Excellent stitch definition, good for beginners. |
| Patons Alpaca Blend | Bulky (5) | 155 yds | Luxurious feel, slightly more drape. |
⚠️ Note: Avoid yarns that are too stiff or have very little stretch, as this will affect the fit and comfort of your beanie. Wool blends or acrylics with some elasticity work best for the ribbed texture.
Gauge
| Stitch/Row | Measurement over 4 inches (10 cm) |
|---|---|
| TLHDC in rows | 11 stitches |
| TLHDC in rows | 8 rows |
💡 Designer Tip: Taking the time to create a gauge swatch is crucial for achieving the correct size! If your swatch is too small, go up a hook size. If it’s too large, go down a hook size.
Abbreviations
| Abbreviation | Meaning |
|---|---|
| ch | chain |
| sl st | slip stitch |
| hdc | half double crochet |
| TLHDC | third loop half double crochet |
| st(s) | stitch(es) |
| rep | repeat |
| sc | single crochet |
| hdc2tog | half double crochet two together |
| FO | fasten off |
Special Stitches Explained
1. Third-Loop Half Double Crochet (TLHDC)
Also known as Half Double Crochet in the Back Bar or Camel Stitch. This stitch is what creates the beautiful knit-look ribbing.
- Yarn over (YO).
- Insert your hook into the third loop (the horizontal bar on the back of the stitch, just below the top two loops).
- YO, pull up a loop (3 loops on hook).
- YO, pull through all 3 loops on hook.
Pattern Instructions
This chunky ribbed crochet beanie is worked flat in rows to create the main body, then seamed, and the crown is gathered. The pattern is written for the Adult size. Refer to the “Size Customization Tips” section to adjust for other sizes.
### Section 1: Beanie Body (Worked Flat)
Using Heathered Charcoal yarn and 7mm hook.
Foundation Chain: Ch 38.
Row 1: Hdc in 3rd ch from hook (counts as 1st hdc), hdc in each ch across. Ch 2 (does not count as st), turn. (36 hdc)
Row 2: TLHDC in each st across. Ch 2 (does not count as st), turn. (36 TLHDC)
Rows 3-45: Rep Row 2. (36 TLHDC)
✅ Checkpoint: You should have a flat rectangle measuring approximately 19 inches (48 cm) wide by 9.5-10 inches (24-25.5 cm) tall. The number of rows corresponds to the head circumference.
💡 Designer Tip: When working the TLHDC, ensure you are consistently inserting your hook into the horizontal bar on the back of the stitch, directly below the ‘V’ of the front and back loops.
### Section 2: Seaming
- Fold the rectangle in half, bringing the first and last rows together.
- Insert your hook into the first st of Row 45 and the corresponding side loop of the starting chain.
- Sl st evenly through both layers across the entire height of the beanie to create a seamless vertical seam. FO, leaving a long tail (approx. 18-20 inches / 45-50 cm) for closing the crown.
✅ Checkpoint: You now have a tube shape. The seam should be neat and blend into the ribbing.
### Section 3: Closing the Crown
Using the long tail left from seaming:
- Thread the tail onto your yarn needle.
- Weave the needle in and out through the top edge of the beanie (the unworked ends of your rows). Work every other row end, or through the base of every other post.
- Once you have worked your way around the entire circumference of the top edge, gently pull the tail to gather the opening tightly.
- Make several small stitches across the gathered hole to securely close it, working through all layers.
- Weave in any remaining yarn tail on the inside of the beanie.
✅ Checkpoint: The crown should be securely closed, forming a neat, flat spiral at the top.
### Section 4: Finishing Touches
- Weave in any remaining loose ends from the starting chain and the seam.
- Fold up the bottom edge of the beanie to create a deep, approximately 2.5-3 inch (6-7.5 cm) brim.
- Attach your cream faux-fur pompom securely to the top of the beanie, centered over the crown. If your pompom has elastic, you can use your yarn needle to loop it through the top and tie it off on the inside.
Size Customization Tips
This chunky ribbed crochet beanie pattern is incredibly versatile for sizing!
- To adjust the Head Circumference (width of the beanie):
- The number of rows determines the circumference.
- Work more rows to make the beanie larger: each additional row adds approximately 0.4 inches (1 cm) to the circumference.
- Work fewer rows to make the beanie smaller: each fewer row subtracts approximately 0.4 inches (1 cm) from the circumference.
- Measure your head circumference and subtract 1-2 inches (2.5-5 cm) for negative ease (stretch fit). Work rows until your flat piece reaches this measurement.
- To adjust the Crown Depth (height of the beanie):
- The starting chain determines the height.
- For a deeper beanie (more slouch), add more chains to your foundation chain (each extra chain adds approx. 0.5 inches / 1.25 cm).
- For a shallower beanie, remove chains from your foundation chain (each removed chain subtracts approx. 0.5 inches / 1.25 cm).
- Refer to the “Finished Measurements” table for target crown depths for different sizes. Remember to account for the folded brim.
⚠️ Note: Always adjust your stitch count by adding or removing chains in multiples of 1 (for an even stitch count) to maintain the integrity of the pattern.
Care Instructions
- Machine wash cold on a gentle cycle, or hand wash gently in cool water.
- Lay flat to dry. Do not hang, as this can stretch the fabric.
- Do not iron.
- Remove faux fur pompom before washing if possible.
Chunky Ribbed Crochet Beanie Free Size Guide
I truly hope you enjoy making this cozy chunky crochet beanie! It’s designed to be a relaxing yet rewarding project that you’ll reach for again and again.
Please share your finished beanies on social media and tag me! I love seeing your creations. Don’t forget to save this free crochet beanie pattern to your Pinterest boards for later. Leave a comment below with your favorite color combination!