
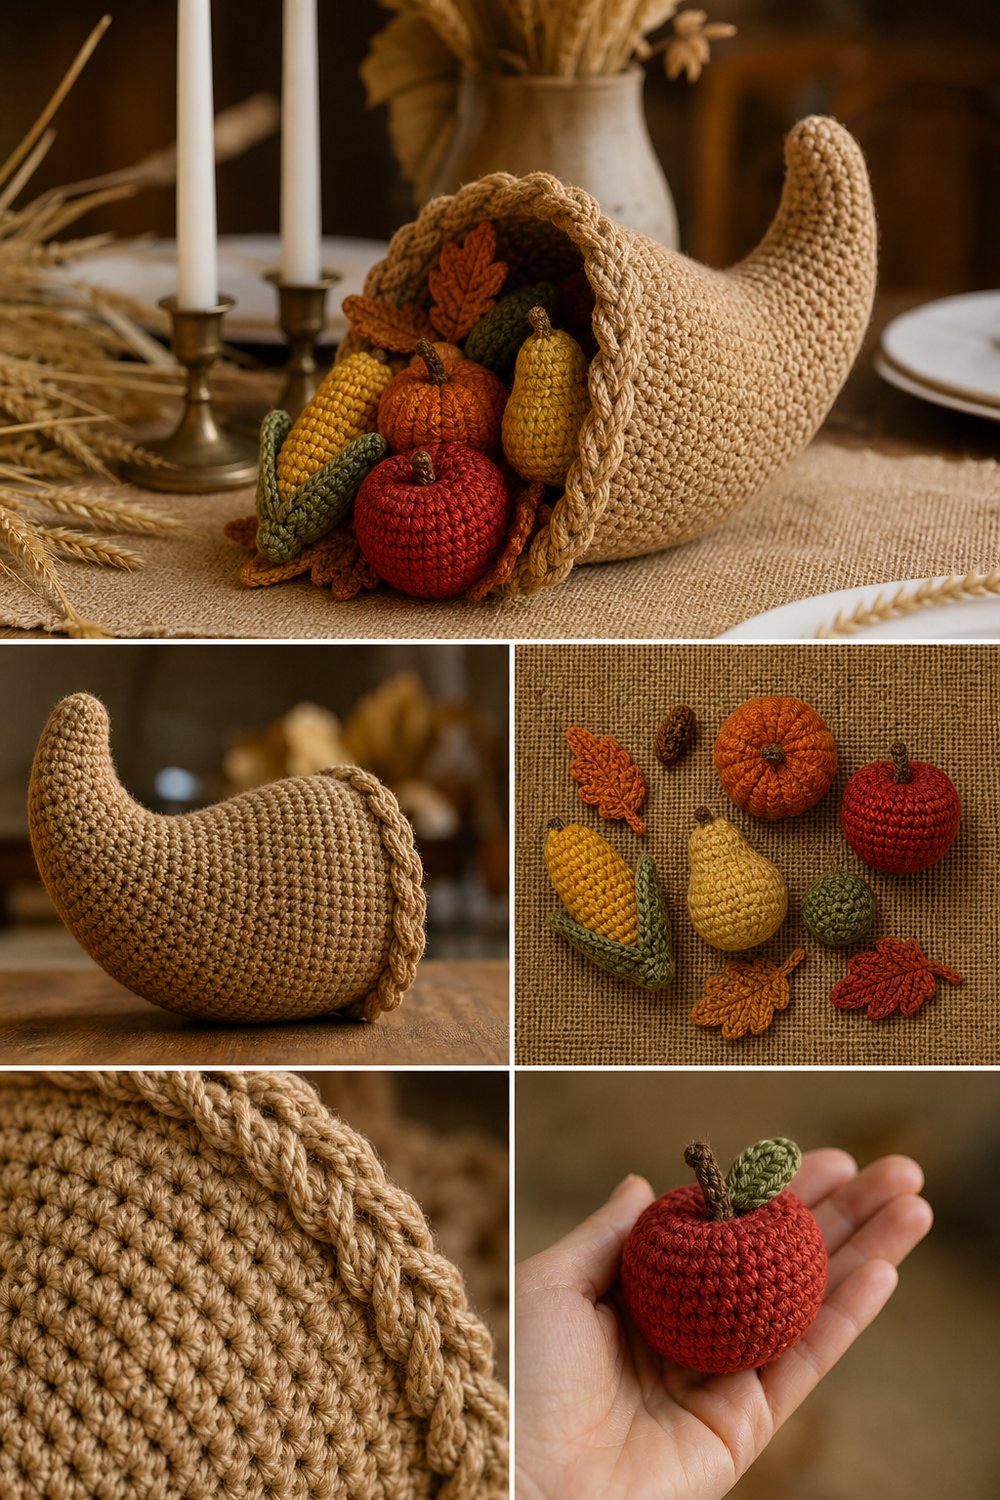
Bring the rich, textured warmth of an autumn harvest into your home with a handmade centerpiece that captures the very essence of the season. Featuring a natural-jute horn-of-plenty overflowing with plump pumpkins, crisp apples, golden pears, sweet corn, and vibrant leaves, this display pairs beautifully with real dried wheat and glowing taper candles for an unforgettable fall table setting.
Rustic Harvest Cornucopia Centerpiece Free Crochet Pattern
This decorative home decor centerpiece features dense single crochet stitches, a stiffened curved horn body, and a decorative braided rim. Designed to fit standard dining tables at roughly 12 inches long by 5 inches wide, this intermediate-level project takes approximately 10 to 14 hours to complete and makes a magnificent seasonal gift or Thanksgiving heirloom.
💡 Designer Tip: Detailed instructions for adjusting the length and flare of the cornucopia body to suit larger or smaller tabletop displays are included further down in this guide.
What Makes This Cornucopia Centerpiece Special
The secret to this stunning centerpiece lies in a combination of structural shaping and rich, organic textures. The cornucopia body is worked in continuous rounds using tight single crochet stitches, then curved and permanently stiffened with a fabric-stiffening solution to hold its signature sweeping horn shape without collapsing. A separate braided jute-colored rim is surface-stitched along the opening to provide a clean, professional finish. The overflowing harvest elements—including a mini pumpkin with ribbed surface shaping, a classic red apple with a wooden stem, a tapered yellow pear, a textured ear of corn in a husked shell, and variegated autumn leaves—are crocheted individually using simple shaping techniques and arranged freely inside the horn.
Skill Level
- Advanced Beginner to Intermediate
- Familiarity with working in the round, simple increases and decreases, and basic shaping
- Comfort with assembly and fabric stiffening processes
⚠️ Note: While the stitches themselves are straightforward, maintaining consistent tension and handling the stiffening process require a bit of patience for the best structural results.
Finished Measurements
| Component | Imperial (Inches) | Metric (Centimeters) |
|---|---|---|
| Cornucopia Length | 12 inches | 30.5 cm |
| Cornucopia Opening Diameter | 5 inches | 12.7 cm |
| Mini Pumpkin | 3 inches wide × 2.5 inches high | 7.6 cm wide × 6.4 cm high |
| Red Apple | 2.5 inches wide × 2.5 inches high | 6.4 cm wide × 6.4 cm high |
| Yellow Pear | 2.5 inches wide × 3.5 inches high | 6.4 cm wide × 8.9 cm high |
| Ear of Corn | 4 inches long × 1.5 inches wide | 10.2 cm long × 3.8 cm wide |
| Autumn Leaves (Average) | 3 inches long × 2 inches wide | 7.6 cm long × 5.1 cm wide |
Materials You Will Need
- Yarn Weight: Aran / Worsted / Heavy Jute-style Cord (see exact color breakdown below)
- Crochet Hook: 4.0 mm (G/6) and 4.5 mm (7)
- Notions: Tapestry needle, stitch markers, poly-fill stuffing for fruits, fabric stiffener or heavy starch, rust-proof stainless steel pins, and plastic wrap for blocking.
| Color Name in Image | Yarn Type / Weight | Yardage Needed |
|---|---|---|
| Natural Jute | Heavy Worsted / Jute Blend | 250 yds / 230 m |
| Rust Orange | Worsted Weight Cotton/Acrylic | 60 yds / 55 m |
| Deep Crimson Red | Worsted Weight Cotton/Acrylic | 45 yds / 41 m |
| Golden Yellow | Worsted Weight Cotton/Acrylic | 50 yds / 46 m |
| Pale Cornsilk | Worsted Weight Cotton/Acrylic | 40 yds / 37 m |
| Forest Green & Olive | Worsted Weight Cotton/Acrylic | 70 yds / 64 m |
Yarn Suggestions
| Yarn Brand & Line Name | Weight | Skein Yardage | Notes |
|---|---|---|---|
| Lion Brand Re-Spun | Worsted | 194 yds / 177 m | Great stitch definition and eco-friendly fiber. |
| Knit Picks Dishie | Worsted | 190 yds / 173 m | 100% cotton; creates crisp, firm fruit shapes. |
| Bernat Handicrafter Cotton | Worsted / Craft | 200 yds / 184 m | Stiffens wonderfully for the cornucopia body. |
⚠️ Note: Avoid ultra-soft, slippery acrylic yarns for the cornucopia body, as they will not hold their stiffened curved shape effectively.
Gauge
| Measurement Type | Stitch & Row Count | Over 4 Inches (10 cm) |
|---|---|---|
| Cornucopia Body (sc) | 16 sts × 18 rows | 4 inches × 4 inches |
| Fruit Motif (sc) | 18 sts × 20 rows | 4 inches × 4 inches |
💡 Designer Tip: Always make and measure your gauge swatch using the 4.5 mm hook for the cornucopia to ensure your horn stands up properly once stiffened.
Abbreviations
| Abbreviation | Full Meaning |
|---|---|
| ch | Chain |
| sl st | Slip stitch |
| sc | Single crochet |
| hdc | Half double crochet |
| dc | Double crochet |
| inc | Increase (work 2 sc in the same stitch) |
| dec | Decrease (sc 2 together) |
| st(s) | Stitch(es) |
| BLO | Back loop only |
| FLO | Front loop only |
| FO | Fasten off |
| rep | Repeat |
| RS | Right side |
Special Stitches Explained
- Invisible Decrease (inv-dec): Insert hook into the front loop only of the next two stitches. Yarn over and pull through both front loops, yarn over and pull through remaining two loops on hook.
- Surface Slip Stitch (surface sl st): With working yarn held on the wrong side of the work, insert hook from right side to wrong side through fabric, yarn over, pull loop through to the right side, and pull directly through the loop on your hook.
- Puff Stitch (puff): [Yarn over, insert hook in indicated st, yarn over and pull up a tall loop] 3 times in the same st (7 loops on hook), yarn over and pull through all 7 loops, ch 1 to close.
Pattern Instructions
Section 1: Cornucopia Body (Natural Jute)
Using a 4.5 mm hook and Natural Jute, start at the narrow pointed tip. Do not join rounds unless specified; work in a continuous spiral, using a stitch marker to track the first stitch of each round.
- Round 1: Magic ring, work 6 sc into ring. (6 sc)
- Round 2: [Inc] around. (12 sc)
- Round 3: [Sc in next st, inc in next st] around. (18 sc)
- Round 4: Sc in each st around. (18 sc)
- Round 5: [Sc in next 2 sts, inc in next st] around. (24 sc)
- Rounds 6–7: Sc in each st around. (24 sc)
- Round 8: [Sc in next 3 sts, inc in next st] around. (30 sc)
- Rounds 9–11: Sc in each st around. (30 sc)
- Round 12: [Sc in next 4 sts, inc in next st] around. (36 sc)
- Rounds 13–15: Sc in each st around. (36 sc)
- Round 16: [Sc in next 5 sts, inc in next st] around. (42 sc)
- Rounds 17–19: Sc in each st around. (42 sc)
- Round 20: [Sc in next 6 sts, inc in next st] around. (48 sc)
- Rounds 21–24: Sc in each st around. (48 sc)
- Round 25: [Sc in next 7 sts, inc in next st] around. (54 sc)
- Rounds 26–29: Sc in each st around. (54 sc)
- Round 30: [Sc in next 8 sts, inc in next st] around. (60 sc)
- Rounds 31–35: Sc in each st around. (60 sc)
- Round 36: [Sc in next 9 sts, inc in next st] around. (66 sc)
- Rounds 37–42: Sc in each st around. (66 sc)
- Round 43: [Sc in next 10 sts, inc in next st] around. (72 sc)
- Rounds 44–48: Sc in each st around. Sl st in next st, FO, weave in ends. (72 sc)
✅ Checkpoint: Your cornucopia body should measure approximately 12 inches long, flaring smoothly from a narrow point to a 5-inch wide opening.
Section 2: Braided Rim
Using Natural Jute and a 4.0 mm hook, make three separate long ch strands, each measuring 20 inches. Braid the three strands together loosely. Wrap the braided cord around the outer edge of the cornucopia opening (Round 48) and secure it firmly using matching yarn and whip stitches every few inches. FO and weave in ends.
Section 3: Mini Pumpkin (Rust Orange)
Using a 4.0 mm hook and Rust Orange.
- Round 1: Magic ring, work 6 sc into ring. (6 sc)
- Round 2: [Inc] around. (12 sc)
- Round 3: [Sc in next st, inc] around. (18 sc)
- Round 4: [Sc in next 2 sts, inc] around. (24 sc)
- Rounds 5–10: Sc in each st around. (24 sc)
- Round 11: [Sc in next 2 sts, inv-dec] around. (18 sc)
- Stuff firmly with poly-fill.
- Round 12: [Sc in next st, inv-dec] around. (12 sc)
- Round 13: [Inv-dec] around. (6 sc)
- FO, leaving a long 12-inch tail. Thread tail onto tapestry needle, weave through front loops of remaining 6 sts, and pull tight to close. Wrap the tail vertically around the outside of the pumpkin from top to bottom 4 times, pulling slightly to create natural pumpkin segments (ribs). Securely knot and hide ends. Use a short length of green yarn to anchor a small stem at the top center.
Section 4: Red Apple (Deep Crimson Red)
Using a 4.0 mm hook and Deep Crimson Red.
- Work identically to Mini Pumpkin Rounds 1 through 10. (24 sc)
- Round 11: [Sc in next 2 sts, inv-dec] around. (18 sc)
- Stuff firmly with poly-fill.
- Round 12: [Sc in next st, inv-dec] around. (12 sc)
- Round 13: [Inv-dec] around. (6 sc)
- FO and close as for pumpkin. Indent the top and bottom centers slightly by passing your needle and yarn tail straight down through the center from top to bottom, pulling firmly, and securing. Add a small brown yarn stem at the top.
Section 5: Yellow Pear (Golden Yellow)
Using a 4.0 mm hook and Golden Yellow.
- Round 1: Magic ring, work 6 sc into ring. (6 sc)
- Round 2: Sc in each st around. (6 sc)
- Round 3: [Sc in next st, inc] around. (9 sc)
- Round 4: Sc in each st around. (9 sc)
- Round 5: [Sc in next 2 sts, inc] around. (12 sc)
- Round 6: Sc in each st around. (12 sc)
- Round 7: [Sc in next 3 sts, inc] around. (15 sc)
- Round 8: [Sc in next 4 sts, inc] around. (18 sc)
- Rounds 9–11: Sc in each st around. (18 sc)
- Round 12: [Sc in next st, inv-dec] around. (12 sc)
- Stuff firmly, keeping the bottom round and tapering the upper body.
- Round 13: Sc in each st around. (12 sc)
- Round 14: [Inv-dec] around. (6 sc)
- FO, close opening, and attach a tiny brown stem at the narrow top.
Section 6: Ear of Corn (Pale Cornsilk & Forest Green)
Using a 4.0 mm hook and Pale Cornsilk.
- Round 1: Ch 12, join with sl st to form a ring.
- Rounds 2–8: Work 1 hdc in each ch around. (12 hdc)
- Stuff lightly.
- Round 9: [Hdc2tog] around. (6 hdc)
- FO, close opening.
- Husks (Make 4 in Forest Green): Ch 10, working in rows: sc in 2nd ch from hook and across. Turn, ch 1, dec, sc across to last 2 sts, dec. FO. Sew 3 to 4 husks around the base of the corn ear, folding outer edges outward to reveal the yellow kernels.
Section 7: Autumn Leaves (Rust Orange, Golden Yellow, Deep Crimson Red)
Using a 4.0 mm hook. Make 4 to 6 leaves in assorted fall colors.
- Row 1: Ch 11, sc in 2nd ch from hook, hdc in next 2 chs, dc in next 4 chs, hdc in next 2 chs, 3 sc in last ch. Working along opposite side of foundation chain: hdc in next 2 chs, dc in next 4 chs, hdc in next 2 chs, sc in last ch. Join with sl st to first sc.
- Row 2: [Ch 3, sl st in 2nd ch from hook, hdc in next ch, skip 1 st, sl st in next st] around the leaf perimeter to create serrated edges. FO, leaving a tail for assembly.
Section 8: Assembly & Stiffening
- Shaping the Cornucopia: Stuff the inside of the cornucopia body tightly with plastic bags or scrap fabric to hold its curved horn shape.
- Applying Stiffener: Paint or spray the exterior and interior thoroughly with fabric stiffener or heavy starch. Shape the curve of the horn as desired on a protected work surface lined with plastic wrap. Insert stainless steel pins if necessary to hold the curve in place while drying. Allow to dry completely for 24 to 48 hours.
- Arranging the Centerpiece: Remove internal packing material. Arrange the mini pumpkin, red apple, yellow pear, ear of corn, and autumn leaves so they spill naturally out of the horn opening. Secure pieces with hidden stitches or hot glue if a permanent arrangement is desired.
Size Customization Tips
- Sizing Up: To create a larger 18-inch cornucopia for a grand dining table focal point, continue the increase rounds of Section 1 up to Round 56 (84 sts), then work 10 even rounds before adding the braided rim.
- Sizing Down: To make mini cornucopia place-card holders, stop the increase sequence at Round 25 (54 sts), work 5 even rounds, and scale down fruit motif yarn weight to sport or size 10 crochet thread.
Care Instructions
- Dust gently with a dry, soft-bristled brush or canned air.
- Do not submerge in water or wash in a washing machine, as the fabric stiffener will dissolve.
- Store flat in a breathable cotton dust bag during off-seasons.
Rustic Harvest Cornucopia Centerpiece Free Crochet Pattern
Thank you so much for joining me in making this charming seasonal centerpiece! I hope crafting this piece brings warmth and cozy autumn feelings to your home. If you enjoyed this free crochet pattern, please share photos of your finished cornucopia and overflowing harvest fruits on Instagram by tagging @YourHandle and using the hashtag #RusticHarvestCornucopia. Pin this project to your favorite fall crochet boards on Pinterest so you can easily find it year after year, and be sure to leave a comment below sharing your favorite fall color combinations!