
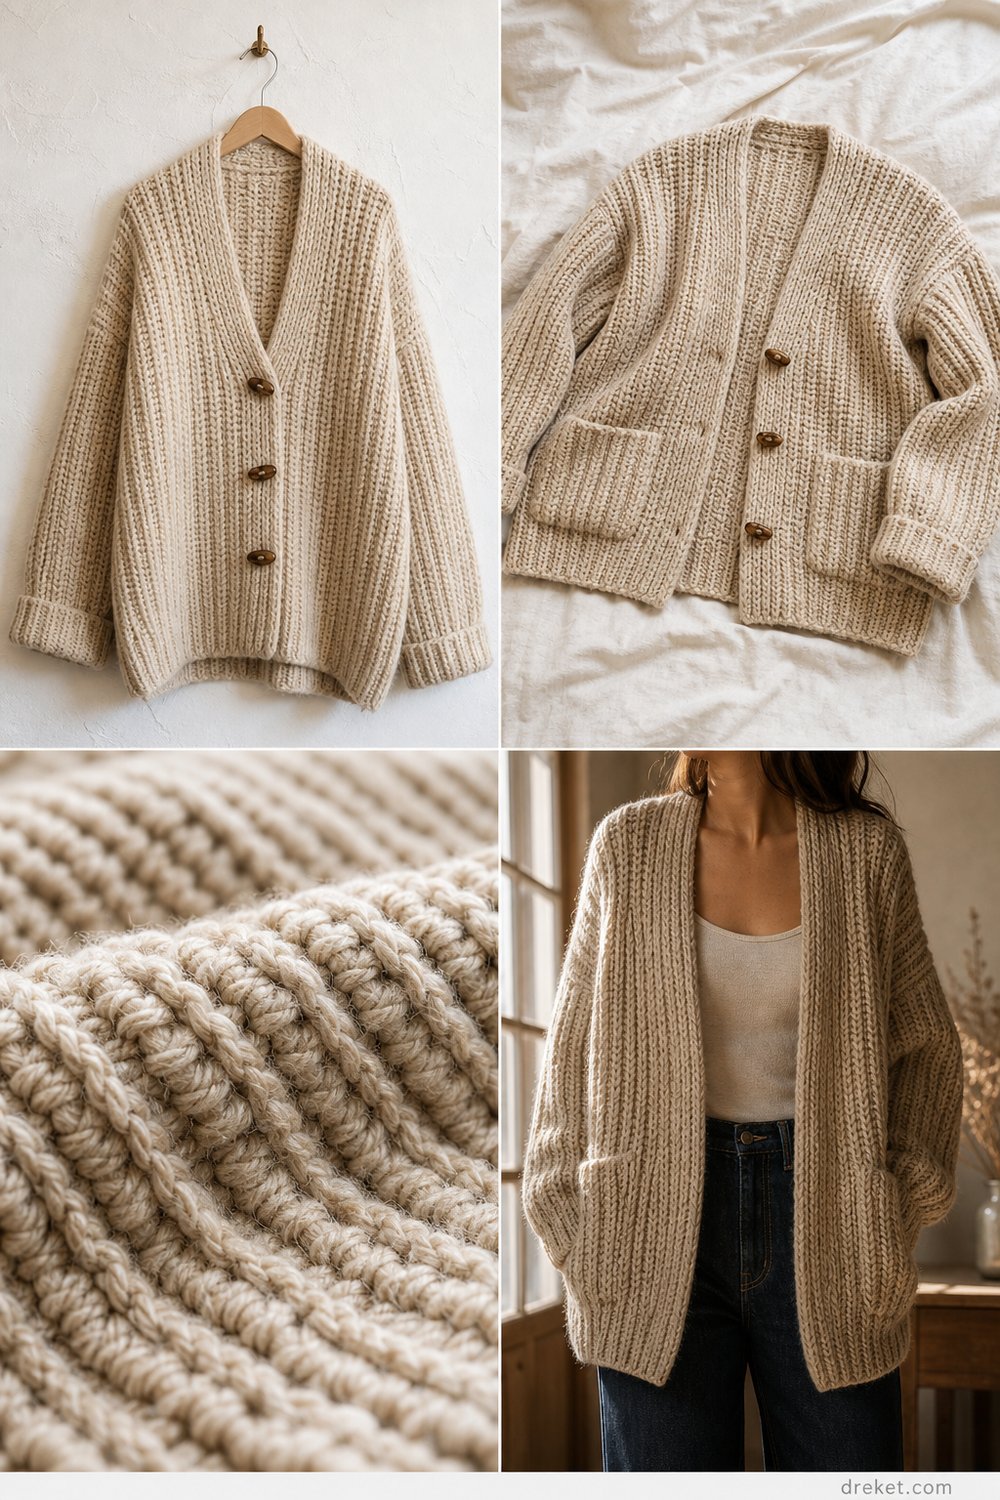
Wrap yourself in the rustic luxury of a handmade layer that feels like an embrace on crisp autumn mornings. Designed with deep, plush ribbing and rich wooden toggles, this relaxed hip-length garment brings timeless texture and cozy sophistication straight to your handmade wardrobe.
Oatmeal Chunky Ribbed Cardigan Free Crochet Pattern
Quick Facts
- Stitches Used: Chain (ch), Half Double Crochet (hdc), Slip Stitch (sl st), Half Double Crochet in the Third Loop Only (hdc-3rd-loop).
- Size Fit: Designed with 6-8 inches of positive ease for an oversized, relaxed silhouette. Instructions cover sizes XS (S, M, L, XL, 2XL, 3XL).
- Estimated Hours to Complete: 12 to 16 hours of relaxing, meditative stitching.
- Gift-Appeal Framing: An heirloom-quality handmade gift that delivers ultimate cozy comfort for loved ones who appreciate classic style and everyday warmth.
Sizing customization tips are included later in this post to help you achieve your ideal fit.
What Makes This Oatmeal Chunky Ribbed Cardigan Special
The secret to this cardigan’s professional boutique look lies entirely in its construction and texture. Working half double crochet stitches exclusively into the third loop creates a knit-like, elastic ribbing that mimics high-end retail knitwear without requiring knitting needles. The dropped-shoulder construction ensures a modern, drape-friendly fit that flatters every body type, while the integrated deep patch pockets provide both practical warmth and structural balance. Finished with large tortoiseshell toggle buttons, this piece bridges the gap between classic outerwear and everyday comfort wear.
Skill Level
- Intermediate: Comfort working with chunky yarn, maintaining consistent tension, and reading a garment schematic.
- Required Skills:
- Working in rows and turning chains.
- Identifying and working into the third loop (back camel stitch) of half double crochet stitches.
- Seaming panels using the mattress stitch or slip stitch method.
- Adding a clean ribbed edging and buttonholes directly onto raw garment edges.
- Reassurance Line: If you have mastered basic half double crochet and are ready to try your hand at garment assembly and third-loop shaping, you are more than ready to tackle this rewarding project!
Finished Measurements
| Size | Bust Circumference (in / cm) | Length (in / cm) | Sleeve Length (in / cm) |
|---|---|---|---|
| XS | 36 in / 91.5 cm | 24 in / 61 cm | 18 in / 45.5 cm |
| S | 40 in / 101.5 cm | 24.5 in / 62 cm | 18 in / 45.5 cm |
| M | 44 in / 111.5 cm | 25 in / 63.5 cm | 18.5 in / 47 cm |
| L | 48 in / 122 cm | 26 in / 66 cm | 18.5 in / 47 cm |
| XL | 52 in / 132 cm | 27 in / 68.5 cm | 19 in / 48 cm |
| 2XL | 56 in / 142 cm | 28 in / 71 cm | 19.5 in / 49.5 cm |
| 3XL | 60 in / 152.5 cm | 29 in / 73.5 cm | 19.5 in / 49.5 cm |
Materials You Will Need
| Colorway / Shade | Yarn Weight / Type | Yardage Needed (Yards / Meters) |
|---|---|---|
| Creamy Oatmeal | Bulky (Weight 5) / 80% Acrylic, 20% Wool Blend | 1,100 (1,220, 1,350, 1,480, 1,620, 1,760, 1,900) yds / 1,005 (1,115, 1,235, 1,355, 1,480, 1,610, 1,740) m |
- Crochet Hook: US M/13 (9.0 mm) hook (or size needed to obtain gauge).
- Additional Tools: Tapestry needle for weaving ends and seaming, locking stitch markers (4), measuring tape, and three large (1.5 inch / 38 mm) tortoiseshell toggle buttons.
💡 Designer Tip: Choose a smooth, tightly twisted bulky yarn rather than a roving-style single ply to prevent excessive pilling and ensure your textured ribbing stays crisp and defined through regular wear and washing.
Yarn Suggestions
| Brand & Line Name | Yarn Weight | Yardage per Skein | Notes |
|---|---|---|---|
| Lion Brand Hue + Me | Bulky (5) | 137 yds / 125 m per 125g ball | Excellent stitch definition, wonderful heathered oatmeal tones, and a soft wool-acrylic blend. |
| Patons Woolike Chunky | Bulky (5) | 127 yds / 116 m per 100g ball | Lightweight with great warmth and an extensive neutral palette. |
| Bernat Roving | Bulky (5) | 120 yds / 109 m per 100g ball | Avoid roving styles prone to fiber separation; stick to plied yarns for durability in ribbed garments. |
Gauge
| Measurement Type | Stitches / Rows | Dimension |
|---|---|---|
| HDC Ribbing Gauge | 10 sts x 8 rows | 4 inches x 4 inches (10 cm x 10 cm) |
⚠️ Note: Always crochet a gauge swatch using the hdc-3rd-loop stitch pattern before beginning your cardigan. Chunky yarn weights vary significantly between brands, and adjusting your hook size is crucial to ensure your garment fits according to the measurements table.
Abbreviations
| Abbreviation | Meaning |
|---|---|
| ch | Chain |
| hdc | Half double crochet |
| hdc-3rd-loop | Half double crochet worked in the third loop (back horizontal bar) only |
| sl st | Slip stitch |
| st(s) | Stitch(es) |
| rep | Repeat |
| RS | Right side |
| WS | Wrong side |
| PM | Place marker |
| FO | Fasten off |
Special Stitches Explained
- Half Double Crochet in the Third Loop Only (hdc-3rd-loop): When looking at the front of a half double crochet stitch, you see the front and back loops at the top. Tilt the stitch slightly away from you to reveal a horizontal loop running along the back (WS) of the stitch directly below the back loop. Yarn over, insert hook under this third loop, yarn over, pull up a loop, yarn over, and draw through all 3 loops on the hook. This pushes the standard top loops forward, creating a prominent raised ribbed texture.
Pattern Instructions
Section 1: Back Panel
- With US M/13 (9.0 mm) hook, ch 38 (42, 46, 50, 54, 58, 62).
- Row 1 (WS): Working in the back bumps of the foundation chain, hdc in 3rd ch from hook and in each ch across, turn. (36 [40, 44, 48, 52, 56, 60] hdc)
- Row 2 (RS): Ch 2 (does not count as a st here and throughout), working in hdc-3rd-loop, hdc in each st across, turn. (36 [40, 44, 48, 52, 56, 60] hdc)
- Rep Row 2 until piece measures 24 (24.5, 25, 26, 27, 28, 29) inches from foundation edge, ending on a WS row. FO, leaving a long tail for shoulder seaming.
✅ Checkpoint: Measure your back panel flat. The vertical rib ridges should be uniform, and the width should match half of your chosen size’s bust circumference from the finished measurements table.
Section 2: Left Front Panel
- Ch 18 (20, 22, 24, 26, 28, 30).
- Row 1 (WS): Hdc in 3rd ch from hook and each ch across, turn. (16 [18, 20, 22, 24, 26, 28] hdc)
- Row 2 (RS): Ch 2, working in hdc-3rd-loop, hdc in each st across, turn. (16 [18, 20, 22, 24, 26, 28] hdc)
- Rep Row 2 until panel matches the length of the Back Panel, ending on a WS row. FO, leaving a long tail.
Section 3: Right Front Panel
- Work identically to Left Front Panel until piece is 1 row short of matching Back Panel length.
- On the final row (RS), create buttonholes if desired by working ch 2, skipping 2 sts, and working hdc in remaining sts, or complete solid and add button loop bands in the finishing section. FO, leaving a long tail.
Section 4: Sleeves (Make 2)
- Ch 24 (24, 26, 26, 28, 28, 30).
- Row 1 (WS): Hdc in 3rd ch from hook and each ch across, turn. (22 [22, 24, 24, 26, 26, 28] hdc)
- Row 2 (RS): Ch 2, working in hdc-3rd-loop, hdc in each st across, turn. (22 [22, 24, 24, 26, 26, 28] hdc)
- Shaping Rows: Continue working in established rib pattern while evenly increasing 1 st at each end of every 4th row 4 times. (30 [30, 32, 32, 34, 34, 36] hdc)
- Work even in pattern until sleeve measures 18 (18.5, 18.5, 19, 19, 19.5, 19.5) inches from foundation. FO.
Section 5: Patch Pockets (Make 2)
- Ch 15.
- Row 1: Hdc in 3rd ch from hook and across, turn. (13 hdc)
- Row 2: Ch 2, working in hdc-3rd-loop, hdc across, turn. (13 hdc)
- Rep Row 2 for 6 inches. FO, leaving a long tail for sewing.
Section 6: Assembly & Edging
- Lay Back Panel RS up. Align Left and Right Front Panels across the top shoulders. Seam shoulder edges using mattress stitch or whipstitch over the outer 5 (6, 6, 7, 7, 8, 8) inches, leaving a central neck opening.
- Fold sleeves in half lengthwise to find the center point, align with shoulder seams, and mattress-stitch sleeves to armhole openings.
- Fold garment at shoulder seams, seam sleeve undersides and cardigan side seams from hem to underarm.
- Sew patch pockets to front panels approximately 3 inches up from bottom hem and 2 inches in from front opening edge.
- Front Band & Collar: Join yarn at bottom right front corner, ch 2, and work an even row of hdc evenly up the right front opening, around the back neck, and down the left front opening. Work 3 rows total of hdc ribbing. FO and weave in all ends.
- Securely sew three large tortoiseshell toggle buttons opposite the button loops or corresponding openings.
💡 Designer Tip: Block your finished panels with steam before final seaming to relax the chunky fibers and ensure crisp, straight edges.
Size Customization Tips
- To Adjust Length: Add or subtract rows in the body and sleeve sections before starting the final edge. Each additional 2 rows of hdc ribbing adds approximately 1 inch of length.
- To Adjust Width: Increase or decrease your starting chain count in multiples of 2. Keep in mind that every 2 chains added or removed adjusts the overall bust circumference by approximately 1.6 inches.
Care Instructions
- Hand wash gently in lukewarm water using mild wool detergent.
- Do not wring or twist. Press out excess moisture gently by rolling the cardigan in a clean, dry towel.
- Lay flat on a clean surface to dry, reshaping gently to match your finished measurements.
- Store folded rather than hung on a hanger to prevent shoulder stretching over time.
Oatmeal Chunky Ribbed Cardigan Free Crochet Pattern
Thank you so much for joining me in making this cozy layering staple! I would love to see your handmade creation. Please share photos of your cardigan on Instagram, tag your projects, and use the hashtag #OatmealRibbedCardigan. Be sure to save this free pattern to your favorite Pinterest boards for easy access later, and leave a comment below sharing your favorite yarn choice or any questions you have!