
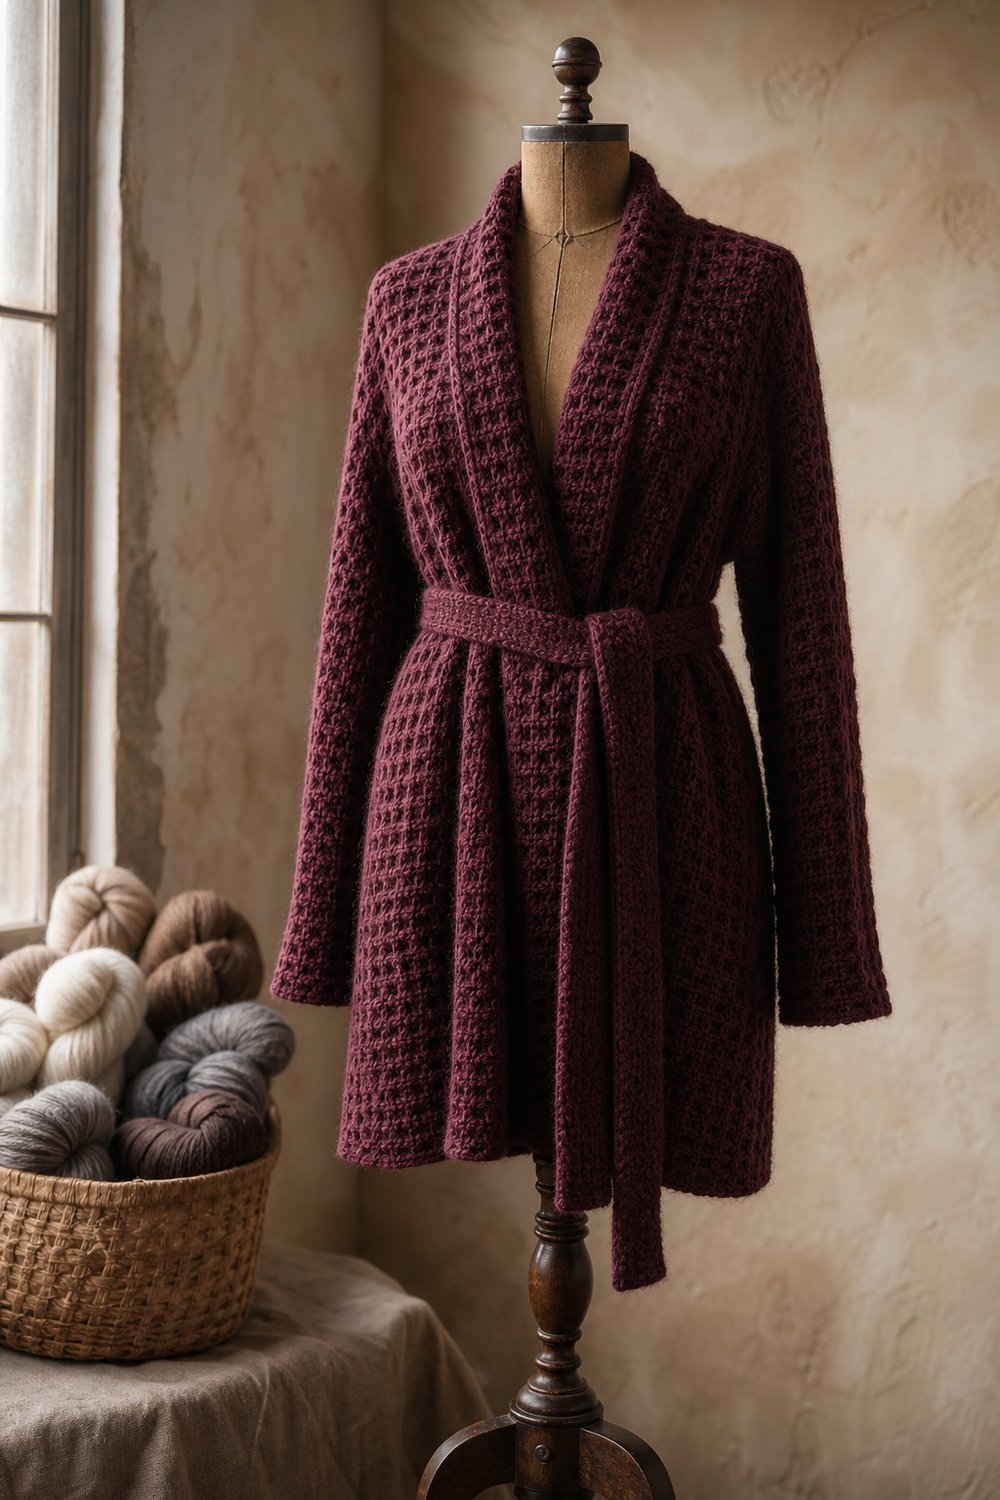
Wrap yourself in the luxurious, tactile warmth of morning light pouring over rich, deep-toned wool with a handmade garment designed to feel like an embrace. This piece brings together the comforting weight of a classic wrap silhouette and the sophisticated depth of a deeply textured architectural stitch.
Rich Burgundy Waffle Wrap Cardigan Free Crochet Pattern
This cozy wrap cardigan is worked in the classic waffle stitch, creating a thick, cushiony fabric that drapes beautifully over an off-white linen flat-lay or an antique wooden dress form. Designed for an inclusive size range (XS to 3XL), it takes approximately 18 to 22 hours to complete and makes an extraordinarily thoughtful heirloom-quality holiday or birthday gift for someone special.
Detailed sizing customization tips are included further down in this guide to help you achieve your perfect fit.
What Makes This Rich Burgundy Waffle Wrap Cardigan Special
The magic of this design lies in the harmonious interplay between two distinct textures. The body of the cardigan utilizes the classic waffle stitch, which alternates post stitches with standard crochet stitches to create deep, recessed squares that trap warmth and yield a remarkably rich, three-dimensional surface. This dense, plush fabric is balanced by a stretchy, highly responsive ribbed hem and front bands worked in alternating slip stitches and back-loop-only half double crochets. Constructed in seamless panels from the bottom up, the cardigan features a fluid, open-front wrap silhouette cinched cleanly at the waist by a matching custom-crafted sash, creating a timeless profile that flatters every form.
Skill Level
- Skill Level: Intermediate
- Required Skills: Working in rows, front post and back post double crochet manipulation, maintaining accurate stitch counts over repeating patterns, foundation half double crochet rows, and basic seam assembly.
Reassurance Line: If you are comfortable reading your stitches and have mastered front post double crochets, you are entirely ready to tackle this rewarding project!
Finished Measurements
- Bust Circumference (closed wrap): 36 (40, 44, 48, 52, 56) inches / 91.5 (101.5, 112, 122, 132, 142) cm
- Length from Shoulder to Hem: 26 (26, 27, 27, 28, 28) inches / 66 (66, 68.5, 68.5, 71, 71) cm
- Sleeve Length: 18 inches / 45.5 cm across all sizes
Materials You Will Need
- Yarn Weight: Worsted weight (Category 4) wool or wool-blend yarn
- Hook: US J/10 (6.0 mm) crochet hook (or size needed to obtain gauge)
- Notions: Tapestry needle for weaving ends, measuring tape, locking stitch markers (4)
| Colorway (Exact Order) | Color Name | Yardage Needed (XS to 3XL) |
|---|---|---|
| Color 1 | Rich Burgundy | 1,450 – 2,150 yards |
Yarn Suggestions
- Lion Brand Wool-Ease: (80% Acrylic, 20% Wool; 197 yrs / 180 m per 3 oz / 85 g skein) – Budget-friendly, durable, and provides excellent stitch definition.
- Malabrigo Rios: (100% Superwash Merino Wool; 210 yrs / 192 m per 3.5 oz / 100 g skein) – A luxurious upgrade offering magnificent hand-dyed tonal depth.
- Knit Picks Wool of the Andes Worsted: (100% Peruvian Highland Wool; 110 yrs / 100 m per 50g ball) – Sturdy, traditional wool that blocks exceptionally well.
Avoid using: 100% slick bamboo or overly heavy plant fibers (like cotton) for this pattern. Because the waffle stitch creates a naturally heavy fabric, non-wool yarns will stretch excessively under their own weight and lose the crisp, architectural texture shown in the photographs.
Gauge
- 16 stitches and 11 rows = 4 inches (10 cm) in Waffle Stitch pattern using a US J/10 (6.0 mm) hook.
- Crucial Reminder: Always make and block your gauge swatch before beginning your cardigan to ensure your finished measurements and yardage requirements match!
Abbreviations
- approx: approximately
- beg: beginning
- BLO: back loop only
- ch: chain
- dc: double crochet
- FPdc: front post double crochet
- hdc: half double crochet
- rep: repeat
- rnd(s): round(s)
- RS: right side
- sc: single crochet
- sl st: slip stitch
- st(s): stitch(es)
- WS: wrong side
- yo: yarn over
Special Stitches Explained
- Waffle Stitch (WS): A multi-row pattern worked over a multiple of 3 sts + 2.
- Row 1 (RS): Dc in each st across. Turn.
- Row 2 (WS): Ch 2 (does not count as st here and throughout), *dc in first st, FPdc around next 2 sts; rep from * to last 2 sts, dc in last 2 sts. Turn.
- Row 3: Ch 2, *dc in first st, dc in next st, FPdc around next st; rep from * to last 2 sts, dc in last 2 sts. Turn.
- Alternate Rows 2 and 3 to build the textured waffle pattern.
- Foundation Half Double Crochet (Fhdc): Ch 2, yo, insert hook in 2nd ch from hook, yo and pull up loop (3 loops on hook), yo and pull through 1 loop (chain made), yo and pull through all 3 loops on hook (hdc made). To start next st: Insert hook under the two loops of the foundation chain just created, yo and pull up loop, yo and pull through 1 loop, yo and pull through all 3 loops.
Pattern Instructions
(Note: Instructions are written for the smallest size XS, with sizes S, M, L, XL, and 2XL/3XL indicated in parentheses.)
Section 1: Back Panel
Row 1: Work 74 (80, 86, 92, 98, 104) Fhdc. Alternatively, ch 76 (82, 88, 94, 100, 106), hdc in 3rd ch from hook and in each ch across. Turn. (74 [80, 86, 92, 98, 104] sts)
Row 2 (RS – First Waffle Row): Ch 2, dc in first st, FPdc around next 2 sts, dc in next st; rep from * across to last st, dc in last st. Turn. (74 [80, 86, 92, 98, 104] sts)*
Row 3 (WS): Ch 2, dc in first st, dc in next st, FPdc around next st, dc in next 2 sts; rep from * across to last 2 sts, dc in last 2 sts. Turn. (74 [80, 86, 92, 98, 104] sts)*
Rows 4 to 52 (52, 54, 54, 56, 56): Rep Rows 2 and 3 consecutively. Fasten off, leaving a long tail for shoulder seams.
Section 2: Left Front Panel
Row 1: Work 35 (38, 41, 44, 47, 50) Fhdc. Turn. (35 [38, 41, 44, 47, 50] sts)
Row 2 (RS): Ch 2, dc in first st, FPdc around next 2 sts, dc in next st; rep from * across to last st, dc in last st. Turn. (35 [38, 41, 44, 47, 50] sts)*
Row 3 (WS): Ch 2, dc in first st, dc in next st, FPdc around next st, dc in next 2 sts; rep from * across to last 2 sts, dc in last 2 sts. Turn. (35 [38, 41, 44, 47, 50] sts)*
Rows 4 to 52 (52, 54, 54, 56, 56): Rep Rows 2 and 3. Fasten off.
Section 3: Right Front Panel
Work identical to Left Front Panel for Rows 1 through 52 (52, 54, 54, 56, 56). Fasten off.
Section 4: Sleeves (Make 2)
Row 1: Work 44 (44, 47, 47, 50, 50) Fhdc. Turn. (44 [44, 47, 47, 50, 50] sts)
Row 2 (RS): Ch 2, dc in first st, FPdc around next 2 sts, dc in next st; rep from * across to last st, dc in last st. Turn. (44 [44, 47, 47, 50, 50] sts)*
Row 3 (WS): Ch 2, dc in first st, dc in next st, FPdc around next st, dc in next 2 sts; rep from * across to last 2 sts, dc in last 2 sts. Turn. (44 [44, 47, 47, 50, 50] sts)*
Rows 4 to 44: Continue repeating Rows 2 and 3 while increasing 1 st at each end every 8 rows 4 times. (52 [52, 55, 55, 58, 58] sts)
Fasten off, leaving a long tail for seaming.
### Checkpoint
Before moving on to assembly, lay your Back Panel, Left Front Panel, and Right Front Panel out on a flat surface with the RS facing upward. Verify that shoulder edges match up cleanly and that your side seams will align symmetrically. Weave in any loose tails from the panel foundations before proceeding.
Section 5: Assembly and Trim
- Shoulder Seams: Sew top 6 (7, 7, 8, 8, 9) inches of front panels to the back panel shoulders, leaving the center unseamed for the neck opening.
- Side Seams: Align front panels to back panel, leaving the bottom 26 rows unseamed for armholes. Sew side seams from underarm down to bottom hem.
- Sleeve Seams: Seam sleeve edges together lengthwise, then match sleeve cap to armhole opening and sew securely in place. Repeat for second sleeve.
- Bottom Ribbed Hem & Front Band: Join yarn at bottom right front corner. Ch 9.
- Row 1: Working in BLO, sl st in 2nd ch from hook and next 7 chs, sl st to next 2 sts of cardigan body, turn.
- Row 2: Skip sl sts on body, working in BLO, work sl st across the 8 band sts. Ch 1, turn.
- Row 3: Working in BLO, sl st across 8 band sts, sl st to next 2 sts of cardigan body, turn.
- Rep Rows 2 and 3 all along the bottom hem, up the right front edge, around the back neck, and down the left front edge. Fasten off and weave in all ends.
- Waist Sash: Ch 210, hdc in 3rd ch from hook and in each ch across. Fasten off. Weave through belt loops or wear tied loosely around the waist.
Size Customization Tips
- Adjusting Length: To make the cardigan longer or shorter, simply add or subtract rows in increments of 2 rows before beginning your assembly. Keep in mind that every 2 rows adds approximately 0.75 inches (2 cm) to the total length.
- Adjusting Width: To grade up or down outside the listed size range, alter your initial foundation row stitch count by multiples of 3 sts. Each 3-stitch adjustment will alter the overall bust circumference by approximately 0.75 inches (2 cm).
Care Instructions
To maintain the gorgeous drape and defined waffle texture of your rich burgundy wool cardigan:
* Hand wash gently in cool water using a mild wool-safe detergent.
* Do not wring or twist. Press out excess water gently by rolling the garment inside a clean, dry towel.
* Lay flat on a blocking mat to dry in its original shape, away from direct sunlight.
* Do not iron. Steam lightly on a low setting if needed.
Rich Burgundy Waffle Wrap Cardigan Free Crochet Pattern
Thank you so much for joining me on this cozy crochet journey! There is nothing quite like the feeling of stepping out into crisp morning air wrapped in a handmade garment crafted with your own two hands.
If you make your own Rich Burgundy Waffle Wrap Cardigan, I would love to see your gorgeous work! Please share your photos on Instagram and tag me [@YourDesignerHandle], use the hashtag #BurgundyWaffleWrap, save this pin to your favorite crochet boards on Pinterest, and leave a comment below to let me know how your project turned out! Happy crocheting!