
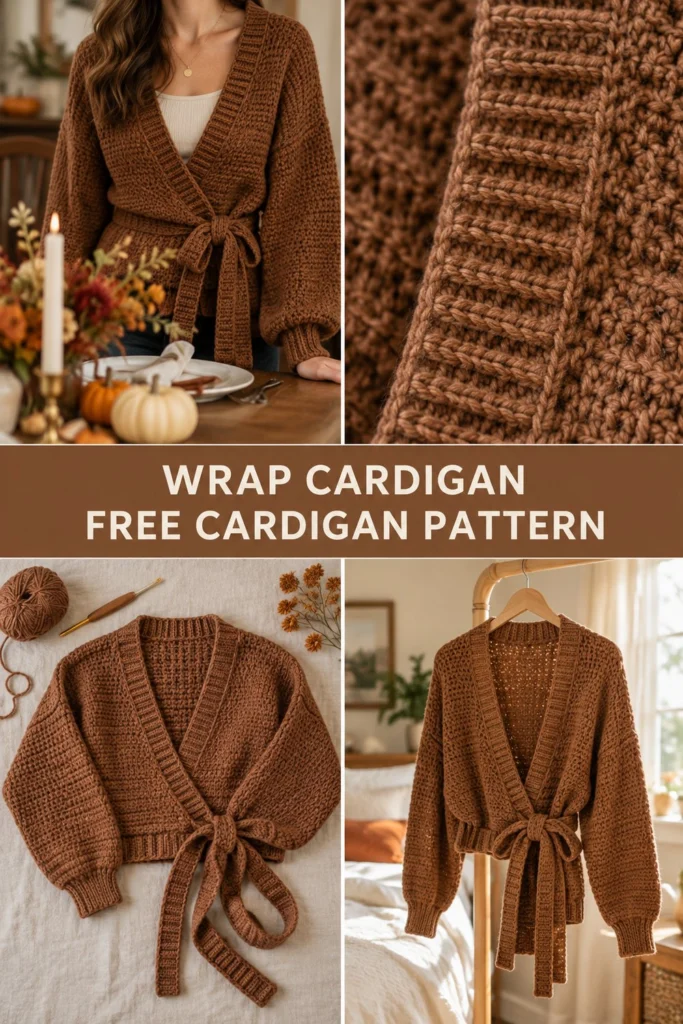
Cozy up for autumn in a cinnamon wrap cardigan featuring drop shoulders and long crossover front ties. The body is worked in simple half double crochet panels with ribbed edges framing the neckline for a tailored finish.
Cinnamon Crochet Wrap Cardigan Free Pattern
Quick Facts
- Skill level: Intermediate
- Finished size: XS (S, M, L, XL, 2XL)
- Yarn: Worsted weight yarn, approx. 1,350 (1,450, 1,600, 1,750, 1,900, 2,050) yards
- Hook: US J/10 (6.0 mm) crochet hook and US I/9 (5.5 mm) hook for ribbing
- Stitches used: ch, sl st, hdc, hdc2tog, BLOhdc, FPdc, BPdc
- Time to make: Approximately 20 to 25 hours
What Makes This Crochet Wrap Cardigan Special
This cinnamon crochet wrap cardigan combines relaxed comfort with elegant styling. The drop shoulders give it an effortless, oversized drape, while the extended front panels cross over and tie securely at the waist to define your silhouette. The ribbed borders add structure along the neckline and cuffs, mirroring classic knitwear texture while remaining completely approachable for crocheters working in half double crochet.
Skill Level
- Basic stitches and turning rows
- Working into the third loop of hdc for faux-ribbing
- Increasing and decreasing simple garment shaping
- Sewing panels together with a mattress stitch
Don’t worry if you are new to garment construction—I will walk you through every single step!
Finished Measurements
| Size | Bust (in / cm) | Length (in / cm) | Sleeve (in / cm) | Ease (in / cm) |
|---|---|---|---|---|
| XS | 32 (81) | 18 (46) | 18 (46) | +4 (10) |
| S | 36 (91) | 18.5 (47) | 18 (46) | +4 (10) |
| M | 40 (102) | 19 (48) | 18.5 (47) | +4 (10) |
| L | 44 (112) | 20 (51) | 18.5 (47) | +5 (13) |
| XL | 48 (122) | 21 (53) | 19 (48) | +5 (13) |
| 2XL | 52 (132) | 22 (56) | 19 (48) | +6 (15) |
Materials You Will Need
| Item | Details | Quantity / Yardage |
|---|---|---|
| Yarn | Worsted weight (Category 4), Cinnamon | 1,350 (1,450, 1,600, 1,750, 1,900, 2,050) yds / 1,235 (1,325, 1,460, 1,600, 1,740, 1,875) m |
| Hook 1 | US J/10 (6.0 mm) crochet hook | 1 |
| Hook 2 | US I/9 (5.5 mm) crochet hook | 1 |
| Notions | Tapestry needle, locking stitch markers, measuring tape | As needed |
Yarn Suggestions
- Lion Brand Pound of Love: Color: Cinnamon (approx. 1020 yds per cake – 2 cakes needed). Excellent yardage and soft acrylic texture.
- Caron One Pound: Color: Medium Thyme or Cinnamon equivalent (approx. 812 yds per skein – 2 skeins needed). Very durable and machine washable.
- Red Heart Super Saver: Color: Warm Brown (approx. 364 yds per skein – 4 to 6 skeins needed). Budget-friendly with great stitch definition.
Gauge
12 sts x 9 rows = 4 in / 10 cm in half double crochet using larger hook.
Check your gauge before starting. If your gauge is too loose, your cardigan will turn out larger than expected; if too tight, size up your hook.
Abbreviations
- ch: chain
- sl st: slip stitch
- hdc: half double crochet
- hdc2tog: half double crochet 2 together (decrease)
- BLOhdc: half double crochet in the back loop only
- FPdc: front post double crochet
- BPdc: back post double crochet
- st(s): stitch(es)
- rep: repeat
- RS: right side
- WS: wrong side
- sk: skip
- yo: yarn over
UK equivalents: sc = dc, hdc = htr, dc = tr, tr = dtr.
Special Stitches Explained
- BLOhdc: Work a standard half double crochet, but insert your hook only under the back loop of the designated stitch.
- hdc2tog (Decrease): [Yo, insert hook in next st, yo and pull up loop] twice (5 loops on hook), yo and pull through all 5 loops on hook.
- Post Stitches (FPdc / BPdc): Yo, insert hook from front to back to front around the post of the indicated stitch from the previous row, yo, pull up a loop, [yo and pull through 2 loops] twice.
Pattern Instructions
Pattern Notes
- Turning chains (ch 2) do not count as a stitch throughout unless specifically stated.
- Panels are worked flat in rows, then seamed at the shoulders and sides.
- Tie extensions are worked directly onto the front panels or attached separately.
Section 1: Back Panel (Make 1)
Using US J/10 (6.0 mm) hook:
- Foundation Row: Ch 49 (55, 61, 67, 73, 79).
- Row 1: Working in the 3rd ch from hook (skipped chs do not count), hdc in each ch across, turn (47 (53, 59, 65, 71, 77) hdc).
- Row 2: Ch 2, hdc in each st across, turn (47 (53, 59, 65, 71, 77) hdc).
- Rows 3 to 42 (43, 44, 46, 48, 50): Rep Row 2. Fasten off, leaving a 12-inch tail for seaming.
Section 2: Left Front Panel with Wrap Tie (Make 1)
Using US J/10 (6.0 mm) hook:
- Foundation Row: Ch 27 (30, 33, 36, 39, 42).
- Row 1: Working in 3rd ch from hook, hdc in each ch across, turn (25 (28, 31, 34, 37, 40) hdc).
- Row 2: Ch 2, hdc in each st across, turn (25 (28, 31, 34, 37, 40) hdc).
- Rows 3 to 42 (43, 44, 46, 48, 50): Rep Row 2.
- Neckline Shaping: At the inner edge of Row 43 (44, 45, 47, 49, 51), begin decreasing 1 st every other row 6 times to form the V-neck slope, continuing straight on the outer edge until reaching the shoulder height matching the back panel. Fasten off.
Section 3: Right Front Panel with Wrap Tie (Make 1)
Mirror the Left Front Panel so the neckline shaping slopes on the opposite side. Fasten off.
Section 4: Sleeves (Make 2)
Using US J/10 (6.0 mm) hook:
- Foundation Row: Ch 35 (37, 39, 41, 43, 45).
- Row 1: Working in 3rd ch from hook, hdc in each ch across, turn (33 (35, 37, 39, 41, 43) hdc).
- Row 2 (Increase Row): Ch 2, 2 hdc in first st, hdc across to last st, 2 hdc in last st, turn (35 (37, 39, 41, 43, 45) hdc).
- Rows 3 to 34: Rep Row 2 every 4th row, working straight hdc rows in between, until you reach (47 (49, 51, 53, 55, 57) hdc) at Row 34.
- Cuff Ribbing: Switch to US I/9 (5.5 mm) hook. Work 6 rows in alternating [FPdc, BPdc] ribbing. Fasten off.
Section 5: Waist Ties (Make 2)
Using US J/10 (6.0 mm) hook:
- Foundation Row: Ch 51.
- Row 1: Working in 3rd ch from hook, hdc in each ch across, turn (49 hdc).
- Rows 2 to 3: Ch 2, hdc in each st across, turn (49 hdc). Fasten off, leaving a long tail to securely attach ties to the side seams of the front panels.
Section 6: Assembly
- Shoulder Seams: Lay the Back Panel flat with RS facing up. Place Front Panels on top with RS facing down. Seam the shoulder edges using a mattress stitch, leaving the center 18 inches unseamed for the neck opening.
- Sleeve Attachment: Fold each sleeve in half to find the center point. Align that center point with the shoulder seam. Sew the sleeve to the armhole opening across rows.
- Side Seams: Fold the cardigan at the shoulder seams (RS together). Seam from the wrist up the inside of the sleeve, then down the sides of the body to the bottom hem, leaving the bottom split open for movement.
- Attach Ties: Sew one waist tie firmly to the lower side seam of the left front panel, and the second tie to the right front panel wrap position.
Section 7: Neckline & Front Banding
Using US I/9 (5.5 mm) hook, join yarn at the bottom right front hem:
* Row 1: Work hdc evenly up the right front edge, around the V-neck slope, across the back neck, and down the left front edge. Turn.
* Rows 2 to 4: Ch 2, work in ribbing pattern [FPdc, BPdc] across the entire band for a neat, stretchy finished frame. Fasten off and weave in all ends securely.
Size Customization Tips
- To adjust length: Add or subtract rows from the main body panels before starting the neckline shaping. Each extra 4 rows adds approximately 1.75 inches of length.
- To adjust width: Foundation chains must be adjusted in multiples of 2. Each 2-stitch adjustment changes the panel width by about 0.6 inches.
Care Instructions
Hand wash gently in cool water with mild wool wash. Do not wring or twist. Lay flat on a clean towel to dry in its original shape. Do not iron or tumble dry.
FAQ
Can I substitute a different yarn weight?
It is not recommended. Changing the yarn weight will throw off the drape, stitch counts, and finished measurements of the wrap cardigan. Stick to a standard worsted weight yarn for the best results.
How do I make the cardigan longer or shorter?
Simply adjust the number of rows in the Back and Front panels before beginning the neckline decreases. Just be sure to record your row count changes so both front panels match!
Can I eliminate the waist tie?
Yes! If you prefer a loose, open-front cardigan rather than a wrap style, simply omit the waist ties and leave the front edges unfastened.