
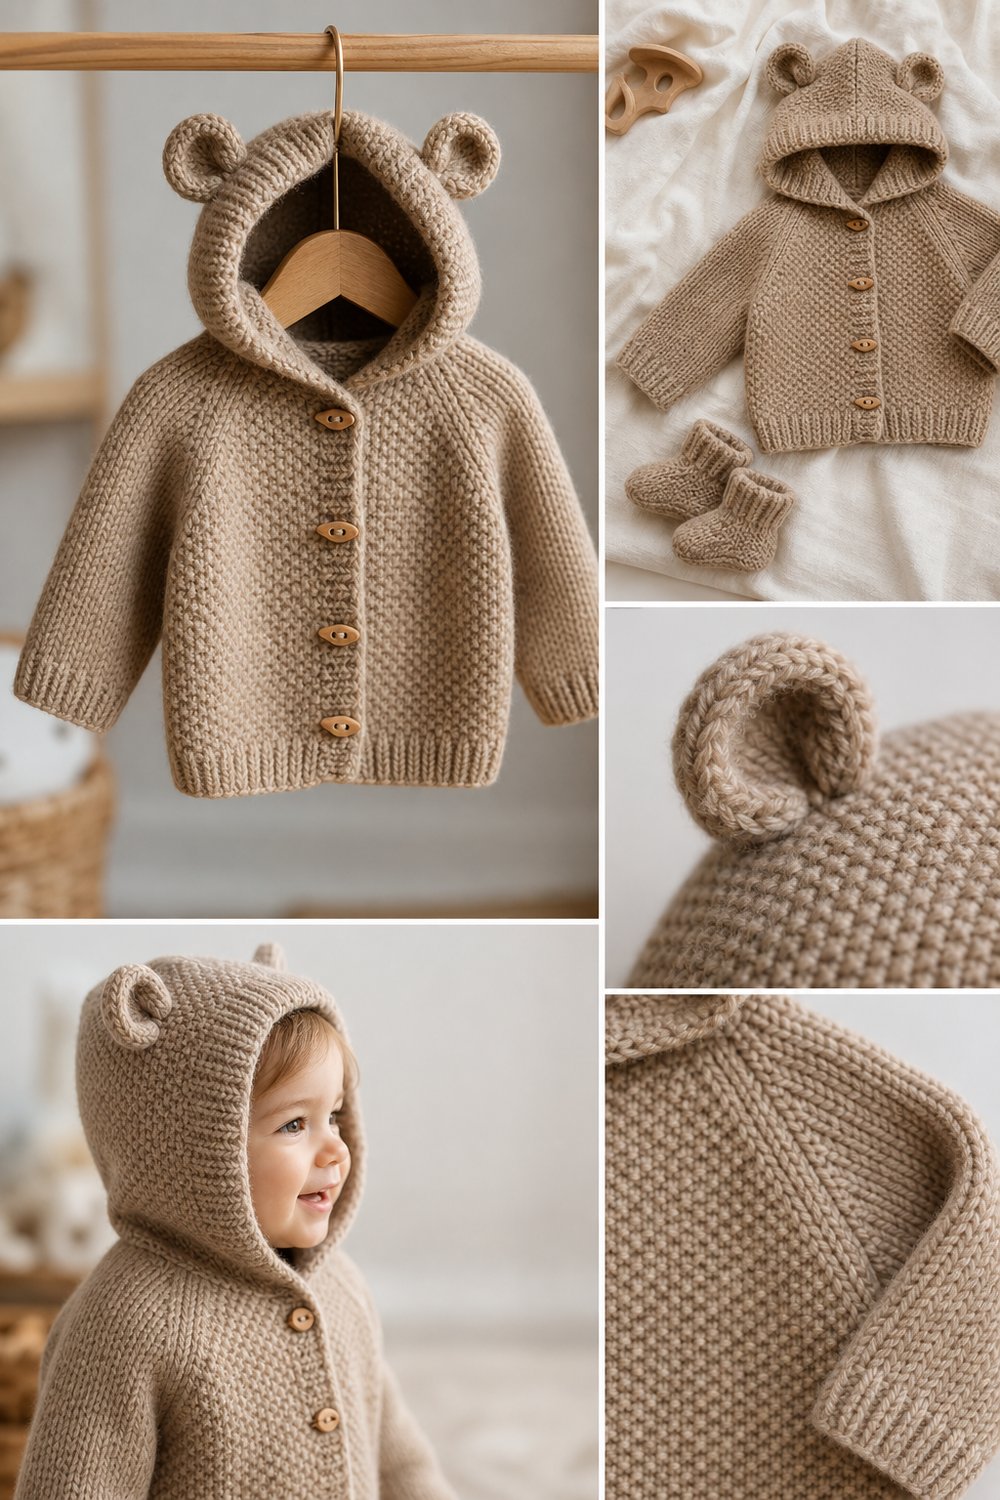
Wrap your little one in the gentle, tactile warmth of toasted almond merino wool while they explore the world, completely cozy inside a hooded sweater finished with the sweetest handmade details. There is nothing quite like dressing a baby in heirloom-quality knit-look crochet that feels as soft against delicate skin as it looks in keepsake nursery photographs. This project brings together classic comfort and modern whimsy, making it a joy to stitch from the very first foundation chain to the final wooden toggle button.
Sweet Bear Ear Hooded Baby Cardigan Free Baby Romper Pattern
Quick Facts
- Stitches Used: Chain (ch), Single Crochet (sc), Half Double Crochet (hdc), Moss Stitch / Granite Stitch (sc, ch 1, skip 1), Invisible Decrease (inv-dec).
- Size Fit: Newborn (0-3 months), 3-6 months, 6-12 months, 12-18 months.
- Estimated Hours to Complete: 10–14 hours depending on size.
- Gift-Appeal Framing: An unforgettable heirloom baby shower gift that photographs beautifully and pairs effortlessly with modern nursery aesthetics.
Sizing customization tips are included later in this post to help you adjust the fit perfectly for your growing baby.
What Makes This Sweet Bear Ear Hooded Baby Cardigan Special
This garment achieves its high-end, store-bought look through a combination of seamless raglan yoke construction and textured moss-stitch body shaping. Working the jacket top-down means zero mattress stitching at the sleeves and body, allowing the fabric to drape naturally over soft baby shoulders. The tactile moss-stitch body creates a subtle, woven appearance that mimics high-end knitwear without losing the structural integrity of crochet. Finishing touches include worked-in-the-round bear ears that securely hold their round shape, neat ribbed cuffs, and rustic wooden toggle buttons looped through clean chain-spaces.
Skill Level
- Skill Level: Intermediate
- Required Skills:
- Working in the round and in rows
- Seamless top-down raglan construction
- Basic increases and invisible decreases
- Simple seaming and surface crochet attachment
- Reassurance Line: If you are comfortable reading a basic crochet pattern and have mastered the foundational stitches, you have all the skills needed to complete this heirloom cardigan successfully.
Finished Measurements
| Size | Chest / Bust Width (Inches / cm) | Total Length (Inches / cm) | Sleeve Length from Underarm (Inches / cm) |
|---|---|---|---|
| Newborn (0-3M) | 18″ / 46 cm | 10.5″ / 27 cm | 5″ / 13 cm |
| 3-6 Months | 20″ / 51 cm | 11.5″ / 29 cm | 6″ / 15 cm |
| 6-12 Months | 21.5″ / 55 cm | 13″ / 33 cm | 7″ / 18 cm |
| 12-18 Months | 23″ / 58 cm | 14.5″ / 37 cm | 8″ / 20 cm |
Materials You Will Need
| Color Name | Yarn Weight / Fiber Type | Yardage / Meters Needed (By Size) |
|---|---|---|
| Toasted Almond | DK Weight / 100% Superwash Merino Wool | 0-3M: 400 yds (365 m) 3-6M: 475 yds (434 m) 6-12M: 550 yds (503 m) 12-18M: 650 yds (594 m) |
| Cream (Accents) | DK Weight / 100% Superwash Merino Wool | All Sizes: 40 yds (37 m) |
- Crochet Hook: US G/6 (4.0mm) or size needed to obtain correct gauge.
- Additional Tools: Tapestry needle for weaving ends, 4-5 small wooden toggle buttons (approx. 3/4 inch / 20mm), stitch markers (4 locking stitch markers), measuring tape.
Yarn Suggestions
| Yarn Brand & Line | Yarn Weight | Skein Yardage | Notes |
|---|---|---|---|
| Cascade Yarns 220 Superwash Sport | Sport / DK | 136 yds / 125 m per 50g skein | Excellent stitch definition, wonderful merino loft, machine washable. |
| Knit Picks Comfy DK | DK | 129 yds / 118 m per 50g skein | Ultra-soft pima cotton and acrylic blend; budget-friendly alternative. |
| Malabrigo Arroyo | Sport / DK | 335 yds / 306 m per 100g skein | Luxurious hand-dyed merino wool with stunning tonal depth. |
⚠️ Note: Avoid heavy 100% acrylic yarns with no elasticity or coarse wools that lack softness. Merino wool or high-grade superwash blends are essential to achieve the cozy, flexible drape shown in the photos.
Gauge
| Measurement Type | Stitch / Row Count | Target Size |
|---|---|---|
| Moss Stitch Gauge | 20 sts x 20 rows = 4 inches (10 cm) | Using US G/6 (4.0mm) hook |
| HDC Raglan Gauge | 18 hdc x 12 rows = 4 inches (10 cm) | Using US G/6 (4.0mm) hook |
💡 Designer Tip: Always make a gauge swatch using the moss stitch pattern before starting. Baby garments rely on correct sizing, and merino wool can stretch slightly when wet blocked.
Abbreviations
| Abbreviation | Full Meaning |
|---|---|
| ch | chain |
| sc | single crochet |
| hdc | half double crochet |
| dc | double crochet |
| sl st | slip stitch |
| st(s) | stitch(es) |
| sp(s) | space(s) |
| sk | skip |
| rep | repeat |
| rnd(s) | round(s) |
| PM | place marker |
| inv-dec | invisible decrease (sc2tog working in front loops only) |
| RS / WS | Right Side / Wrong Side |
Special Stitches Explained
- Moss Stitch (Granite Stitch): Worked over an even number of stitches. (Sc in indicated st, ch 1, skip next st) repeating across. On subsequent rows/rounds, work the sc into the ch-1 space of the previous row and ch 1 over the sc.
- Invisible Decrease (inv-dec): Insert hook into the front loop only of the first stitch, then insert hook into the front loop only of the second stitch. Yarn over, pull through both loops on hook, yarn over and pull through remaining 2 loops on hook.
- Raglan Increase: Work (2 hdc, ch 2, 2 hdc) into the designated chain-2 corner space to expand the yoke evenly across front, sleeves, and back panels.
Pattern Instructions
Section 1: The Yoke (Top-Down Construction)
Using Toasted Almond and US G/6 (4.0mm) hook, ch 64 (68, 72, 76).
Row 1 (RS): Working in back bumps of foundation chain, hdc in 3rd ch from hook (skipped 2 chs count as first hdc), hdc in next 8 (9, 10, 11) sts [Left Front], (2 hdc, ch 2, 2 hdc) in next ch [Raglan Corner 1], PM in ch-2 sp; hdc in next 10 (10, 11, 11) sts [Left Sleeve], (2 hdc, ch 2, 2 hdc) in next ch [Raglan Corner 2], PM in ch-2 sp; hdc in next 18 (20, 20, 22) sts [Back], (2 hdc, ch 2, 2 hdc) in next ch [Raglan Corner 3], PM in ch-2 sp; hdc in next 10 (10, 11, 11) sts [Right Sleeve], (2 hdc, ch 2, 2 hdc) in next ch [Raglan Corner 4], PM in ch-2 sp; hdc in final 9 (10, 10, 11) sts [Right Front]. Turn. (78 (84, 88, 92) hdc)
Rows 2 through 7 (9, 11, 13): Ch 2 (does not count as st here and throughout), hdc in each st to ch-2 corner sp, work (2 hdc, ch 2, 2 hdc) in each ch-2 corner sp, hdc in each st to end. Turn.
(Stitch count increases by 16 sts per row).
✅ Checkpoint: At the end of the yoke rows, verify your stitch counts across all sections. Total stitch count should equal 174 (186, 200, 212) sts (excluding corner ch-sps).
Section 2: Separating Body and Sleeves
Row 1 (RS): Ch 2, hdc across Left Front to 1st marker, work 1 hdc in ch-2 sp, sk all Left Sleeve sts (from 1st marker to 2nd marker), work 1 hdc in 2nd ch-2 sp, hdc across Back to 3rd marker, work 1 hdc in ch-2 sp, sk all Right Sleeve sts (from 3rd marker to 4th marker), work 1 hdc in 4th ch-2 sp, hdc across Right Front to end. Turn. (98 (104, 112, 120) hdc)
Section 3: Body (Moss Stitch Texture)
Row 1 (WS): Switch to moss stitch pattern. Ch 1, sc in first st, ch 1, sk next st, (sc in next st, ch 1, sk next st) across to end, ending with sc in last st. Turn. (49 (52, 56, 60) sc + 48 (51, 55, 59) ch-1 sps)
Rows 2 through 16 (18, 20, 22): Ch 1, sc in first sc, ch 1, sk ch-1 sp, (sc in next sc, ch 1, sk ch-1 sp) across, ending with sc in turning ch sp. Turn.
Bottom Ribbing Edge:
Next Row: Ch 2, hdc in each sc and ch-1 sp across. Turn. (97 (103, 111, 119) hdc)
Final Ribbing Row: Ch 1, work front post hdc (fphdc) around first st, back post hdc (bphdc) around next st, alternating fphdc and bphdc across to end. Fasten off and weave in all ends.
Section 4: Sleeves (Worked in the Round)
Join Toasted Almond with a sl st at the underarm gap of one sleeve opening.
Rnd 1: Ch 2, evenly work 32 (34, 38, 40) hdc around the armhole opening, join with sl st to first hdc. (32 (34, 38, 40) hdc)
Rnd 2: Ch 2, hdc in each st around, join. (32 (34, 38, 40) hdc)
Rnd 3 (Decrease Rnd): Ch 2, hdc in first st, work hdc-dec over next 2 sts, hdc to last 3 sts, work hdc-dec over next 2 sts, hdc in last st, join. (30 (32, 36, 38) hdc)
Rnds 4 through 8 (10, 12, 14): Repeat Rnd 2. (30 (32, 36, 38) hdc)
Cuff Ribbing:
Rnd 9 (11, 13, 15): Ch 1, (fphdc around next st, bphdc around next st) around, join with sl st.
Fasten off and repeat for second sleeve.
Section 5: The Hood
Join Toasted Almond at the right front neckline edge of the collar.
Row 1: Ch 2, hdc evenly across neckline opening (approx. 50 (54, 58, 62) hdc). Turn. (50 (54, 58, 62) hdc)
Row 2: Ch 1, sc in first st, ch 1, sk 1, (sc in next st, ch 1, sk 1) across in moss stitch. Turn.
Rows 3 through 22 (24, 26, 28): Continue working in moss stitch back and forth across rows until hood measures 7 (7.5, 8, 8.5) inches from neckline base.
Top Seam: Fold hood in half right-sides together along the top edge. Whipstitch or mattress stitch the top edges closed securely. Fasten off.
Section 6: Bear Ears (Make 2)
Using Toasted Almond, start with a magic ring.
Rnd 1: Work 6 sc in magic ring, join with sl st to first sc. (6 sc)
Rnd 2: Ch 1, 2 sc in each st around, join. (12 sc)
Rnd 3: Ch 1, (sc in next st, 2 sc in next st) around, join. (18 sc)
Rnds 4 & 5: Ch 1, sc in each st around, join. (18 sc)
Fasten off leaving a 10-inch tail for sewing. Fold ears slightly to create a natural curved shape, and securely sew them to the top outer corners of the hood, spaced approximately 2.5 inches apart.
Right Front Band (Buttonhole Band): Join Cream at bottom right front corner, ch 1, work 1 row of sc evenly up the front edge to hood opening. Work 4-5 evenly spaced buttonholes (ch 2, sk 2 sts) along the band. Fasten off.
Left Front Band: Join Cream at top left hood opening, work 1 row of sc down left front edge. Fasten off.
Sew wooden toggle buttons securely opposite the buttonholes. Weave in all remaining yarn ends securely.
Size Customization Tips
💡 Designer Tip: To make this cardigan larger or smaller, adjust your starting chain count in multiples of 4 plus 4 for the yoke foundation. Each 4-chain adjustment modifies the finished chest circumference by approximately 1 inch (2.5 cm). If working for a cloth diaper-wearing baby, consider adding 1 extra row to the body length for a more relaxed fit.
Care Instructions
- Hand wash or machine wash on a gentle wool cycle (max 30°C / 85°F) using a mild wool detergent.
- Do not bleach or tumble dry.
- Dry flat in shade, reshaping gently while damp to maintain crisp stitch definition and ear structure.
- Cool iron if needed, using a pressing cloth.
Sweet Bear Ear Hooded Baby Cardigan Free Baby Romper Pattern
Thank you so much for stitching along with me today! I hope creating this adorable toasted almond cardigan brings as much warmth to your crafting corner as it will to your little one. If you loved making this pattern, please save it to your Pinterest boards, share your finished photos on Instagram and tag me [@YourDesignerHandle], and leave a comment below to let me know how your project turned out! Happy crocheting!