
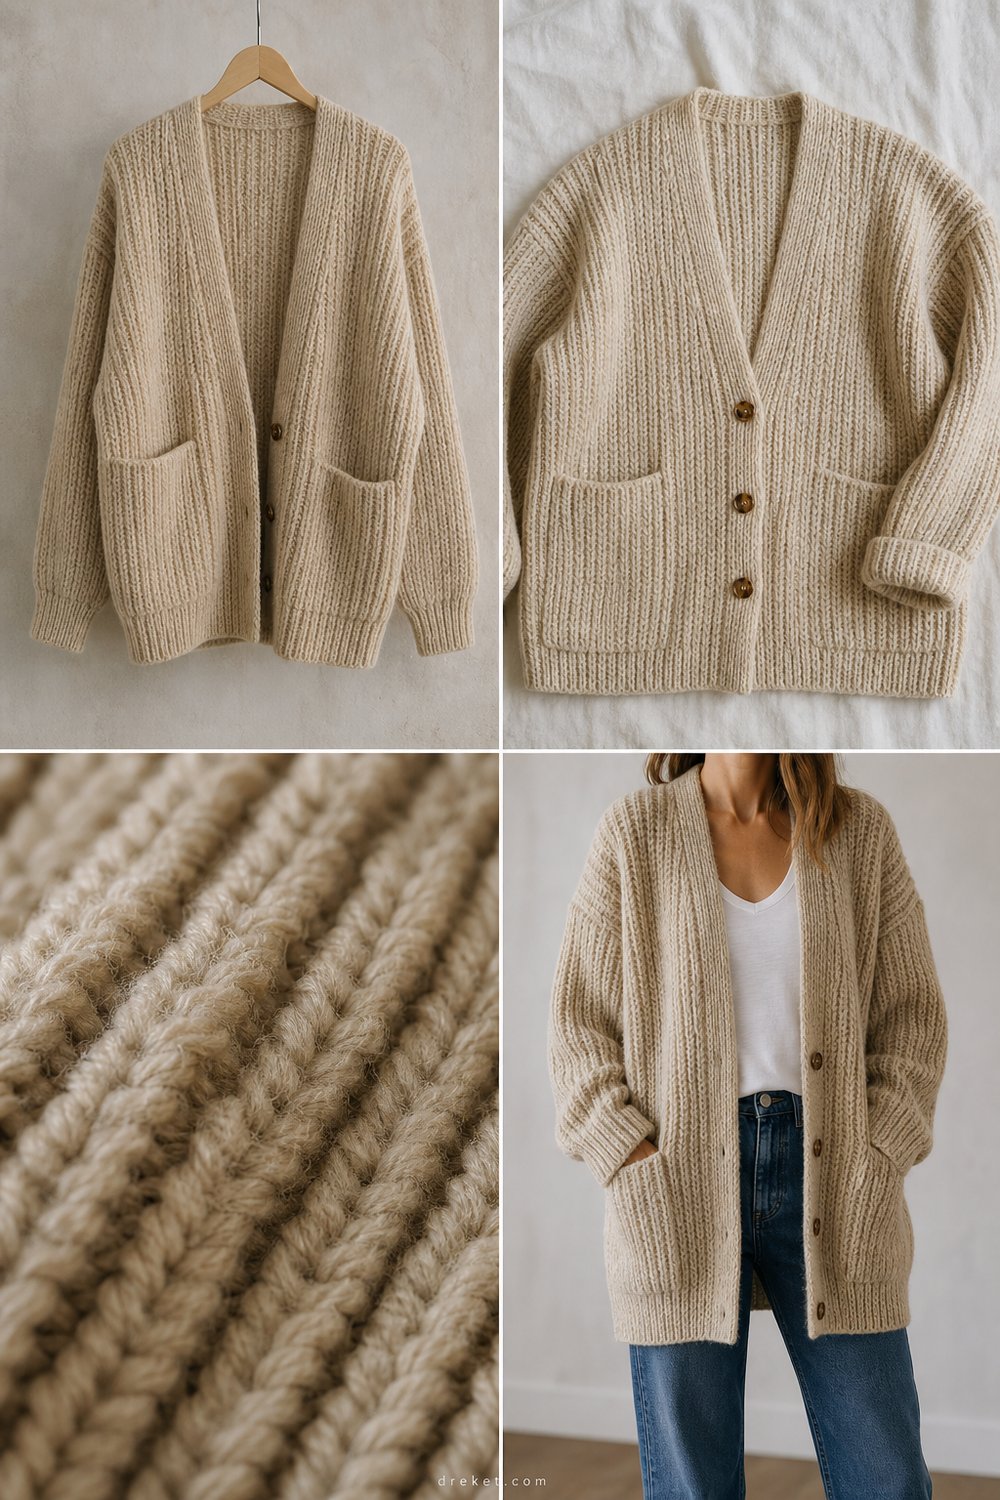
Wrap yourself in the comforting, substantial embrace of a handmade garment that bridges the gap between cozy cabin styling and effortless everyday wear. Designed with dramatic vertical ribbing, deep patch pockets, and rich woolen loft, this classic layering piece brings timeless texture and warmth to your cold-weather wardrobe.
Oatmeal Chunky Ribbed Cardigan Free Cardigan Pattern
Quick Facts
- Stitches Used: Chain (ch), Half Double Crochet (hdc), Half Double Crochet Back Loop Only (hdc-blo), Slip Stitch (sl st)
- Size Fit: Designed with 6-8 inches of positive ease for an oversized, slouchy fit across sizes XS through 3XL
- Estimated Hours to Complete: 14-18 hours of soothing, rhythmic stitching
- Gift-Appeal Framing: An exceptionally luxurious handmade heirloom gift that looks deceptively high-end and store-bought
💡 Designer Tip: Detailed size customization instructions are included later in this post to help you easily adjust the body length and sleeve circumference for a truly bespoke fit.
What Makes This Oatmeal Chunky Ribbed Cardigan Special
The secret to the rich, tactile look of this cardigan lies entirely in its construction and stitch selection. By working exclusively in the half double crochet back loop only (hdc-blo) stitch, the fabric naturally pulls together to create deep, pronounced vertical ridges that mimic traditional knitted fisherman’s ribbing without requiring knitting needles. The garment is built using a modern drop-shoulder construction method—the back panel is worked straight up from the bottom hem, followed by two matching front panels that seamlessly frame the open front. Sturdy patch pockets are crocheted separately and whipstitched into place, while the button placket is worked directly along the front edge, featuring reinforced buttonholes designed to secure three classic tortoiseshell horn buttons.
Skill Level
- Intermediate: Comfortable working in rows, maintaining consistent tension with bulky yarn, and following basic garment shaping and assembly instructions.
- Reassurance line: If you have mastered basic crochet stitches and are ready to tackle your first full-sized garment with clear, step-by-step guidance, this project is well within your reach.
Finished Measurements
| Size | Bust Circumference | Back Width | Armhole Depth | Length |
|---|---|---|---|---|
| XS | 38 in / 96.5 cm | 19 in / 48.3 cm | 8 in / 20.3 cm | 26 in / 66.0 cm |
| S | 42 in / 106.7 cm | 21 in / 53.3 cm | 8.5 in / 21.6 cm | 26.5 in / 67.3 cm |
| M | 46 in / 116.8 cm | 23 in / 58.4 cm | 9 in / 22.9 cm | 27 in / 68.6 cm |
| L | 50 in / 127.0 cm | 25 in / 63.5 cm | 9.5 in / 24.1 cm | 28 in / 71.1 cm |
| XL | 54 in / 137.2 cm | 27 in / 68.6 cm | 10 in / 25.4 cm | 29 in / 73.7 cm |
| 2XL | 58 in / 147.3 cm | 29 in / 73.7 cm | 10.5 in / 26.7 cm | 30 in / 76.2 cm |
| 3XL | 62 in / 157.5 cm | 31 in / 78.7 cm | 11 in / 27.9 cm | 31 in / 78.8 cm |
Materials You Will Need
- Yarn: Bulky weight (#5) wool or wool-blend yarn with rich loft and structure.
- Hook: US M/13 (9.0 mm) crochet hook (or size needed to obtain gauge).
- Notions: Tapestry needle for weaving in ends, locking stitch markers (4), measuring tape, and three 1.25-inch (30 mm) tortoiseshell horn buttons.
| Colorway | Yarn Type | Total Yardage Required | Total Meters Required |
|---|---|---|---|
| Oatmeal | Bulky (#5) Wool Blend | 1,150 – 1,650 yds | 1,050 – 1,508 m |
Yarn Suggestions
| Brand & Line Name | Yarn Weight | Yardage per Skein | Notes |
|---|---|---|---|
| Lion Brand Hue + Me | Bulky (#5) | 137 yds / 125 m per 100g | Excellent stitch definition and gorgeous neutral color range. |
| WeCrochet Wool of the Andes Bulky | Bulky (#5) | 110 yds / 100 m per 100g | 100% Peruvian wool providing incredible warmth and drape. |
| Berroco Vintage Chunky | Bulky (#5) | 130 yds / 119 m per 100g | Durable acrylic/wool blend that is machine washable and easy to care for. |
⚠️ Note: Avoid lightweight acrylic yarns that lack structural memory, as they will cause the heavy vertical ribbing of this cardigan to stretch out and sag over time.
Gauge
| Measurement Type | Stitches & Rows | Dimensions |
|---|---|---|
| Gauge Swatch (HDC-BLO) | 10 sts x 8 rows | 4 inches x 4 inches (10 cm x 10 cm) |
💡 Designer Tip: Always make and block your gauge swatch before beginning. Because this garment relies on vertical ribbing, row gauge is just as important as stitch gauge for achieving the correct overall length.
Abbreviations
| Abbreviation | Full Term |
|---|---|
| ch | chain |
| hdc | half double crochet |
| hdc-blo | half double crochet in the back loop only |
| rep | repeat |
| RS | right side |
| sc | single crochet |
| sl st | slip stitch |
| st(s) | stitch(es) |
| WS | wrong side |
| yo | yarn over |
Special Stitches Explained
- Half Double Crochet Back Loop Only (hdc-blo): Yo, insert hook under the back loop only of the indicated stitch, yo, pull up a loop, yo, pull through all three loops on the hook.
- Neat Edge Turning Ch-2: The turning chain-2 at the beginning of each row does not count as a stitch unless specifically noted. Always work your first hdc into the very first stitch at the base of the turning chain.
Pattern Instructions
Section 1: Back Panel
Note: The back panel is worked from the bottom hem up to the shoulder.
- Row 1: Ch 52 (for all sizes, length can be adjusted later), working in the back bumps of the chain, hdc in 3rd ch from hook (skipped chs do not count as st) and in each ch across, turn. (50 hdc)
- Row 2 (RS): Ch 2, working in back loop only, hdc-blo in each st across, turn. (50 hdc-blo)
- Rows 3 to 52 (adjust for desired length): Rep Row 2. (50 hdc-blo)
- Fasten off, leaving a 12-inch tail for shoulder seaming.
✅ Checkpoint: Measure your back panel height. For the standard size, it should measure approximately 26 inches from bottom hem to top shoulder edge.
Section 2: Left Front Panel
- Row 1: Ch 26, hdc in 3rd ch from hook and in each ch across, turn. (24 hdc)
- Row 2 (RS): Ch 2, hdc-blo in each st across, turn. (24 hdc-blo)
- Rows 3 to 52: Rep Row 2 to match the row count of the back panel. (24 hdc-blo)
- Fasten off.
Section 3: Right Front Panel
- Row 1: Ch 26, hdc in 3rd ch from hook and in each ch across, turn. (24 hdc)
- Row 2 (RS): Ch 2, hdc-blo in each st across, turn. (24 hdc-blo)
- Rows 3 to 52: Rep Row 2 to match the row count of the back panel. (24 hdc-blo)
- Fasten off.
Section 4: Sleeves (Make 2)
- Row 1: Ch 32, hdc in 3rd ch from hook and in each ch across, turn. (30 hdc)
- Row 2: Ch 2, hdc-blo in each st across, turn. (30 hdc-blo)
- Rows 3 to 38: Rep Row 2, working a slight increase at both ends every 6th row by working 2 hdc-blo in the first and last st. (42 hdc-blo by Row 38)
- Fasten off, leaving a long tail for seaming.
Section 5: Patch Pockets (Make 2)
- Row 1: Ch 18, hdc in 3rd ch from hook and in each ch across, turn. (16 hdc)
- Rows 2 to 14: Ch 2, hdc-blo in each st across, turn. (16 hdc-blo)
- Fasten off, leaving a long yarn tail for sewing.
Section 6: Assembly and Finishing
- Lay the back panel flat with the right side facing up. Place the left and right front panels on top, aligning the outer shoulder edges. Seam the shoulders together using a mattress stitch or whipstitch over a span of 5 inches from the outer edge.
- Fold sleeves in half lengthwise and align the center fold with the shoulder seam. Sew the sleeve to the armhole opening.
- Fold the cardigan at the shoulder seams and seam the underarm and sleeve seams in one continuous motion.
- Position the patch pockets symmetrically on the front panels approximately 4 inches up from the bottom hem and 3 inches in from the front edge; secure with pins and whipstitch around the side and bottom edges.
- Working along the front opening edge, attach yarn and work 1 row of sc evenly spaced up the right front edge, across the back neck, and down the left front edge, creating three evenly spaced buttonholes (ch 2, skip 2 sts) on the right front band.
- Sew the three tortoiseshell horn buttons opposite the buttonholes.
- Weave in all loose ends securely with a tapestry needle.
Size Customization Tips
- Adjusting Length: To make the cardigan longer or shorter, simply add or subtract chains at the very beginning of the back and front panel foundations. Ensure you maintain an even number of starting chains.
- Adjusting Width: To increase or decrease the overall bust circumference, add or subtract rows in increments of 2 rows for both the back and front panels so that the ribbing pattern remains symmetrical.
Care Instructions
- Hand wash gently in cool water using a mild wool-safe detergent.
- Do not wring or twist the wet fabric; gently press out excess water by rolling the cardigan in a clean, dry towel.
- Lay flat to dry on a clean surface away from direct sunlight and heat sources to maintain the shape and elasticity of the woolen fibers.
Oatmeal Chunky Ribbed Cardigan Free Cardigan Pattern
I truly hope you enjoy stitching up this cozy staple piece as much as I did designing it! If you make your own Oatmeal Chunky Ribbed Cardigan, I would love to see your creation. Be sure to share your photos, tag me on social media, save this pattern to your Pinterest boards for later, and leave a friendly comment below telling me which colorway you chose!