
Vintage Velvet Tuna Can Jewelry Box Free Crochet Pattern
Transform an everyday upcycled item into a treasure with this Vintage Velvet Tuna Can Jewelry Box! Imagine nestled on your dresser, catching the soft morning light, this plush creation holds your most cherished small keepsakes, a testament to handmade beauty and sustainable crafting. It’s not just a storage solution; it’s a decorative piece that whispers stories of vintage charm and thoughtful design.
Vintage Velvet Tuna Can Jewelry Box Free Crochet Pattern
This adorable upcycled jewelry box is crafted using luxurious velvet yarn, primarily in single crochet and slip stitches, creating a dense, plush fabric. Designed to fit a standard 5 oz (142g) tuna can, it’s a perfect stash-buster project that can be completed in approximately 2-3 hours. It makes for a unique, heartfelt gift, perfect for Mother’s Day, birthdays, or just because.
Sizing customization tips are included later, so you can adapt it to various can sizes!
What Makes This Vintage Velvet Tuna Can Jewelry Box Special
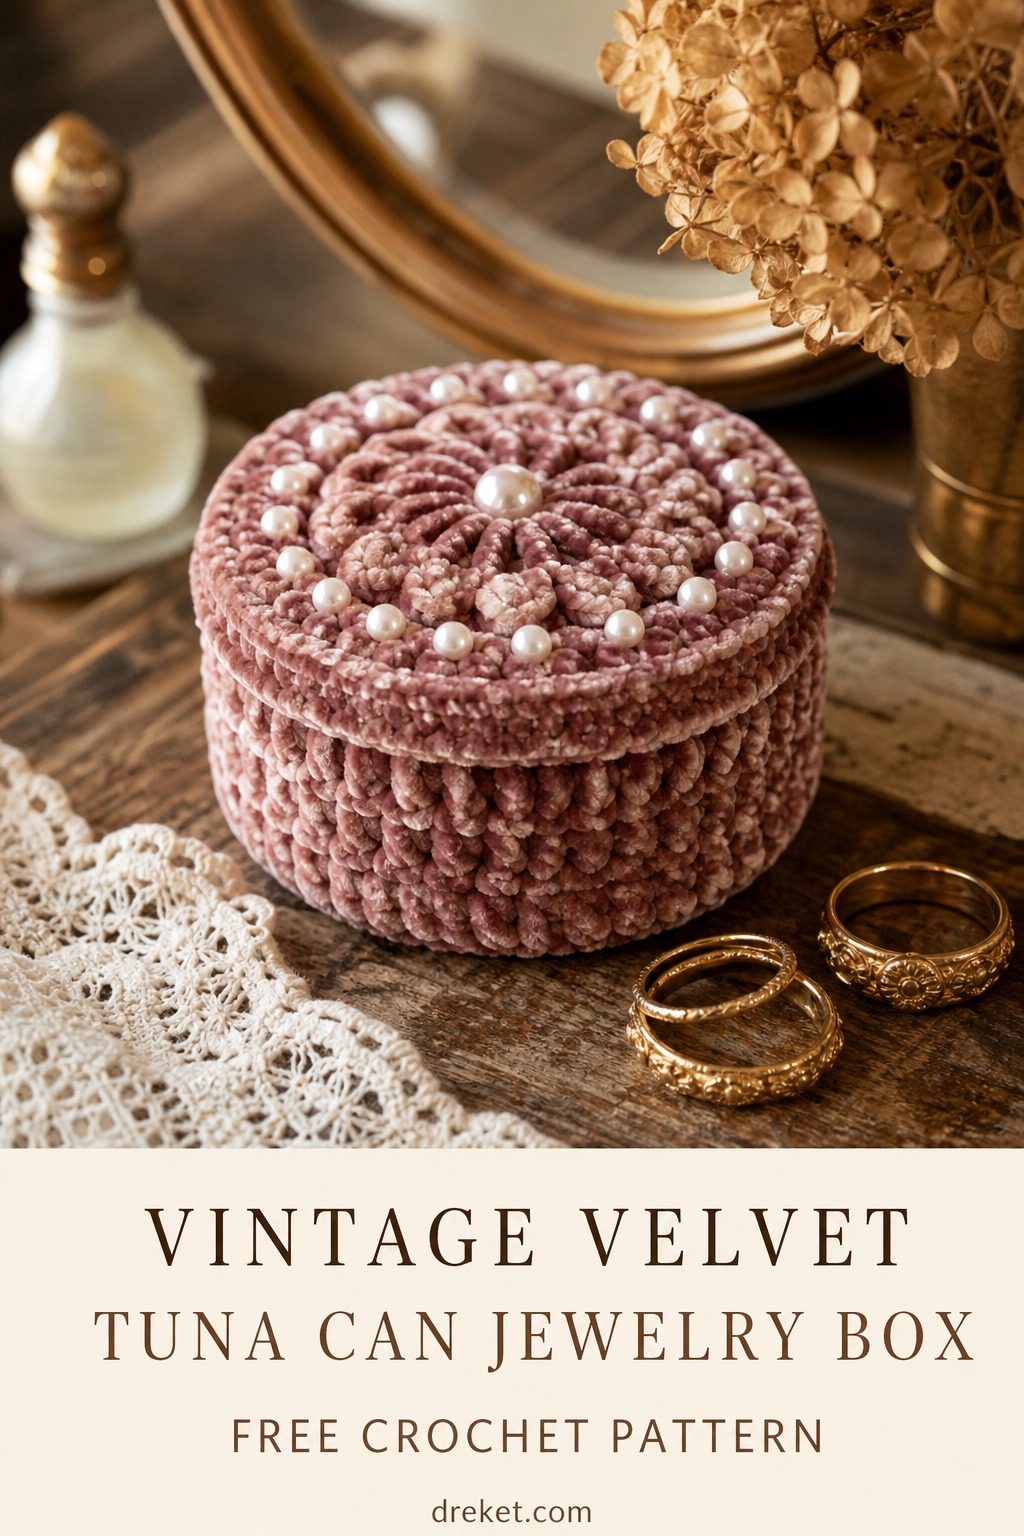
The magic of this jewelry box lies in its transformation of a humble tuna can into a luxurious, tactile storage piece. The use of velvet yarn, specifically in a rich, deep maroon, creates an incredibly soft, plush texture that evokes a vintage feel, as described in the product image. The pearl bead accents on the lid aren’t just decorative; they provide a subtle weight and elegance, echoing classic jewelry box designs. By working stitches tightly and carefully, we create a seamless, tailored fit around the can, ensuring a professional finish. The combination of upcycling and elegant embellishment makes this piece both sustainable and sophisticated, perfectly capturing that “antique gold rings on a rustic vanity” aesthetic.
Skill Level
This pattern is suitable for advanced beginners to intermediate crocheters.
* Required Skills:
* Magic Ring (MR)
* Single Crochet (sc)
* Slip Stitch (sl st)
* Single Crochet Increase (sc inc)
* Working in the round
* Basic sewing skills (for attaching beads)
* Understanding of basic pattern repeats
* If you’re comfortable with these techniques and can maintain consistent tension, you’ll find this project a delight!
Finished Measurements
- Height (with lid): Approximately 1.75 inches (4.5 cm)
- Diameter (base): Approximately 3.25 inches (8.25 cm)
- Fits a standard 5 oz (142g) tuna can: 3.25 inches (8.25 cm) diameter, 1.5 inches (3.8 cm) height.
Materials You Will Need
- Yarn: Worsted Weight (Category 4) Velvet Yarn
- Hook: US G/6 (4.0 mm) crochet hook
- Notions:
- Standard 5 oz (142g) empty, clean tuna can (ensure edges are smooth)
- Tapestry needle
- Stitch marker
- Scissors
- Small amount of polyester fiberfill (for lid padding)
- Approximately 6-8 small pearl beads (around 4-6mm diameter)
- Matching sewing thread and fine sewing needle (for beads)
| Color | Yardage Needed |
|---|---|
| Maroon | 40 yards |
| Light Grey | 5 yards |
Yarn Suggestions
For that plush, vintage velvet feel, I highly recommend yarns like Bernat Velvet (around 315 yds per skein) or Lion Brand Vel-Luxe (246 yds per skein). Both offer a beautiful sheen and softness perfect for this project. Alternatively, Hobby Lobby’s I Love This Yarn! Velvety is also a great option. Look for yarns with a good amount of “fluff” that can hide slight imperfections and provide that luxurious texture. Avoid stiff cotton yarns or overly thin acrylics, as they won’t give you the desired plush, rounded shape or vintage feel.
Gauge
Using US G/6 (4.0 mm) hook with worsted weight velvet yarn:
10 sc and 9 rows = 2 inches (5 cm)
The base of the jewelry box should measure approximately 3.25 inches (8.25 cm) in diameter after Round 5. Please swatch to ensure your finished item will fit your tuna can snugly. Adjust hook size if necessary to achieve the correct gauge.
Abbreviations
- MR: Magic Ring
- ch: Chain
- sc: Single Crochet
- sl st: Slip Stitch
- sc inc: Single Crochet Increase (2 sc in same stitch)
- BLO: Back Loop Only
- st(s): Stitch(es)
- Rnd: Round
- FO: Fasten off
Special Stitches Explained
There are no special stitches beyond basic single crochet and increases in this pattern, keeping it accessible while focusing on the plush texture of the velvet yarn.
Pattern Instructions
This pattern is worked in continuous rounds unless otherwise specified. Use a stitch marker to keep track of the beginning of your rounds.
Section 1: Jewelry Box Base (Maroon Yarn)
Start with Maroon yarn.
- Rnd 1: Create a MR, ch 1. Work 6 sc into MR. Pull tail to close. (6 sc)
- Rnd 2: Sc inc in each st around. (12 sc)
- Rnd 3: (Sc in next st, sc inc in next st) repeat 6 times. (18 sc)
- Rnd 4: (Sc in next 2 sts, sc inc in next st) repeat 6 times. (24 sc)
- Rnd 5: (Sc in next 3 sts, sc inc in next st) repeat 6 times. (30 sc)
- Rnd 6: (Sc in next 4 sts, sc inc in next st) repeat 6 times. (36 sc)
- Rnd 7: (Sc in next 5 sts, sc inc in next st) repeat 6 times. (42 sc)
- Checkpoint: At this point, your base should measure approximately 3.25 inches (8.25 cm) in diameter. If it’s significantly off, adjust your hook size.
- Rnd 8: Sc in the BLO of each st around. (42 sc) This creates a crisp edge for the side of the box.
- Rnd 9-16: Sc in each st around. (42 sc) Work until the height is approximately 1.5 inches (3.8 cm) or just covers the height of your tuna can.
- Rnd 17: Sc in each st around. (42 sc)
- Sl st in next st. FO, weave in ends.
Section 2: Jewelry Box Lining (Light Grey Yarn)
Start with Light Grey yarn. This part will fit inside the tuna can.
- Rnd 1: Create a MR, ch 1. Work 6 sc into MR. Pull tail to close. (6 sc)
- Rnd 2: Sc inc in each st around. (12 sc)
- Rnd 3: (Sc in next st, sc inc in next st) repeat 6 times. (18 sc)
- Rnd 4: (Sc in next 2 sts, sc inc in next st) repeat 6 times. (24 sc)
- Rnd 5: (Sc in next 3 sts, sc inc in next st) repeat 6 times. (30 sc)
- Checkpoint: This base should be slightly smaller than the maroon base, designed to fit inside the can.
- Rnd 6: Sc in the BLO of each st around. (30 sc)
- Rnd 7-12: Sc in each st around. (30 sc) Work until the height is approximately 1.25 inches (3.2 cm) or slightly less than the height of your tuna can.
- Sl st in next st. FO, weave in ends.
Section 3: Jewelry Box Lid (Maroon Yarn)
Start with Maroon yarn. This part creates a padded lid for the box.
- Rnd 1: Create a MR, ch 1. Work 6 sc into MR. Pull tail to close. (6 sc)
- Rnd 2: Sc inc in each st around. (12 sc)
- Rnd 3: (Sc in next st, sc inc in next st) repeat 6 times. (18 sc)
- Rnd 4: (Sc in next 2 sts, sc inc in next st) repeat 6 times. (24 sc)
- Rnd 5: (Sc in next 3 sts, sc inc in next st) repeat 6 times. (30 sc)
- Rnd 6: (Sc in next 4 sts, sc inc in next st) repeat 6 times. (36 sc)
- Checkpoint: This will form the top surface of your lid. It should be slightly larger than the tuna can opening.
- Rnd 7: Sc in each st around. (36 sc)
- Rnd 8: (Sc in next 5 sts, sc inc in next st) repeat 6 times. (42 sc)
- Rnd 9-10: Sc in each st around. (42 sc)
- Rnd 11: (Sc in next 5 sts, sc2tog) repeat 6 times. (36 sc)
- Checkpoint: Begin to lightly stuff the lid with fiberfill. Continue to stuff as you decrease.
- Rnd 12: (Sc in next 4 sts, sc2tog) repeat 6 times. (30 sc)
- Rnd 13: (Sc in next 3 sts, sc2tog) repeat 6 times. (24 sc)
- Rnd 14: (Sc in next 2 sts, sc2tog) repeat 6 times. (18 sc)
- Rnd 15: (Sc in next st, sc2tog) repeat 6 times. (12 sc)
- Rnd 16: Sc2tog repeat 6 times. (6 sc)
- FO, leaving a long tail. Use tapestry needle to weave tail through remaining 6 sts and pull tight to close. Weave in ends. Ensure the lid is nicely plump and rounded.
Section 4: Assembly
- Covering the Tuna Can: Insert the empty tuna can into the crocheted maroon base. The BLO round (Rnd 8 of Section 1) should create a neat edge at the bottom of the can, and the remaining rounds should snugly fit around the sides.
- Adding the Lining: Place the crocheted light grey lining inside the tuna can. It should fit snugly. This provides a soft, protective interior for your jewelry.
- Embellishing the Lid: Using your sewing needle and thread, carefully sew the pearl beads onto the center top of the maroon lid. Arrange them in a cluster or a small design as desired, referencing the featured product image for inspiration (a central cluster usually works beautifully). Secure each bead well.
- Place the finished lid on top of the covered tuna can.
Size Customization Tips
This pattern is designed for a standard 5 oz (142g) tuna can. To adapt for other can sizes:
- For Wider Cans: Continue increasing rounds for the “Jewelry Box Base” (Section 1) until the diameter matches the base of your can. For example, Rnd 8 would be (Sc in next 6 sts, sc inc in next st) repeat 6 times (48 sc). Then, proceed with the BLO round and straight sc rounds. Adjust the “Jewelry Box Lining” (Section 2) similarly, ensuring its diameter is slightly smaller than the can’s opening. The “Jewelry Box Lid” (Section 3) should also be adjusted to match the final diameter of the base, typically 2-3 increase rounds larger than the main box.
- For Taller Cans: After reaching the desired diameter for your base in Section 1, simply work more straight “Sc in each st around” rounds until the height of the crochet cover matches the height of your can. Do the same for the lining (Section 2), making it slightly shorter than the can’s internal height.
Always measure your specific can (diameter and height) and make sure your crocheted pieces fit snugly at each checkpoint.
Care Instructions
To keep your Vintage Velvet Tuna Can Jewelry Box looking its best:
- Spot clean only with a damp cloth and mild soap.
- Do not submerge in water.
- Gently blot and air dry.
- Do not machine wash or dry.
- Avoid direct heat.
Closing
I truly hope you enjoy crafting your own Vintage Velvet Tuna Can Jewelry Box! There’s something so satisfying about transforming an everyday item into a beautiful, functional piece, especially one that adds such a touch of elegance to your space.
I would absolutely love to see your finished jewelry boxes! Please share your creations on social media and tag me @dreket, using the hashtag #VintageVelvetTunaCanBox. Don’t forget to save this pattern to your Pinterest boards for easy access later, and leave a comment below to let me know what you think! Happy crocheting!