
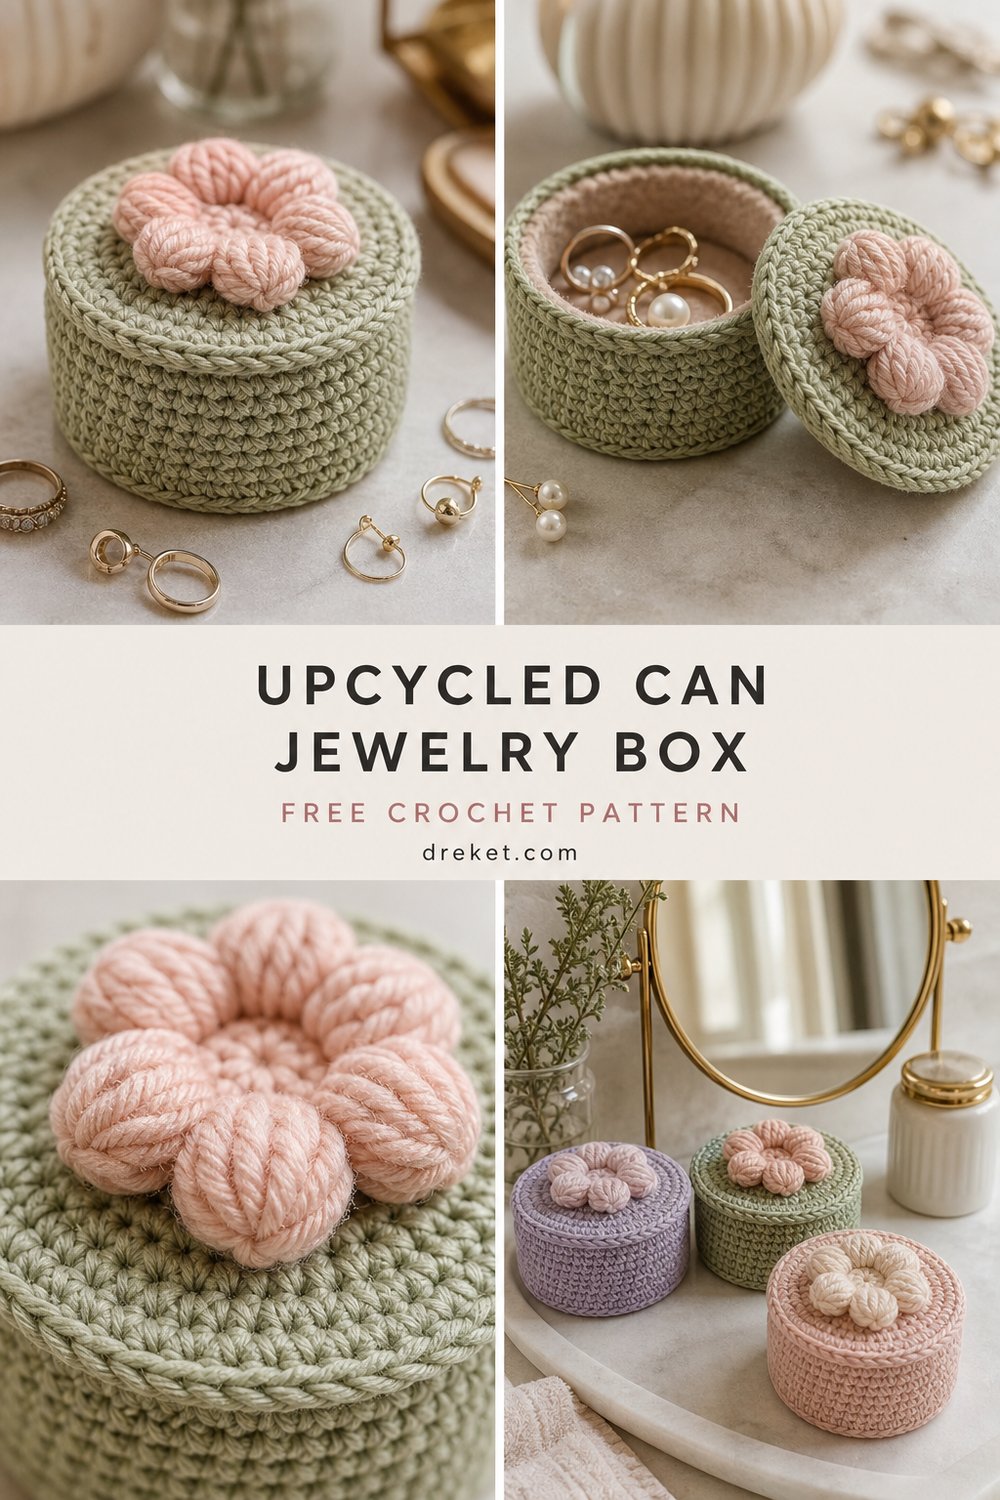
Transform an everyday recycled tuna tin into an heirloom-quality vanity accent with this mindful home decor project. Combining practical recycling with delicate texture, this piece turns basic cotton remnants into a structured, charming vanity accessory.
Clever Upcycled Can Jewelry Box Free Crochet Pattern
Quick Facts
- Stitches Used: ch, sl st, sc, hdc, dc, pc (Puff Stitch)
- Size Fit: Fits a standard 3.75-inch diameter tuna can (approx. 3.25 oz size)
- Estimated Time to Complete: 2 to 3 hours
- Gift Appeal: Perfect for Mother’s Day, bridesmaid gifts, thoughtful birthdays, or elegant dorm organization
Sizing customization tips are included later in the article for larger or smaller tins.
What Makes This Clever Upcycled Can Jewelry Box Special
This design relies on a snug, double-thick foundation and rigid vertical single crochet rows to securely hug the raw metal edges of the tin, creating a clean finish without permanent glue. The fitted flat lid features a seamless spiral construction that rests securely on the rim, topped with a striking 5-petal raised puff-stitch floral motif. The combination of clean single crochet textures and lush floral dimensions gives it a high-end boutique look that elevates discarded household items into functional art.
Skill Level
- Skill Level: Intermediate
- Required Skills: Working in the round, maintaining consistent tension, basic shaping, and executing puff stitches.
- Reassurance Line: If you are comfortable working basic amigurumi stitches and following a round-by-round chart or text, you will breeze through this delightful afternoon make!
Finished Measurements
| Measurement | Inches | Centimeters |
|---|---|---|
| Diameter | 3.75 in | 9.5 cm |
| Total Height (with lid) | 2.25 in | 5.7 cm |
| Can Cavity Depth | 1.5 in | 3.8 cm |
Materials You Will Need
- Yarn Weight: Sport-weight or Light DK 100% cotton yarn
- Hook: US C/2 (2.75 mm) crochet hook
- Notions: Standard 3.25 oz tuna can (cleaned, washed, and dried with edges checked for safety), matching felt circle for interior base (3.75 in diameter), tapestry needle, scissors, fabric glue (optional, for lining)
| Color Name | Exact Color Order | Yardage Needed |
|---|---|---|
| Sage Green | Base and Outer Can Wrap | 55 yds |
| Blush Pink | Lid Flower Motifs | 15 yds |
| Cream | Lid Base Accent | 25 yds |
Yarn Suggestions
| Yarn Brand & Line | Weight | Yardage per Skein | Notes |
|---|---|---|---|
| Schachenmayr Catania | Sport / 4-ply | 137 yds (50g) | Crisp stitch definition, excellent rigid structure for containers. |
| Knit Picks CotLin | DK | 123 yds (50g) | Wonderful linen-cotton blend that holds its shape nicely. |
| Hobbii Rainbow Cotton 8/4 | Fingering / Sport | 186 yds (50g) | Broad color palette, though you may want to hold it double for extra rigidity. |
⚠️ Note: Avoid stretchy acrylic or superwash wool yarns. They lack the structural firmness required to keep the box walls standing upright around the metal tin.
Gauge
- Gauge: 22 sts and 24 rows = 4 inches (10 cm) in standard single crochet using a US C/2 (2.75 mm) hook.
- Motif Check: The flat lid base should measure 3.75 inches across after completing the flat circle increases.
| Metric | Measurement |
|---|---|
| Stitch Gauge | 5.5 sts per inch |
| Row Gauge | 6 rows per inch |
💡 Designer Tip: Always swatch in the round if possible; working in spiral rounds can sometimes alter your natural tension compared to working flat rows.
Abbreviations
| Abbreviation | Full Term |
|---|---|
| ch | chain |
| sl st | slip stitch |
| sc | single crochet |
| hdc | half double crochet |
| dc | double crochet |
| pc | puff stitch |
| st(s) | stitch(es) |
| Rnd | Round |
| BLO | back loop only |
| FO | fasten off |
Special Stitches Explained
- Puff Stitch (pc): [Yo, insert hook into indicated st, yo, pull up a long loop] 5 times into the exact same stitch. You will have 11 loops on your hook. Yo, pull through all 11 loops, ch 1 to secure the puff.
- Back Loop Only (BLO): Working under the back loop of the designated stitch only, leaving the front loop exposed to create a crisp 90-degree corner ridge.
Pattern Instructions
Section 1: The Base and Can Wrap (Sage Green)
Rnd 1: Magic ring, work 6 sc into the ring, pull closed, sl st to first sc to join. (6 sc)
Rnd 2: Ch 1, 2 sc in each st around, sl st to join. (12 sc)
Rnd 3: Ch 1, 2 sc in next st, 1 sc in next st; repeat from * around, sl st to join. (18 sc)
Rnd 4: Ch 1, 2 sc in next st, 1 sc in next 2 sts; repeat from * around, sl st to join. (24 sc)
Rnd 5: Ch 1, 2 sc in next st, 1 sc in next 3 sts; repeat from * around, sl st to join. (30 sc)
Rnd 6: Ch 1, 2 sc in next st, 1 sc in next 4 sts; repeat from * around, sl st to join. (36 sc)
Rnd 7: Ch 1, 2 sc in next st, 1 sc in next 5 sts; repeat from * around, sl st to join. (42 sc)
Rnd 8: Ch 1, 2 sc in next st, 1 sc in next 6 sts; repeat from * around, sl st to join. (48 sc)
Rnd 9: Ch 1, 2 sc in next st, 1 sc in next 7 sts; repeat from * around, sl st to join. (54 sc)
(Note: Circle should now match the exact diameter of the base of your tuna can—approx. 3.75 inches).*
✅ Checkpoint: Lay your flat crochet circle against the bottom of your tuna can. It should sit completely flat without cupping or rippling. Total count is (54 sc).
Rnd 10: Working in BLO, ch 1, sc in each st around, sl st to join. (54 sc)
Rnds 11-20 (10 rounds): Ch 1, sc in each st around, sl st to join. (54 sc per round)
(Slide your clean tuna can inside the working cozy around Rnd 13 to ensure a snug, glove-like fit as you continue up the sides).
Rnd 21: Working along the top rim, ch 1, sc 7, dec 1; repeat from * around, sl st to join. (48 sc)*
FO, weave in all ends securely.
Section 2: The Lid Top (Cream)
Rnd 1: Magic ring, work 6 sc into ring, sl st to join. (6 sc)
Rnd 2: Ch 1, 2 sc in each st around, sl st to join. (12 sc)
Rnd 3: Ch 1, 2 sc in next st, 1 sc in next st; repeat from * around, sl st to join. (18 sc)
Rnd 4: Ch 1, 2 sc in next st, 1 sc in next 2 sts; repeat from * around, sl st to join. (24 sc)
Rnd 5: Ch 1, 2 sc in next st, 1 sc in next 3 sts; repeat from * around, sl st to join. (30 sc)
Rnd 6: Ch 1, 2 sc in next st, 1 sc in next 4 sts; repeat from * around, sl st to join. (36 sc)
Rnd 7: Ch 1, 2 sc in next st, 1 sc in next 5 sts; repeat from * around, sl st to join. (42 sc)
Rnd 8: Ch 1, 2 sc in next st, 1 sc in next 6 sts; repeat from * around, sl st to join. (48 sc)
Rnd 9: Ch 1, 2 sc in next st, 1 sc in next 7 sts; repeat from * around, sl st to join. (54 sc)*
Section 3: The Lid Lip Edge (Sage Green)
Join Sage Green yarn to any stitch of the final lid round.
Rnd 1: Ch 1, working in BLO, sc in each st around, sl st to join. (54 sc)
Rnds 2-3 (2 rounds): Ch 1, sc in each st around, sl st to join. (54 sc per round)
FO, leaving a long tail for neat finishing. Slip this lid over the top of the can wrap to check the fit; it should slip on smoothly with a slight overlap.
Section 4: The 5-Petal Puff Flower Motif (Blush Pink)
Rnd 1: With Blush Pink, magic ring, work [1 pc, ch 2] 5 times into the ring, sl st to top of first pc to join. (5 puffs, 5 ch-2 sps)
Rnd 2: Sl st into the first ch-2 space, ch 1, work [1 sc, 1 hdc, 1 dc, 1 hdc, 1 sc] in the same ch-2 space, repeat this petal sequence in each of the remaining 4 ch-2 spaces around, sl st to first sc to join. (5 petals)
FO, leaving a 10-inch yarn tail.
Section 5: Assembly & Finishing
- Center the Blush Pink 5-petal flower motif onto the top center of the cream lid. Using your tapestry needle and the long yarn tail, securely whip-stitch the base of each petal down to the lid.
- Cut a circular piece of matching felt to 3.75 inches in diameter. Place a thin layer of fabric glue inside the bottom of the metal can and press the felt down firmly to create a soft interior lining for rings and delicate jewelry.
- Slide your finished lid onto the can base. Check alignment and weave in any remaining loose yarn tails inside the work.
Size Customization Tips
- To fit a wider can (e.g., standard soup or tomato can ~4.25 in diameter): Continue your flat base circle increases for one or two more rounds (adding 6 sts per round), then match the side wall stitch count accordingly before beginning the BLO transition round.
- To make a deeper box: Simply add 3 to 5 more straight single crochet rounds to Section 1 before working the decrease rim round.
Care Instructions
Spot clean only with a damp cloth and mild soap. Do not submerge in water or place in a washing machine, as the inner metal can may rust over time if moisture gets trapped behind the crochet casing. Air dry thoroughly away from direct sunlight.
Clever Upcycled Can Jewelry Box
Thank you so much for joining me in making this functional little treasure! I hope your vanity sparkles a little brighter with your new handmade creation. If you enjoyed this pattern, please be sure to save it to your Pinterest boards, share your finished photos online and tag me, and leave a warm comment below letting me know what color combination you chose!