
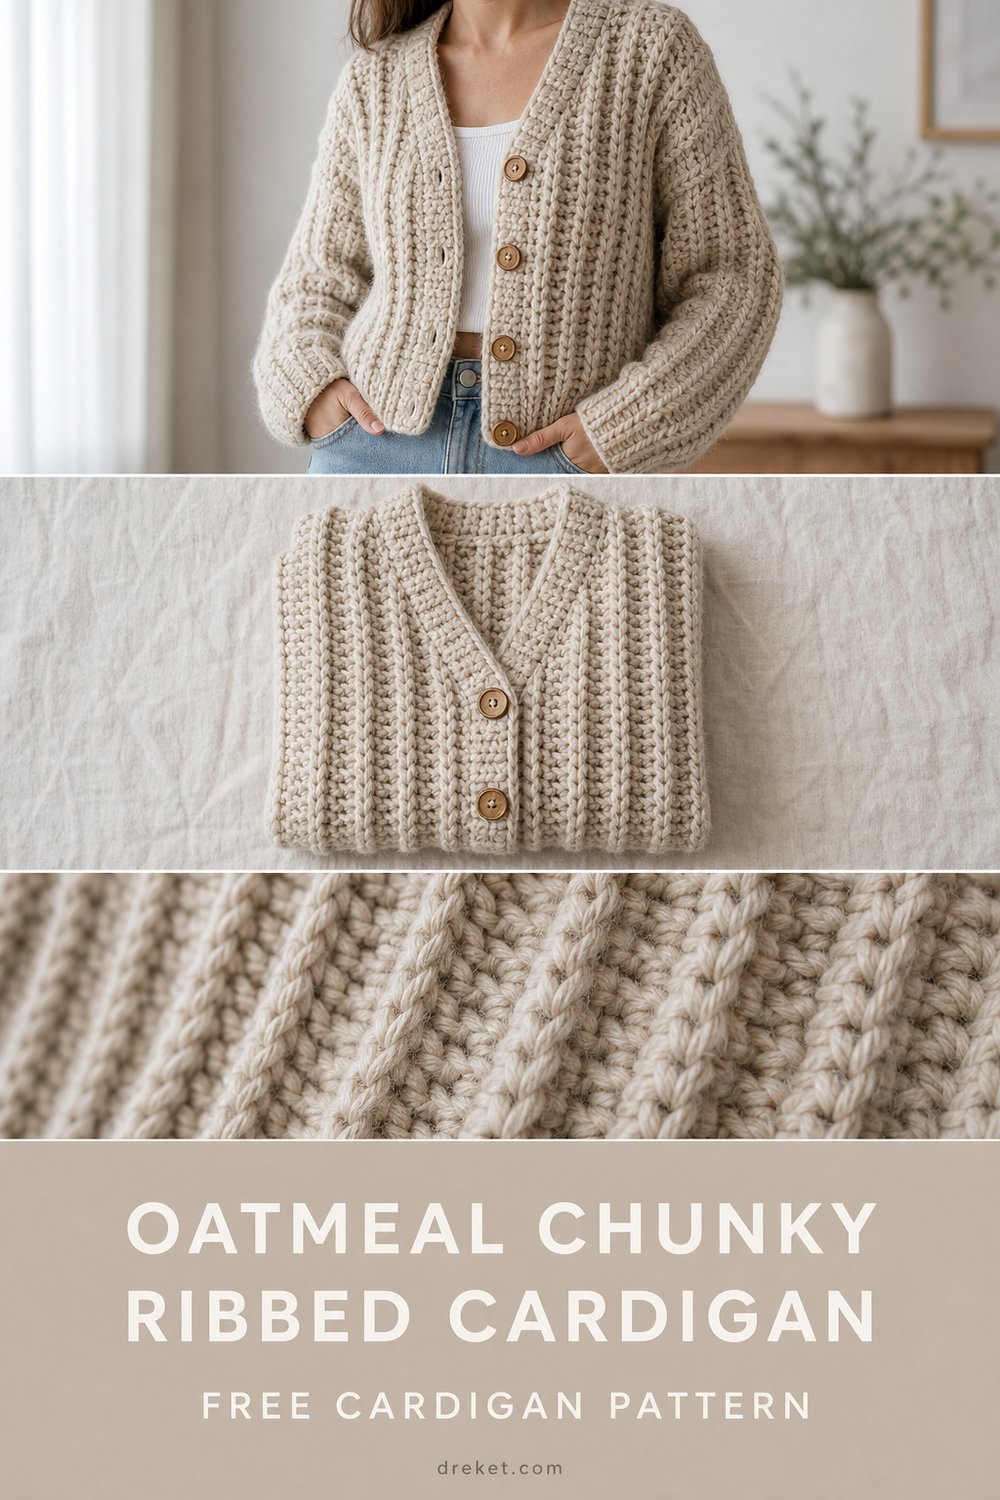
Wrap yourself in the ultimate cozy embrace of a garment designed to feel like your favorite heavy blanket on a brisk autumn morning. This textural classic pairs effortlessly with high-waisted denim or a flowing dress, bringing timeless warmth and understated elegance straight to your handmade wardrobe.
Quick Facts
- Stitches Used: Slip stitch, half double crochet in the back loop only, and single crochet for neat seaming edges.
- Size Fit: Designed with a classic, slightly relaxed boxy fit across a comprehensive range from XS through 3XL.
- Estimated Hours to Complete: 12 to 16 hours of mindful, deeply satisfying stitching.
- Gift-Appeal Framing: An heirloom-quality handmade present that feels remarkably luxurious, making it the ultimate heartfelt gift for someone special.
Sizing customization tips are included later in this article to help you achieve your ideal bespoke fit.
The secret to this cardigan’s stunning high-end look lies in its vertical construction and textural stitch placement. Working rows of half double crochet exclusively in the back loop creates deep, dramatic rib columns that mimic high-end retail knitwear without sacrificing the structural stability of crochet. The dense fabric provides incredible tactile relief, catching the light across its ridges just like the professional product photography showcases. Finished with large natural coconut buttons, this piece bridges the gap between rustic charm and modern minimalist style.
Skill Level
- Intermediate
- Familiarity with working in the back loops only.
- Ability to maintain an even row gauge for seamless seaming.
- Comfort reading a row-by-row garment construction pattern.
💡 Designer Tip: If you are comfortable counting rows and maintaining consistent tension, an ambitious advanced beginner can easily tackle this project by making a thorough gauge swatch first.
Finished Measurements
| Size | Bust Circumference (in / cm) | Length (in / cm) | Sleeve Length (in / cm) |
|---|---|---|---|
| XS | 36 in / 91.5 cm | 20 in / 50.8 cm | 18 in / 45.7 cm |
| S | 40 in / 101.6 cm | 20.5 in / 52.0 cm | 18 in / 45.7 cm |
| M | 44 in / 111.8 cm | 21 in / 53.3 cm | 18.5 in / 47.0 cm |
| L | 48 in / 121.9 cm | 22 in / 55.9 cm | 19 in / 48.3 cm |
| XL | 52 in / 132.0 cm | 23 in / 58.4 cm | 19.5 in / 49.5 cm |
| 2XL | 56 in / 142.2 cm | 24 in / 61.0 cm | 20 in / 50.8 cm |
| 3XL | 60 in / 152.4 cm | 24.5 in / 62.2 cm | 20 in / 50.8 cm |
Materials You Will Need
- Yarn: Bulky weight (Weight 5) wool-blend yarn for superior stitch definition and warmth.
- Hook: US M/13 (9.0 mm) crochet hook, or size needed to obtain correct gauge.
- Notions: Tapestry needle, locking stitch markers, measuring tape, and 4 to 5 large wooden or coconut buttons (approx. 1.25 inches / 32 mm in diameter).
| Color Name in Exact Order | Yarn Weight | Total Yardage Needed (XS – 3XL) |
|---|---|---|
| Oatmeal Beige | Bulky (Weight 5) | 1,100 – 1,750 yds / 1,005 – 1,600 m |
Yarn Suggestions
| Brand & Yarn Line | Weight | Yards per Skein | Notes |
|---|---|---|---|
| Lion Brand Hue + Me | Bulky (5) | 137 yds / 125 m | Excellent stitch definition, wonderful heathered oatmeal shade range. |
| WeCrochet Brava Bulky | Bulky (5) | 136 yds / 124 m | Soft acrylic option with great durability and easy care. |
| Drops Nepal | Bulky (5) | 82 yds / 75 m | Luxurious wool and alpaca blend for maximum drape and warmth. |
⚠️ Note: Avoid extremely slippery novelty yarns or novelty eyelash yarns, as they obscure the chunky ribbed stitch definition and make it difficult to locate your back loops.
Gauge
10 stitches and 8 rows = 4 inches (10 cm) in HDC-BLO using a US M/13 (9.0 mm) hook.
| Measurement Type | Stitch / Row Count | Target Area |
|---|---|---|
| Stitch Gauge | 10 sts = 4 in / 10 cm | Horizontal width |
| Row Gauge | 8 rows = 4 in / 10 cm | Vertical height |
⚠️ Note: Always work a gauge swatch measuring at least 6×6 inches. Because bulky yarn has a heavy pull, achieving the correct row gauge is critical to ensure your cardigan length matches the schematic.
Abbreviations
| Abbreviation | Full Meaning |
|---|---|
| ch | chain |
| sl st | slip stitch |
| hdc | half double crochet |
| blo | back loop only |
| st(s) | stitch(es) |
| rep | repeat |
| RS | right side |
| WS | wrong side |
| yo | yarn over |
Special Stitches Explained
- Half Double Crochet in the Back Loop Only (hdc-blo): Yo, insert hook under the back loop only of the designated stitch, yo, pull up a loop, yo, draw through all three loops on the hook. This creates the signature stretchy ridge of the cardigan.
Pattern Instructions
Section 1: Back Panel
The back panel is worked vertically from side to side, creating vertical rib columns from the moment you start.
* Row 1 (RS): Ch 46 (47, 49, 51, 53, 55, 56), working in the 2nd ch from hook, hdc in each ch across, turn. (45 [46, 48, 50, 52, 54, 55] hdc)
* Row 2 (WS): Ch 1 (does not count as st here and throughout), working in blo, hdc in each st across, turn. (45 [46, 48, 50, 52, 54, 55] hdc)
* Rows 3 through 22 (24, 26, 28, 30, 32, 34): Repeat Row 2. Fasten off, leaving a long tail for shoulder seaming.
✅ Checkpoint: Measure your flat back panel width. It should match half of your intended bust circumference plus ease.
Section 2: Left Front Panel
- Row 1 (RS): Ch 46 (47, 49, 51, 53, 55, 56), hdc in 2nd ch from hook and across, turn. (45 [46, 48, 50, 52, 54, 55] hdc)
- Row 2 (WS): Ch 1, working in blo, hdc in each st across, turn. (45 [46, 48, 50, 52, 54, 55] hdc)
- Rows 3 through 10 (11, 12, 13, 14, 15, 16): Repeat Row 2.
- Neckline Shaping: On the next row, leave the top edge unworked for the neckline by working hdc across only the first 33 (34, 35, 36, 37, 38, 39) sts, turn, leaving remaining sts unworked.
- Work 4 more rows over these remaining sts for the upper front shoulder. Fasten off.
Section 3: Right Front Panel
- Row 1 (RS): Ch 46 (47, 49, 51, 53, 55, 56), hdc in 2nd ch from hook and across, turn. (45 [46, 48, 50, 52, 54, 55] hdc)
- Row 2 (WS): Ch 1, working in blo, hdc in each st across, turn. (45 [46, 48, 50, 52, 54, 55] hdc)
- Mirror the neckline shaping of the Left Front Panel on the opposite edge to ensure symmetrical front openings. Fasten off.
Section 4: Sleeves (Make 2)
- Row 1: Ch 36 (36, 38, 38, 40, 40, 42), hdc in 2nd ch from hook and across, turn. (35 [35, 37, 37, 39, 39, 41] hdc)
- Rows 2 through 18 (18, 20, 20, 22, 22, 24): Ch 1, hdc-blo across, turn. Fasten off, leaving a long tail for seam assembly.
Section 5: Assembly & Finishing
- Shoulder Seams: Lay front panels flat against the back panel, right sides facing. Mattress stitch the top shoulder seams together.
- Side Seams: Fold sleeves in half lengthwise and seam into armhole openings. Seam underarm down to bottom hem.
- Buttonband & Buttonholes: Attach yarn at the bottom right front corner. Work rows of single crochet evenly up the front edge, creating 4-5 evenly spaced ch-2 buttonhole loops on the right band (or left band depending on personal preference).
- Buttons: Securely sew large wooden coconut buttons opposite your buttonholes. Weave in all loose ends.
Size Customization Tips
- To adjust length: Add or subtract starting chain stitches. Note that every 2 chains added or removed adjusts the total length by approximately 0.8 inches (2 cm).
- To adjust width: Simply work more or fewer total rows before shaping your neckline and armholes. Each pair of hdc rows adds approximately 0.8 inches (2 cm) to the overall circumference.
Care Instructions
- Hand wash gently in cool water with a mild wool-safe detergent.
- Do not wring or twist the damp fabric.
- Lay flat on a clean towel, block to final measurements, and reshape gently while drying away from direct sunlight.
- Store folded in a drawer rather than hanging to preserve the structural shape of the chunky ribbed fabric.
I had an absolute joy designing this classic layering staple for you! If you decide to hook your own, please pin this pattern to your favorite crochet boards on Pinterest, share your progress shots on social media, and tag me so I can admire your gorgeous stitches. Drop a comment below if you have any questions along the way—happy crocheting!