
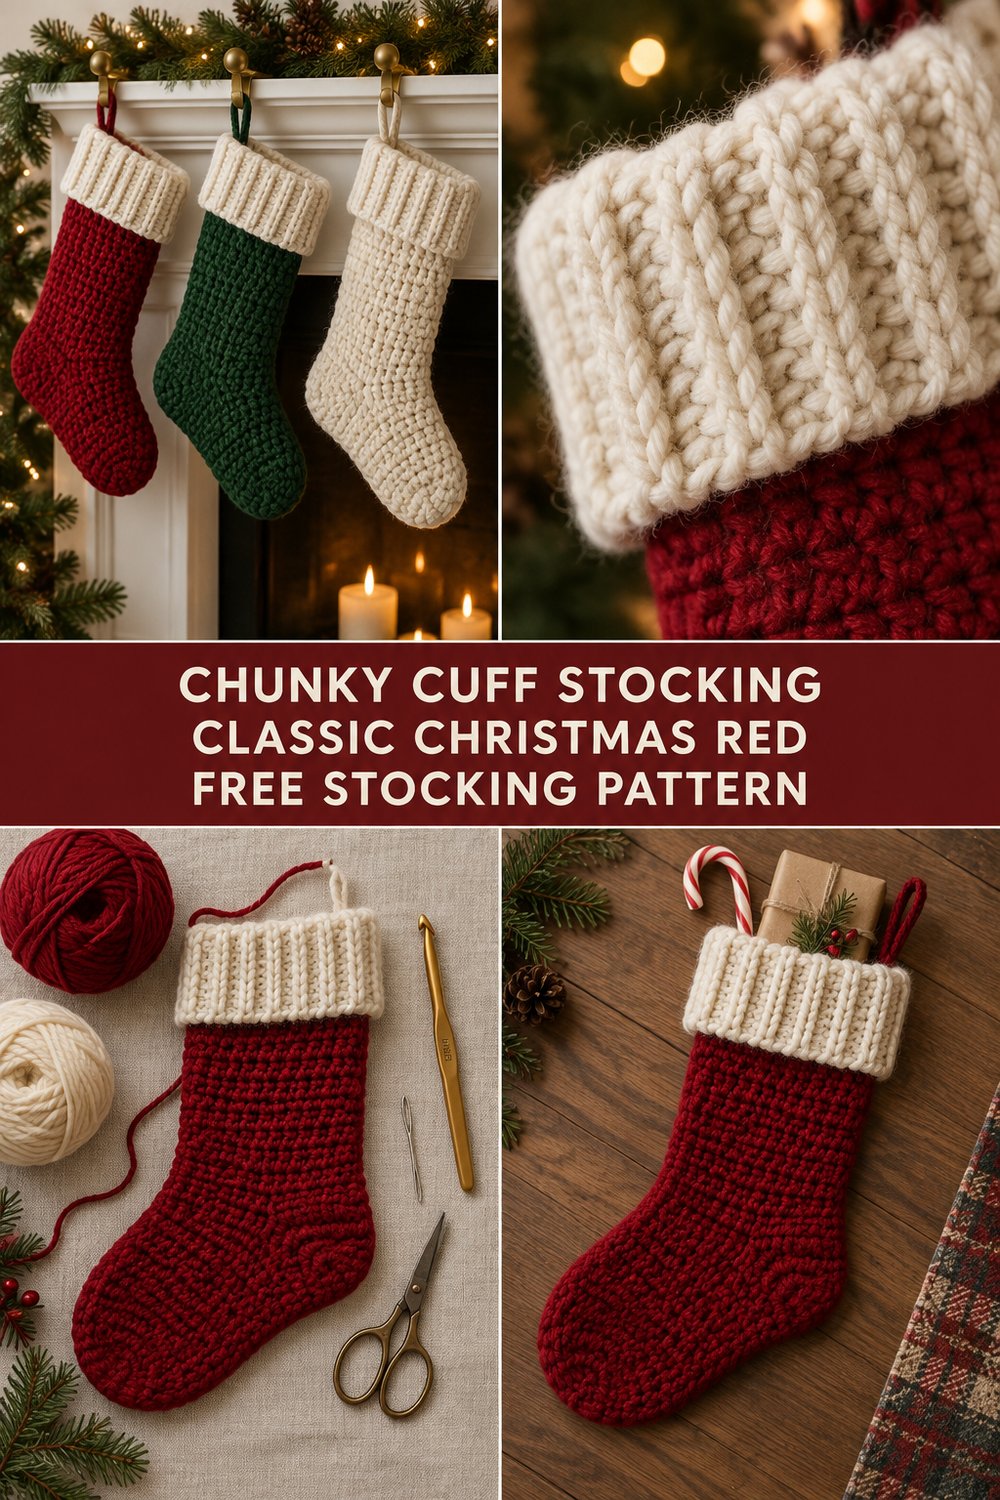
There is nothing quite like the warmth of handmade holiday decor waiting by the hearth on Christmas morning. This classic crochet Christmas stocking brings traditional heirloom charm to your mantel, featuring a rich crimson body paired with a deeply textured, folded cream ribbed cuff that holds its shape year after year.
Crochet Christmas Stocking — Free Pattern With Chunky Cuff
Quick Facts
- Stitches Used: Half Double Crochet (hdc), Front Post Half Double Crochet (fphdc), Back Post Half Double Crochet (bphdc), Slip Stitch (sl st)
- Size Fit: One size adult stocking (Generous capacity: approx. 18 inches / 46 cm long)
- Estimated Hours to Complete: 4 to 6 hours
- Gift-Appeal Framing: Perfect for family heirloom gifting, stuffing with treats, or personalizing with family names
Easily customize the size of your stocking for toddlers or pets using the straightforward tips included at the bottom of this pattern.
What Makes This Chunky Cuff Stocking Special
This design relies on a clever construction method that balances beauty and function. The main body is worked in sturdy rows of half double crochet using a worsted-weight cranberry yarn, ensuring the stocking stays upright and holds heavy gifts without sagging. The heel features a shaped turning technique that forms a natural, ergonomic pocket without awkward seams. Finally, the dramatic cuff is worked separately in long rows of ribbed post stitches using aran-weight cream yarn, creating a thick, cushiony fabric that folds neatly over the top edge for that unmistakable vintage holiday look.
Skill Level
- Easy
- Required Skills: Working in rows, basic shaping with increases and decreases, post stitches for ribbing, basic seaming.
- Reassurance Line: If you are comfortable with basic half double crochet and eager to try your first post stitches, you have all the skills needed to complete this project.
Finished Measurements
| Measurement | Inches | Centimeters |
|---|---|---|
| Total Length (Cuff Folded to Toe) | 18 in | 46 cm |
| Foot Length (Heel to Toe) | 10 in | 25.5 cm |
| Leg Circumference | 14 in | 35.5 cm |
| Cuff Width (Laid Flat) | 7 in | 18 cm |
Materials You Will Need
| Color Name (Image Order) | Yarn Weight / Type | Yardage / Meters Needed |
|---|---|---|
| 1. Cranberry Red | Worsted Weight (4) / 100% Wool or Acrylic | 220 yds / 201 m |
| 2. Pine Green | Optional accent for hanging loop | 15 yds / 14 m |
| 3. Cream | Aran Weight (4) / 100% Wool or Acrylic | 140 yds / 128 m |
- Hook: 5.0 mm (US H/8) crochet hook (or size needed to obtain gauge)
- Notions: Tapestry needle for weaving in ends, locking stitch markers, measuring tape, sharp scissors
Yarn Suggestions
| Yarn Brand & Line | Weight | Yardage per Skein | Notes |
|---|---|---|---|
| Lion Brand Wool-Ease | Worsted (4) | 197 yds / 180 m | Excellent stitch definition and durability for holiday heirlooms. |
| Knit Picks Brava Worsted | Worsted (4) | 218 yds / 200 m | Budget-friendly, washable, and comes in rich holiday shades. |
| Caron Simply Soft | Worsted (4) | 315 yds / 288 m | Beautiful sheen, though slightly drapier; check gauge carefully. |
⚠️ Note: Avoid novelty eyelash yarns or super-slippery bamboo blends for the main body, as they obscure stitch definition and lack the structural integrity required to hold heavy stocking stuffers.
Gauge
| Measurement Type | Stitches & Rows | Over |
|---|---|---|
| Stitch Gauge (HDC) | 14 sts x 11 rows | 4 inches (10 cm) |
| Ribbing Gauge (Cuff) | 16 sts x 12 rows | 4 inches (10 cm) |
💡 Designer Tip: Always make a gauge swatch before starting your holiday crochet projects. If your stitches are too loose, your stocking may sag under the weight of holiday treats.
Abbreviations
| Abbreviation | Full Term |
|---|---|
| ch | Chain |
| sl st | Slip Stitch |
| hdc | Half Double Crochet |
| fphdc | Front Post Half Double Crochet |
| bphdc | Back Post Half Double Crochet |
| hdc2tog | Half Double Crochet 2 Together (decrease) |
| st(s) | Stitch(es) |
| RS / WS | Right Side / Wrong Side |
| rep | Repeat |
Special Stitches Explained
- Front Post Half Double Crochet (fphdc): Yarn over, insert hook from front to back to front around the post of the indicated stitch from the row below, yarn over and pull up a loop, yarn over and draw through all 3 loops on hook.
- Back Post Half Double Crochet (bphdc): Yarn over, insert hook from back to front to back around the post of the indicated stitch from the row below, yarn over and pull up a loop, yarn over and draw through all 3 loops on hook.
- Half Double Crochet 2 Together (hdc2tog): [Yarn over, insert hook in next st, yarn over and pull up a loop] 2 times, yarn over and draw through all 5 loops on hook. (1 st decreased)
Pattern Instructions
Section 1: The Toe (Cranberry Red)
Working in joined rounds from the toe up.
- Round 1: Using Cranberry Red and 5.0 mm hook, make a magic ring, ch 1, work 10 hdc in ring. Join with sl st to first hdc. (10 hdc)
- Round 2: Ch 1, 2 hdc in each st around. Join with sl st. (20 hdc)
- Round 3: Ch 1, 2 hdc in first st, 1 hdc in next st; rep from * around. Join with sl st. (30 hdc)*
- Round 4: Ch 1, 2 hdc in first st, 1 hdc in next 2 sts; rep from * around. Join with sl st. (40 hdc)*
- Rounds 5 to 12: Ch 1, hdc in each st around. Join with sl st. (40 hdc)
✅ Checkpoint: At the end of Round 12, your toe section should measure approximately 4 inches from the tip. Verify you have exactly (40 hdc) before moving to the foot.
Section 2: The Foot & Heel Placement
- Rounds 13 to 22: Ch 1, hdc in each st around. Join with sl st. (40 hdc)
💡 Designer Tip: Working straight rounds here creates the classic foot span of the stocking before shaping the heel.
Section 3: The Shaped Heel
The heel is worked back and forth in rows over half of the total stitches (20 sts). Leave the remaining 20 stitches unworked for the top of the foot.
- Row 1 (RS): Ch 1, hdc in next 20 sts, turn leaving remaining 20 sts unworked. (20 hdc)
- Rows 2 to 8: Ch 1, hdc across the 20 heel sts, turn. (20 hdc)
- Row 9 (Heel Turn): Ch 1, hdc in first 11 sts, hdc2tog, turn leaving remaining 6 sts unworked. (12 sts)
- Row 10: Ch 1, sl st across 2 sts, hdc in next 3 sts, hdc2tog, turn. (5 sts)
- Row 11: Ch 1, hdc in next 4 sts, hdc2tog, turn. (5 sts)
Fasten off Cranberry Red, leaving a 6-inch tail for weaving.
Section 4: The Leg
- Round 1: Reattach Cranberry Red at the corner of the heel opening. Ch 1, work hdc evenly across the heel edge, pick up stitches along the top of the foot, and work across the remaining live stitches. (40 hdc total around)
- Rounds 2 to 24: Ch 1, hdc in each st around. Join with sl st. (40 hdc)
Fasten off Cranberry Red and weave in all ends.
Section 5: The Chunky Cuff (Cream)
The cuff is worked separately in long rows of ribbed post stitches, then seamed to the top of the stocking leg and folded over.
- Row 1: Using Cream, ch 13, hdc in 2nd ch from hook and across. Turn. (12 hdc)
- Row 2: Ch 1, working in back loops only, hdc in each st across. Turn. (12 hdc)
- Row 3: Ch 1, hdc in first st, fphdc in next st, bphdc in next st; rep from * to last st, hdc in last st. Turn. (12 sts)*
- Rows 4 to 38: Repeat Row 3 until the ribbed band measures approximately 14 inches unstretched.
- Seaming: Bring the first and last rows together and slip stitch through both layers to form a loop. Do not fasten off.
Section 6: Assembly & Hanging Loop
- Align the cream cuff seam with the back heel seam of the stocking.
- Attach the cuff to the top edge of the leg using a seamless slip-stitch join from the inside.
- Fold the outer half of the cream cuff downward over the cranberry red leg.
- Hanging Loop: Using Pine Green, ch 16, join in a ring, work 20 sc around the chain ring. Fasten off and securely whipstitch the loop inside the top rear corner of the cuff.
✅ Checkpoint: Inspect your finished stocking to ensure all yarn tails are securely woven in and the hanging loop is firmly anchored to withstand holiday weight.
Size Customization Tips
- To make a smaller stocking (Toddler/Pet): Reduce the initial magic ring toe start to 8 hdc, and stop foot increases at 32 sts. Shorten leg rounds by 6 rows.
- To make an extra-large stocking: Increase toe rounds until you reach 48 sts. Add 4 extra rows to the leg and lengthen the cuff ribbing by 6 rows. This adds roughly 2 inches of overall height and width.
Care Instructions
- Hand wash gently in cool water with mild wool detergent.
- Do not wring or twist. Lay flat on a clean towel to block to final measurements.
- Reshape while damp and allow to air dry completely before hanging by the hearth.
Closing
Crochet Christmas Stocking — Free Pattern With Chunky Cuff
I hope this festive project brings warmth and handmade joy to your holiday season! If you make one (or a whole set for the family), I would love to see your creations. Please share your photos on Instagram using the hashtag #ChunkyCuffStocking and tag me, save this project to your holiday boards on Pinterest, and leave a comment below to let me know which color combination you chose! Happy crocheting and happy holidays!